Configure Azure for a Compliance Audit
The Tenable integration for Microsoft Azure supports multiple methods for creating and registering the application: Key Authentication, Password Authentication, and Certificate Authentication. Choose either of the authentication methods, then complete the setup with the Assign API Permissions steps.
Key Authentication Method
-
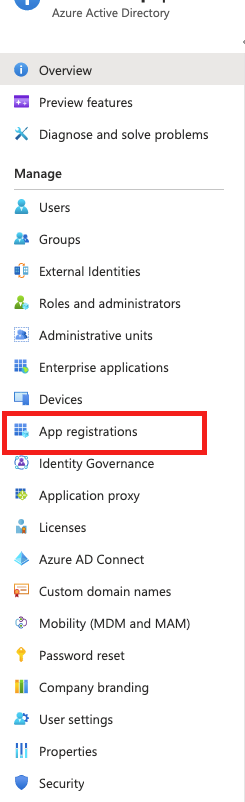
Click Microsoft Entra ID > App Registrations.
- Click the New Registrations application.
- Give the application a name.
- Choose the supported account types for your environment.
- Choose Public Client/Native for the redirect URI type.
- (Optional) Add a redirect URI.
- Click Register.
-
Click your registered application in Microsoft Entra ID > App Registrations.
-
Click Certificates and Secrets.
-
Click + New client secret.

-
Give the secret a name and click Add.
Tip Copy the secret somewhere safe for use in authenticating during a scan.
-
Click Subscriptions > Your Subscription > Access Control (IAM) > Role Assignments > + Add.
-
Add the Reader role to the application you previously created for scanning.
-
Select Reader from the Role drop-down menu.
-
Assign access to User, Group, or Service Principal.
-
In the Select field, type the name of your created application.
-
Select the application.
-
Click Save.
Password Authentication Method
Create a new user to scan in the Microsoft Entra ID. See the Microsoft Azure documentation for steps to add a new user.
-
Click Subscriptions > Your Subscription > Access Control (IAM) > Role Assignments > + Add.
-
Add the Reader role to the user account you created for scanning.
-
Click on Microsoft Entra ID > App registrations.
-
Click New Registrations application.
- Give the application a name.
- Choose the supported account types for your environment.
- Click Register.
-
Click Authentication.
-
Choose Yes for Default Client Type/Treat application as a public client.
Certificate Authentication Method
-
Click Microsoft Entra ID > App Registrations.
- Click the New Registrations application.
- Give the application a name.
- Choose the supported account types for your environment.
- Choose Public Client/Native for the redirect URI type.
- (Optional) Add a redirect URI.
- Click Register.
Execute the following PowerShell commands, replacing the appropriate values:
-
$certname = "{certificateName}" ## Replace {certificateName}
-
$cert = New-SelfSignedCertificate -Subject "CN=$certname" -CertStoreLocation
"Cert:\CurrentUser\My" -KeyExportPolicy Exportable -KeySpec Signature
-KeyLength 2048 -KeyAlgorithm RSA -HashAlgorithm SHA256
-
Export-Certificate -Cert $cert -FilePath
"C:\Users\admin\Desktop\$certname.cer" ## Specify your preferred location
-
Click your registered application in Microsoft Entra ID > App Registrations.
- Click Certificates and Secrets.
- Click Certificates.
- Click Upload certificate.
- Select the certificate file you exported.
-
Give the certificate a description and click Add.
-
Click Subscriptions > Your Subscription > Access Control (IAM) > Role Assignments > + Add.
-
Add the Reader role to the application you previously created for scanning.
-
Select Reader from the Role drop-down menu.
-
Assign access to User, Group, or Service Principal.
- In the Select field, type the name of your created application..
-
Select the application.
-
Click Save.
API Permissions
-
Click your registered application in Microsoft Entra ID > App Registrations > Your Application > API Permissions.
-
Select Microsoft Graph.
Note: If adding permissions for Key Authentication, then select Application permissions. If adding permissions for Password Authentication, then select Delegated permissions.
-
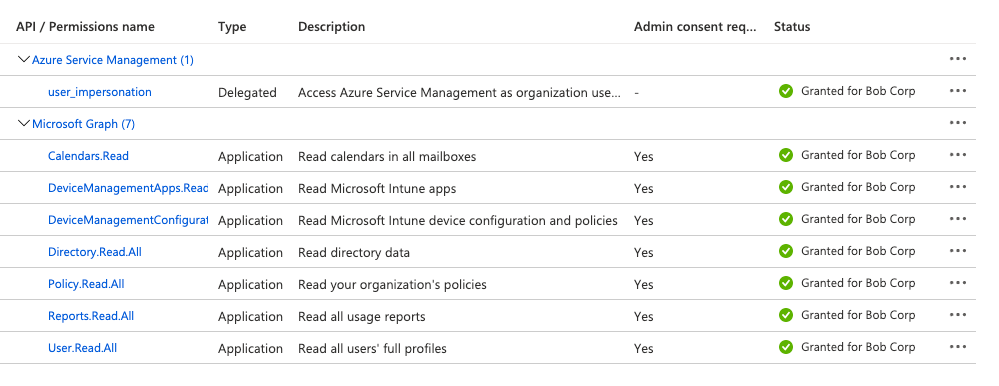
In the Configured permissions section, click Add a permission.
-
Add the following permissions:
- Azure Service Management — user_impersonation
- Microsoft Graph — Calendars.Read
- Microsoft Graph — DeviceManagementApps.Read.All
- Microsoft Graph — DeviceManagementConfiguration.Read.All
- Microsoft Graph — Directory.Read.All
- Microsoft Graph — Policy.Read.All
- Microsoft Graph — Reports.Read.All
- Microsoft Graph — User.Read.All
Scanning Microsoft Intune:
- Microsoft Graph — DeviceManagementApps.Read.All
- Microsoft Graph — DeviceManagementManagedDevices.Read.All
- Click Grant admin consent.
- Click Add permissions.
Note: Additional configuration is required to perform a ScubaGear audit against a Microsoft 365 environment. Refer to Configure Azure for ScubaGear Audit.
What to do next:
Create an audit scan in either Tenable Vulnerability Management or Tenable Nessus: