Creating a Patching Strategy is a great way to start using TPM. Start with a common scenario, and then build a Patching Strategy to distribute a patch to active clients.
An administrator wants to build a Patching Strategy to update devices every day based on devices that have the following characteristics:
-
Company wide (all Clients).
-
Running a version of Google Chrome Enterprise other than the internally approved version.
-
Initial approval needed.
-
Immediate, mandatory update to approved version.
-
Follow the instructions in Create a New Folder for Objects.
-
Hover over or click Strategy in the left navigation menu of the Patch Management Dashboard, and then select Patching Strategies.
-
Select
 Patching Strategies, and then select Show All to view all available Patching Strategies.
For descriptions of each template type, refer to Patching Strategy Templates.
-
Select the Name of a strategy to open it.
-
Select More in the upper left corner of the template, and then select Save As:
-
Enter a unique name that reflects what the strategy does conceptually. For example,
ITS Immediate Daily Product Patching. -
Select Save as on the bottom left corner of the dialog. This opens your strategy template with all the default entries for the built-in strategy, including a detailed description.
-
Enter a detailed Description of your new template or keep the existing detail, and then click Save on the upper-left corner of the dialog.
-
Tip: Remember to click Save on the upper left corner to save your progress as you make changes. After completing the Patching Strategy configuration, you must save and enable the completed strategy to make it available for use.
Deployment Settings for quick start purposes include selecting a built-in Deployment Wave, which already includes a Business Unit. For details on Deployment Waves, refer to Deployment Waves. When customizing an existing template, process and deployment fields may include tables with existing configuration selections.
-
Select Browse next to Deployment Wave in the Deployment Settings workspace of an open Patching Strategy template.
This opens the All Deployment Wave dialog.
-
Select a Deployment Wave from the list.
-
TPM provides a Single Wave-All Clients Deployment Wave, which includes a Business Unit called All Clients Business Unit.
-
If you are following the tasks in Introduction to Patching Strategies, choose Single Wave-All Clients.
-
-
Select OK on the bottom left of the dialog to return to the Patching Strategy.
Note: When updating an existing Patching Strategy with a new Deployment Wave, the system prompts you with a recommendation to specify Business Unit Addition Settings.
-
Select OK to close the recommendation. The system returns you to the Patching Strategy at the Business Unit Addition Settings workspace:
-
If you are following the tasks in Introduction to Patching Strategies, skip to Add Software Products. There is no need to modify the Deployment Bot Runtime settings for purposes of this exercise.
-
If you are creating or modifying a Patching Strategy for ongoing use, continue with the next step.
-
-
Choose whether to specify Business Unit Addition Settings (recommended), if prompted by the system.
-
To continue with Deployment Settings, refer to Deployment Bot Runtime Settings. You may configure Business Unit Addition Settings later in the template.
-
To complete Business Unit Addition Settings now, refer to Business Unit Addition Settings.
-
-
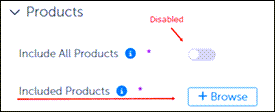
Select + Browse in the Products workspace of an open Patching Strategy template. The following image shows the default settings for this dialog.

-
Select the Include All Products toggle to disable inclusion of all products. This changes the next item to Included Products.
-
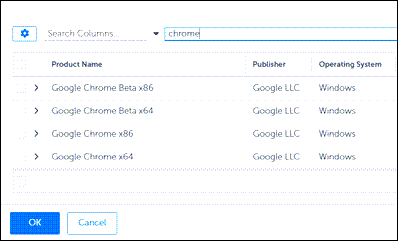
Select Browse to open the Select Software Product dialog.
-
Enter Chrome on the search line, and then click Search.
-
Select Google Chrome x64, and then click OK on the lower-left corner of the dialog.
-
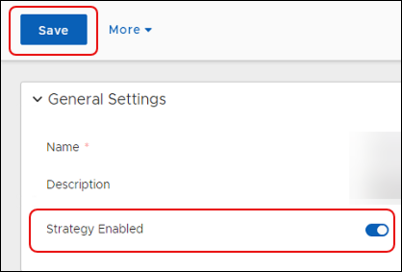
Scroll up to General Settings to enable the strategy.
After completing the Patching Strategy configuration, including Add Software Products, you must enable the Patching Strategy. When enabled, the strategy runs according to the configured schedules.
After you Enable the Patching Strategy, you can view the pending approval request.
-
Select the Approval Requests in the left navigation menu of the Patch Management Dashboard.

-
The view defaults to All requests, which includes pending and completed.
-
The Patching Strategy you just enabled appears in the Approval Summary table with a Request Status of In Progress and Awaiting Response.
-
-
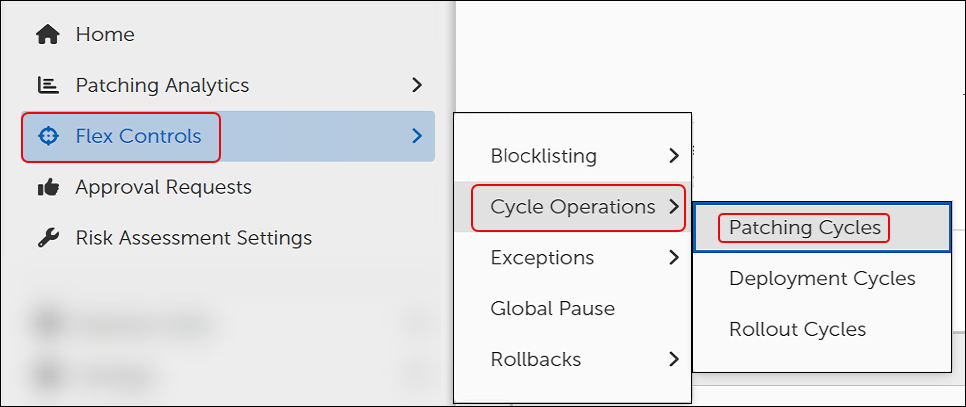
Select Flex Controls > Cycle Operations > Patching Cycles from the left navigation menu of the Patch Management Dashboard.
-
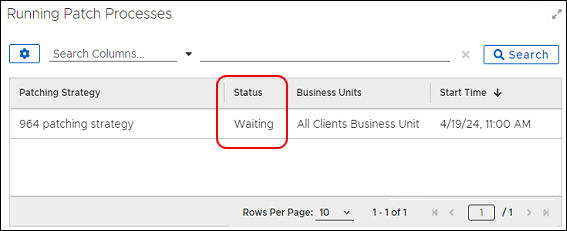
Check the Running Patch Processes table, which lists the status of the Patching Strategy as Waiting.
-
Select Approval Requests in the left navigation menu, and then click the Patching Strategy in the table.
-
Select Approve, and then click Back to Approval Requests. You can wait until the patch time passes, or you can start the deployment manually.
Note: When you add a new endpoint device to your network after this strategy has scanned and updated all associated devices, Tenable Patch Management automatically adds any new devices to the strategy if the next scan detects an earlier version of Chrome.
After the Patching Strategy approval process status shows Completed, you can wait until the time setting for patch deployment, or you can start the deployment immediately.
-
Select Flex Controls > Patching Cycles, and then click the name of the Patching Strategy to open the Cycle Information.
-
Select Play
 under Cycle Information, and then click Close. This returns you to the Patching Cycles workspace where you can view Running Patch Processes.
-
Select the Patching Strategy name to view details about the patching process.
The exercise in Introduction to Patching Strategies uses the minimum requirements for a Patching Strategy.
Additional settings in the Patching Strategy template include those listed below, though you do not need them for quick start purposes. Creating a Patching Strategy documents the configuration steps.
|
|
