A Patching Strategy template contains specific fields that you can configure to make a unique Patching Strategy for your environment. Tenable recommends opening an existing strategy that contains most of the configuration items you want, and then saving it with a new name and description. The configuration options are the same whether you create a new strategy or modify an existing strategy.
-
Follow the instructions in Create a New Folder for Objects.
-
Hover over or click Strategy in the left navigation menu of the Patch Management Dashboard, and then select Patching Strategies.
-
Select
 Patching Strategies, and then select Show All to view all available Patching Strategies.
For descriptions of each template type, refer to Patching Strategy Templates.
-
Select the Name of a strategy to open it.
-
Select More in the upper left corner of the template, and then select Save As:
-
Enter a unique name that reflects what the strategy does conceptually. For example,
ITS Immediate Daily Product Patching. -
Select Save as on the bottom left corner of the dialog. This opens your strategy template with all the default entries for the built-in strategy, including a detailed description.
-
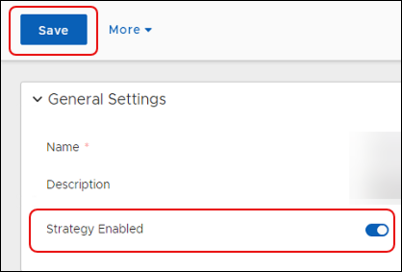
Enter a detailed Description of your new template or keep the existing detail, and then click Save on the upper-left corner of the dialog.
-
Tip: Remember to click Save on the upper left corner to save your progress as you make changes. After completing the Patching Strategy configuration, you must save and enable the completed strategy to make it available for use.
In TPM, configuration options provide several opportunities to select or exclude software products for a patching strategy. Options include include making product sections when creating a strategy, exempting products from business units, and more.
For more information about the products available with TPM, refer to Software Products.
-
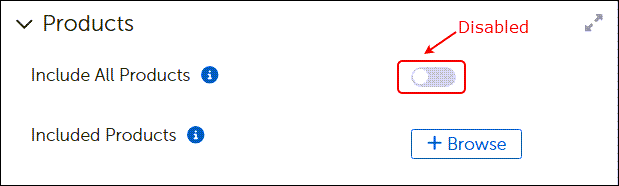
Scroll to the Products workspace in an open Patching Strategy template. The image below shows the default settings.
-
Select the Include All Products toggle to enable it.
The following image shows the default settings and options when you select Include All Products.

-
Select Save on the upper left corner of the strategy:
-
Choose one of the following options to continue managing products:
-
To exclude specific products for this strategy, refer to Exclude Products from a Patching Strategy
-
To include specific platforms, refer to Include or Exclude Platforms in a Patching Strategy
-
After enabling Include All Products from the Products workspace in an open Patching Strategy, you have the option to exclude individual products for the same Patching Strategy.
Note: When you add Business Units to a Strategy, the Patching Exceptions set for the Business Unit take precedence over the Product settings in the Patching Strategy.
When you enable Include All Products from the Products workspace in an open Patching Strategy, you also include all platforms by default.
-
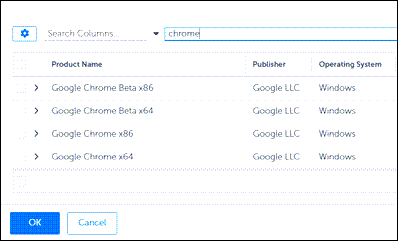
Select + Browse to open the Select Software Product table:
-
Select the Include All Platforms toggle to disable it and view the available Platforms.

-
Decide which platforms to include:
-
To include all Platforms, either Select All or select the Include All Platforms toggle to enable it.
-
To include specific Platforms, select those you want to include.
-
-
Select Save on the upper left corner to keep your changes:
Tenable Patch Management provides several Trigger Metadata Properties..
If a trigger metadata property changes in a given patch, and the patch meets each of the requirements below, the Patching process re-presents the patch to the Patching Strategy.
The changed patch must:
-
Belong to a product in the strategy
-
Be applicable on at least one device.
-
Have been presented previously.
The first table you view shows all available trigger properties.
-
In the Select Trigger Properties table of the Trigger Metadata Properties dialog, select one or more properties to use as triggers:
-
To find a specific trigger, enter a trigger name on the Search line, and then select Search.
-
To sort the list of Trigger Properties, click Property to reverse the alphabetical support order.
-
To page through the available trigger properties, use the navigation tools on the bottom-right of the dialog.

-
-
Select OK on the bottom-left corner of the dialog to save your selections and return to the Patching Strategy template.

In the Select Trigger Properties table of the Trigger Metadata Properties dialog, enable a view of Tenable properties only.

-
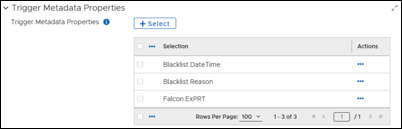
Scroll down to Trigger Metadata Properties in an open Patching Strategy template. If the Patching Strategy includes Trigger Metadata Properties, the table under +Select lists those properties.
-
Select the ellipsis (…) under Actions for the trigger you want to remove, and then select Remove.

-
Select Save on the upper-left corner of the Patching Strategy to save your changes.
Deployment settings in a Patching Strategy include choosing a Deployment Wave, Creating a Deployment Bot Runtime configuration, and choosing whether to present each patch to the first matching Deployment bot only (defaults to disabled). When customizing an existing Patching Strategy (recommended), settings may include tables with configuration selections other than the default.
Begin by adding a Deployment Wave.
-
Select Browse next to Deployment Wave in the Deployment Settings workspace of an open Patching Strategy template.

This opens the All Deployment Wave dialog.

-
Select a Deployment Wave from the list.
-
Tenable Patch Management provides a Single Wave-All Clients Deployment Wave, which includes a Business Unit called All Clients Business Unit.
-
If you are following the tasks in Introduction to Patching Strategies, choose Single Wave-All Clients.
-
-
Select OK on the bottom left of the dialog to return to the Patching Strategy.
Note: When updating an existing Patching Strategy with a new Deployment Wave, the system prompts you with a recommendation to specify Business Unit Addition Settings.
-
Select OK to close the recommendation. The system returns you to the Patching Strategy at the Business Unit Addition Settings workspace:
-
If you are following the tasks in Introduction to Patching Strategies, skip to Add Software Products. There is no need to modify the Deployment Bot Runtime settings for purposes of this exercise.
-
If you are creating or modifying a Patching Strategy for ongoing use, continue with the next step.
-
-
Choose whether to specify Business Unit Addition Settings (recommended), if prompted by the system.
-
To continue with Deployment Settings, refer to Deployment Bot Runtime Settings. You may configure Business Unit Addition Settings later in the template.
-
To complete Business Unit Addition Settings now, refer to Business Unit Addition Settings.
-
In Patching Strategy templates, the Create Deployment Bot Runtime dialog provides a single location to add processes to your Patching Strategy. Use these settings for more advanced operations. For example, when you have multiple Business Units that require the same Patch Deployment Bot but use a different Patching Process and schedule, you can create multiple Deployment Bot Runtime combinations to patch according to different requirements.
After adding a Deployment Wave to the Patching Strategy Deployment Settings, you can configure Deployment Bot Runtime scenarios. Follow these procedures for each Deployment Bot Runtime you need to create. If you need to create a Deployment Bot, refer to Creating Deployment Bots.
Refer to also:
Bots – Patch Deployment and Notification Bots
Deployment Channels and Deployment Channel Processes
Business Units and Rollout Processes
Before creating a Deployment Bot Runtime, select a Deployment Wave to enable the Create Deployment Bot Runtime selection.
-
Select + Create Deployment Bot Runtime from the Deployment Settings workspace of an open Patching Strategy template.
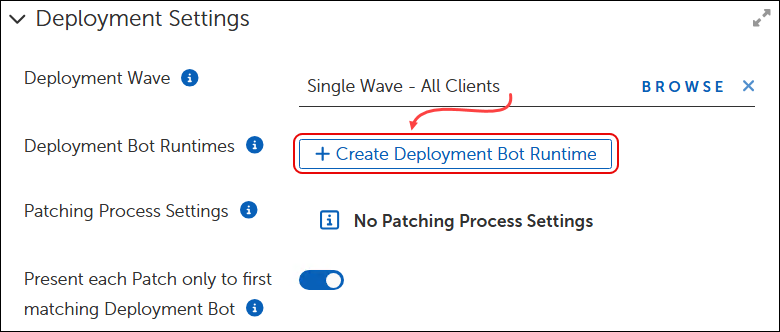
This opens the Create Deployment Bot Runtime dialog:

-
Begin by adding a Patch Deployment Bot.
-
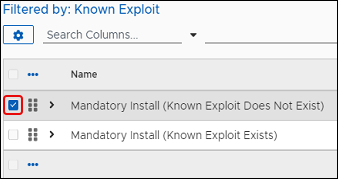
Select Browse next to Patch Deployment Bot to open the Select Patch Deployment Bot dialog.
-
Choose a method for viewing Patch Deployment Bots:
-
Select
Patch Deployment Bots, and then select to view the available choices. -
Select a Filtered by: setting beneath
Patch Deployment Bots to view only the items associated with that filter.
-
-
Select the template you want to use. For example, in Filtered by: Known Exploit, select Mandatory Install (Known Exploit Exists).
-
Select OK on the bottom left of the dialog to return to the Create Deployment Bot Runtime template.
-
Select Browse next to Add Patching Process in the Create Deployment Runtime dialog.
-
Select
Patching Processes, and then select Show All to view the available processes. -
Select the process you want to use. For example, select Immediate Phased Deployment – Initial Patch Manager Approval).
-
Select OK on the bottom left of the dialog.

Note: The Business Units you add here must be the same Business Units included in the Patching Strategy Deployment Wave. If you select other Business Units here or select All Business Units, the Patching Strategy will take no action on those that do not match the Deployment Wave settings.
-
Decide whether to include all Business Units in this Deployment Bot Runtime, or to add specific Business Units:
-
To include all Business Units, click the Include All Business Units toggle to enable running this configuration on all Business Units (defaults to disabled), and then skip to step 3.

-
To choose specific Business Units for this Runtime, click + Browse, and then continue with the next step.
-
-
Select one or more Business Units to add to this Runtime. For example, to use this Runtime on all Windows 11 systems using a Wi-Fi connection, select Operating System – Windows 11 and Office Type – WiFi.

-
Select OK on the bottom left of the dialog to view the completed Runtime Bot.
-
Select Create Deployment Bot Runtime on the bottom-left corner of the dialog to return to the Patching Strategy.
-
Return to Create Deployment Bot Runtime Scenarios to add more Deployment Bot/Patching Process pairs to this Patching Strategy.
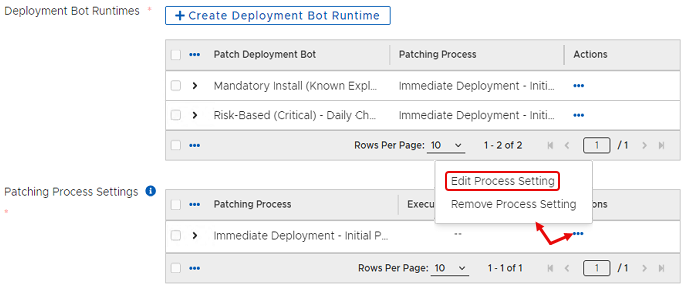
After creating a Deployment Bot Runtime, set the runtime schedule for each Patching Process.
-
Select the ellipsis (…) under Actions in the Patching Process Settings table of an open Patching Strategy template, and then select Edit Process Setting.
-
Add one or more schedules for the process:
-
Select + Browse next to Execution Schedules.
-
Select
Schedules, and then select Show All.
-
Select one or more schedules to use for the Process Setting runtime, and then select OK on the bottom left corner of the dialog.
All Deployment Bot Runtime pairs that use the same Patching Process in this Patching Strategy run on the schedules you choose.
-
Enter the number of Hours, Minutes, and Seconds that the patching process may run before timing out. Zero indicates no time limit.
-
-
Select OK, to return to the Patching Strategy workspace.
This toggle switch enables or disables whether the Patching Strategy stops presenting patches to Deployment Bots as soon as it discovers the first matching Deployment Bot. If you choose to enable this behavior, be sure to order the Bots in your Deployment Bot Runtime from most important to least.

-
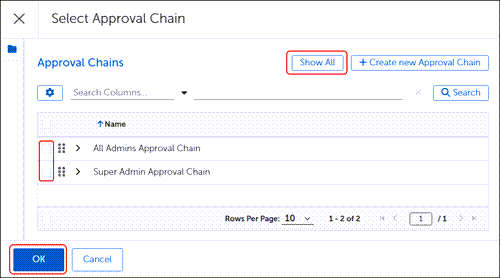
Select Approval Chains to open the Approval Chains workspace.
-
Select Browse next to the type of Approval chain you want to add (Product Owner, Patch Management, Security, and so on).

-
Select an Approval Chain from the Approval Chains table.
-
Select OK to return to the object template.
-
Repeat Steps 2 through 4 for each of the groups listed in the Approval Chains workspace:
-
Skip any groups that do not apply to your situation.
-
When each group from which you need an approval contains an approval chain, continue with the next step.
-
-
Select Save at the upper left to save your progress:
Patching Strategy, Deployment Channel, and Business Unit objects include a Notifications dialog where you can configure notification details. The configuration choices differ slightly for each object.
Note: This configuration requires selecting a specific type of Notification Cycle template. Contact Tenable Patch Management Customer Support for assistance with this configuration and for information about choosing the correct template.
Notification Chain settings exist in the object templates for Patching Strategies, Deployment Channels, and Business Units.
-
Expand the Notifications box in an open object template to show the available configuration options.
-
Select Browse next to Notification Chain. This opens the Notifications Chain dialog.

-
Select
Notification Chains, and then select Show All to view the available templates. -
Select a Notification Chain from the table.
-
Continue editing the Notification settings or click on the bottom left corner to return to the template.
Both Patching Strategies and Deployment Channel templates have an option to Add Patch Notification Bots.
-
Select + Browse next to Patch Notification Bots in the Notifications workspace of the object template.
This opens the Select Patch Notification Bots dialog.

-
Select
Patch Notification Bots, and then select Show All to list all available Patch Notification Bots or click any Filtered by: folder to view the Bots associated with that filter. -
Choose one or more Notification Bots to set requirements for this template. To create more Notification Bots, refer to Creating Notification Bots.
-
Select OK on the bottom left of the dialog to return to the starting template.
These values must match the corresponding values defined in the Notification Bots. Otherwise, the Notification Cycle does not send a notification.

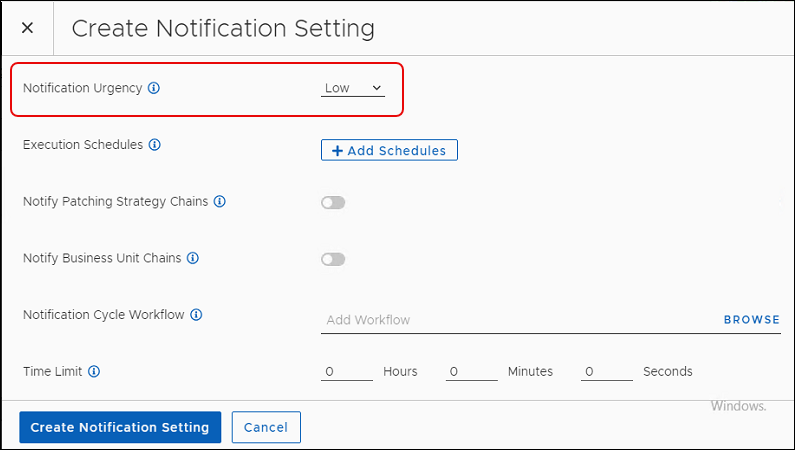
Execution Schedules control when and how often a Notification Cycle sends notifications. Choose schedules based on when and how often receiving parties require notification.
-
Select + Create Notification Setting from the Notifications workspace of a object template.
-
Select +Browse next to Execution Schedules to display the available schedules.
-
Select one or more schedules from the All Schedules table, and then select OK on the lower-left corner of the dialog.

-
Continue editing the notification settings or click to return to the template.
When enabled, sends notifications to the Roles shown in the Notification Chain associated with the Patching Strategy or Deployment Channel template. Defaults to disabled.
-
In the + Create Notification Setting dialog in the Patching Strategy or Deployment Channel template, decide whether to enable notifications:
-
Select the Notify Patching Strategy Chains toggle to enable or disable (default) whether the notification cycle sends notifications to the chains included in the strategy.
-
Select the Notify Business Unit Chains toggle to enable or disable (default) whether the notification cycle sends notifications to Business Unit chains included in the strategy.
-
-
Continue editing the Notifications settings or click to return to the template.
This setting names the Notification Cycle that processes the Notifications for the Patching Strategy or Deployment Channel. Notification Cycle workflows are customized for specific uses. Tenable Patch Management does not provide sample Notification Cycle templates. These templates exist only if you create them for your environment.
Note: Contact Tenable Patch ManagementCustomer Support for assistance with Notification Cycle templates
-
Select + Create Notification Setting from the Notifications box in the object template.

This opens the Create Notification Setting dialog.

-
Select Browse on the Add Workflow line. This opens the list of available workflows.
-
Select your custom workflow from the list, and then click Add Workflow on the lower-left corner of the dialog.
-
Continue editing the Notification settings or click to return to the template.
Specifies the maximum length of time that the Notification Cycle Workflow runs before timing out. If set to all zeros (default) the workflow may run indefinitely. Choose this setting with care. If the notification times out before sending all notifications, the next cycle triggers the notifications again.
-
Select + Create Notification Setting the Notification box of the object template.
-
Next to Time Limit, set the Hours, Minutes, or Seconds that the Notification Cycle will run, or leave the setting default at 0 for each item to allow the workflow to run indefinitely.
-
Continue editing the Notification settings or click to return to the template.
Customer Extension Data is an advanced feature of Tenable Patch Management . The Customer Extension Data fields allow advanced users to specify different key/value pairs for use in customized Patching Strategies, Deployment Chains, or Business Units when necessary to achieve different results.

Customer Extension Data fields relate directly to fields in a customized template. If you do not have customized templates with key/value pairs you can modify, you do not need to configure or use this feature.
If you want to create customized templates that use key/value pairs for some settings, contact Tenable Patch ManagementCustomer Support .
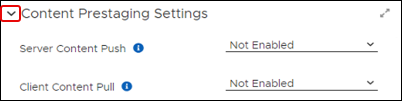
The Content Prestaging feature deploys content to devices ahead of the scheduled deployment, either pushing content to a location or allowing a client to pull content. Prestaging content makes the content available on the device locally when the deployment time arrives. This reduces the deployment time and minimizes the chances of missing service windows or having devices going offline before a content download finishes.
You can create Content Prestaging Settings within the Patching Strategy, Business Unit, or Deployment Channel templates.
The templates for Patching Strategies, Deployment Channels, and Business Units include the choice to set Content Prestaging settings. Settings default to Not Enabled.
Content Prestaging settings include two options:
-
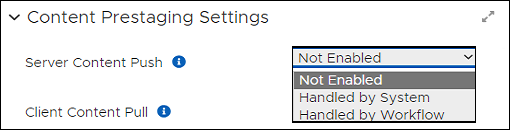
Server Content Push (Recommended) – The Tenable Patch Management pushes the content to the best-suited sources in all locations that require the content. Tenable Patch Management recommends this type of prestaging when the Deployment Strategy targets only a subset of devices. High-availability machines receive the content and function as local sources during discovery and deployment.
-
Client Content Pull – This option enables any client that requires the content to download and cache it before deployment. Suitable when a Deployment Strategy targets all clients that need the updated content.
Push Content
-
Not Enabled -- Disables any prestaging as part of the Patching Process workflow or Patching Strategy.
-
Handled by System – The Tenable Patch Management system handles the prestaging automatically and pushes content to three automatically chosen devices within the office that require the content.
This push occurs at once when the metadata updates include the latest content that meets patching requirements.
-
Handled by Workflow – When enabled as part of a Patching Process, Deployment Channel, or Business Unit template, pushes the content upon deployment of the Patching Process.
Pull Content
-
Not Enabled -- Disables any prestaging as part of the Patching Process workflow or Patching Strategy.
-
Handled by System – The Tenable Patch Management system handles the prestaging automatically. The Client pulls content from the Server and instructs all Clients that require the content to download and cache it ahead of any deployment.
-
Handled by Workflow – When enabled as part of a Patching Process, Deployment Channel, or Business Unit template, the Client pulls the content upon deployment.
Use this procedure to add or change Content Prestaging Settings in Patching Strategy, Business Unit, or Deployment Channel templates.
-
Expand the Notifications box in an open object template, and then scroll down to the Content Prestaging Settings.

-
Expand the Content Prestaging Settings box to view the available settings.

Client Content Pull defaults to Not Enabled. To enable pull settings, complete the following steps in the Content Prestaging Settings of a Patching Strategy, Business Unit, or Deployment Channel template:
-
Select the arrow to the right of Client Content Pull to expand the menu of available options.

-
Select the option you need for the object template you are using. For definitions of push options, refer to Defining Content Prestaging Settings.
-
Select Save on the upper left to save your changes:
Server Content Push defaults to Not Enabled. To enable push settings, complete the following steps in the Content Prestaging Settings of a Patching Strategy, Business Unit, or Deployment Channel template, complete the following steps:
-
Select the arrow to the right of Server Content Push to expand the menu of available options.
-
Select the option you need for the object template you are using. For definitions of push options, refer to Defining Content Prestaging Settings.
-
Select Save on the upper left to save your changes:
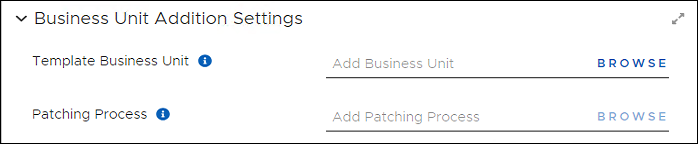
Business Unit Addition Settings do not have a separate menu item. Configure these settings from the Business Unit Addition Settings dialog in a Patching Strategies template.
When you have added a new Business Unit to an enabled Patching Strategy that has already completed the current patching cycle, you must use the Business Unit Addition Settings to add the parent Business Unit that contains the details, such as Patches and Patch Approval Settings, any Business Unit added to the Strategy will inherit.
The Business Unit you specify here includes the patch approvals the Patching Strategy will use for any Business Units you add to the Strategy after the Strategy has run.
The Patching Process you select here is the same process you identified in the Deployment Bot Runtime configuration of the Patching Strategy.
-
Select Strategy > Patching Strategies from the left navigation menu of the Patch Dashboard.
-
Scroll down to Business Unit Addition Settings and then click the right arrow to expand the box.
Specify the parent Business Unit for this strategy so that when new Business Units become part of the strategy after it has already run, the new Business Units inherit settings from the same parent.
-
Select Browse next to Template Business Unit in the Business Unit Addition Settings dialog of an open Patching Strategy template.
-
Select the Business Unit that has the parent settings for any future Business Units added to the Strategy.
-
Click OK to return to the template.
-
Select Save on the upper left to save your changes:
Note: If you came to this procedure while you were configuring Deployment Settings in a Patching Strategy, return to Deployment Settings to continue the Strategy configuration.
Identify the Patching Process that controls the approval and deployment logic for the existing Business Units in this strategy. This is the same Patching Process identified in the Deployment Bot Runtime, which is the only Patching Process you can choose here. This ensures that any Business Units added after initial creation of this strategy use the same Patching Process as the existing Business Units.
-
Verify that the Deployment Bot Runtime details are accurate. The Patching Process settings needed for Business Unit Addition settings are the same as those used in the Deployment Bot Runtime.
-
Select Browse next to Patching Process in the Business Unit Additions dialog of an open Patching Strategy. If Browse is disabled, check the Deployment Bot Runtime Settings.
-
Select the available Patching Process, and then click OK.
-
Select Save on the upper left corner to save your changes:
After completing the Patching Strategy configuration, including Add Software Products, you must enable the Patching Strategy. When enabled, the strategy runs according to the configured schedules.