Set up a NAT Gateway
Introduction
In order for NNM to monitor virtual machine instances in an Amazon Web Services Virtual Private Cloud (VPC), NNM must run on a virtual machine instance that functions as a network address translation (NAT) gateway. A NAT gateway instance routes traffic from internal-only virtual machine instances to the Internet. A NNM installed on a NAT gateway has visibility into the hostnames and private IP addresses of the internal virtual machine instances before the NAT gateway masquerades the source IP address of incoming packets to forward them to the Internet.
This guide shows setting up a NAT gateway in an Amazon Web Services Virtual Private Cloud.
Before You Begin
Follow the Amazon EC2 Setup Instructions. You can skip the steps for creating a VPC and creating a Security Group as they will be covered in the steps below.
Steps
-
From the EC2 management console, click Launch Instance to create a new virtual machine which will be used as the NAT gateway. In this example, a CentOS 6 Amazon Machine Image (AMI) is used.
Note: If you select a different AMI to install on your NAT gateway virtual machine, ensure that it is a platform that NNM supports.
-
In the Configure Instance section of the Launch Instance wizard, click the Create new VPC button to configure the instance's network.
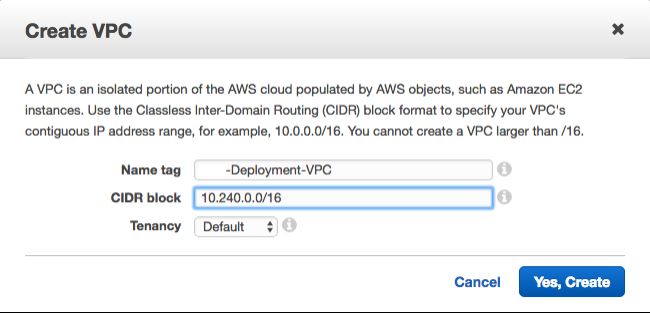
The Create VPC window appears.
-
Enter the details for the new VPC as shown in the following image.
-
Click Yes, Create.
The window closes and the Configure Instance section appears.
-
Select the VPC you just created in the Network drop-down box.
Tip: You may need to click the Refresh button next to the Create new VPC button to force the new VPC to appear in the drop-down box.
-
Click the Create new subnet button to configure the instance's subnet.
The Create Subnet window appears.
-
Enter the details for the new subnet as shown in the following image. The VPC box displays the VPC you created in step 3.

-
Click Yes, Create.
The window closes and the Configure Instance section appears.
-
Select the subnet you just created in the Subnet drop-down box.
Tip: You may need to click the Refresh button next to the Create new subnet button to force the new subnet to appear in the drop-down box.
-
In the Auto-assign Public IP drop-down box, select Enable.
-
In the Tag Instance section of the Launch Instance wizard, assign a name to the instance.
In this example, the name NNM-Deployment-NAT is used.
-
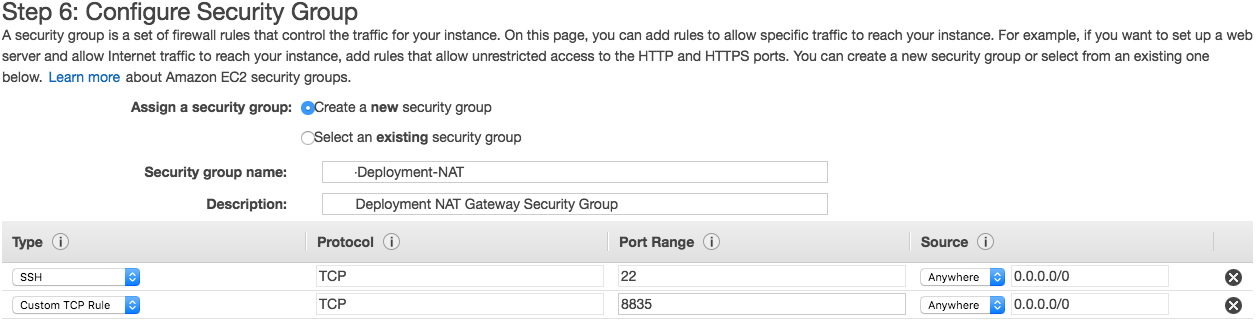
In the Configure Security Group section of the Launch Instance wizard, create a new security group that allows incoming SSH and TCP port 8835 (the default port for the NNM Web server) connections from anywhere.
- Proceed through the rest of the virtual machine instance setup and then launch the virtual machine.
-
Create an Internet Gateway to provide the NAT gateway with internet access and attach it to the VPC created in Step 3. In this example, the created Internet Gateway is attached to NNM-Deployment-VPC.
-
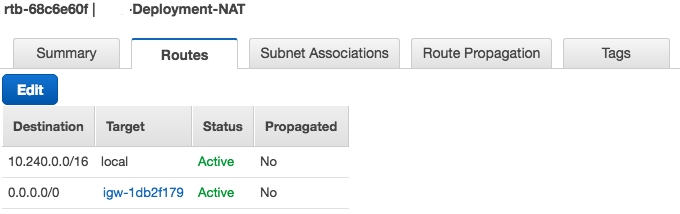
Create a route table for the VPC created in Step 3. Then, create a default route using the Internet Gateway created in Step 12 as the target. In this example, the Internet Gateway is igw-1db2f179.
Associate the route table with the subnet created in Step 7. In this example, the route table is created for NNM-Deployment-VPC and is associated with the NNM-Deployment-Public subnet.
- Connect to the new NAT gateway instance using the public IP that was automatically assigned.
-
Once logged into your NAT gateway instance, configure iptables and IP forwarding.
user@nat-gateway:~$ sudo sh -c "echo 1 > /proc/sys/net/ipv4/ip_forward"
Note: Some CentOS instances have existing iptables rules that should be flushed before executing the iptables command below to avoid conflicting rules. Execute the following to flush iptables rules: sudo iptables -F
user@nat-gateway:~$ sudo iptables -t nat -A POSTROUTING -o eth0 -j MASQUERADE
The first sudo command tells the kernel to allow IP forwarding. The second sudo command masquerades packets received from internal instances as if they originated from the NAT gateway instance.
Tip: Consider saving these commands in a startup script, because these settings will not persist if the instance is rebooted.
-
Create a security group for the private subnet and associate it with the VPC created in Step 3.
-
Create an inbound rule for the new security group to allow all traffic.

-
Update the security group that was created in Step 18 to allow all traffic from the new private network security group.
In this example, the NNM-Deployment-NAT security group is updated to allow all traffic from the NNM-Deployment-Private security group using its ID sg-2001945b as the source.

-
Create a private subnet for the hosts that will not have public IP addresses and will access the internet through the NAT gateway.

-
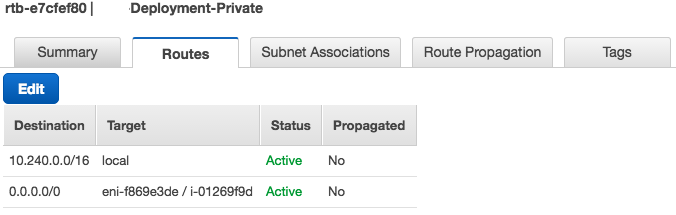
Create a route table for the VPC created in Step 2. Then create a default route using the NNM-Deployment-NAT instance as the target. In this example the NNM-Deployment-NAT instance is i-01269f9d. Associate the route table with the subnet created in Step 21. In this example, the route table is created for NNM-Deployment-VPC and is associated with the NNM-Deployment-Private subnet.
- Disable source/destination checks on the NAT gateway instance.
-
Launch example instances into the private subnet. Use the VPC created in Step 3 as the network and the subnet created in Step 21 for the subnet. In this example, the NNM-Deployment-VPC is used as the network and the NNM-Deployment-Private subnet is used as the subnet.
For the Auto-assign Public IP setting, select Use subnet setting from the drop-down. For the security group, select the security group that was created in Step 18. In this example, the NNM-Deployment-Private security group is used.