Tenable One: Microsoft Entra ID IdP
One of the most common IdPs used to configure SAML with Tenable One is Microsoft Entra ID. The following steps guide you through the configuration process from start to finish.
Manual configuration requires the following:
-
Reply URL: A custom URL provided by Tenable in the following format:
https://cloud.tenable.com/saml/login/PLACEHOLDERTip: FedRAMP environments use the following custom URL format: https://fedcloud.tenable.com/saml/login/PLACEHOLDER -
Identifier (Entity ID): A custom ID provided by Tenable during SAML configuration in the following format:
TENABLE_IO_PLACEHOLDER -
A certificate within the SAML metadata object that matches the data originally sent to Tenable.
Note: Tenable does not support the use of multiple certificates and only extracts the first certificate from the metadata object. If the object includes multiple certificates, you must specify which certificate to use if it is not the first one listed.
Microsoft Entra ID: Create Initial Application
To create an application in Microsoft Entra ID:
-
In your browser, navigate to the Azure Admin portal.
-
In the navigation menu, navigate to All services > Enterprise Applications.
The application gallery appears.

-
Click New Application > Create your own application.
The Create your own application window appears.

-
In the What's the name of your app? text box, type a name for your application, for example, Tenable One.
-
In the What are you looking to do with your application section, select the Integrate any other application you don't find in the gallery radio button.
-
Click Create.
Microsoft Entra ID redirects you to the application overview page.
-
In the left navigation menu, click Manage > Single sign-on.
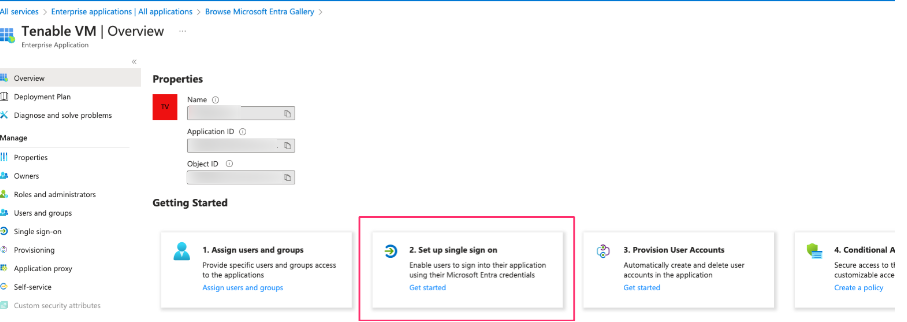
The Single Sign-on options appear.
-
Click the SAML tile.

The SAML-based Sign-on page appears.
-
On the Basic SAML Configuration tile, click the
 Edit button.
The Basic SAML Configuration page appears.

-
In the Identifier (Entity ID) text box, type the following placeholder text:
TENABLE_IO_PLACEHOLDERNote: You will later replace PLACEHOLDER with a unique UUID for the SAML configuration. -
In the Reply URL text box, type the following placeholder text:
https://cloud.tenable.com/saml/login/PLACEHOLDERNote: You will later replace PLACEHOLDER with a unique UUID for the SAML configuration. This link is case-sensitive. -
Click Save.
You return to the SAML-based Sign-on page.
-
On the SAML Certificates tile, in the Federation Metadata XML section, click Download.

Your browser downloads the metadata.xml file.
Tenable One SAML Configuration
Once you have downloaded your medata.xml file, you can use it to configure SAML in Tenable One. You can configure this directly in the Tenable Vulnerability Management application.
To set up the Tenable One SAML configuration:
- In your browser, navigate to Tenable One.
- On the Workspace page, click Tenable Vulnerability Management.
The Tenable Vulnerability Management user interface appears.
-
In the upper-left corner, click the
 button.
 The left navigation plane appears.
-
In the left navigation plane, click Settings.
The Settings page appears.
-
Click the SAML tile.
The SAML page appears.
-
In the action bar, click
 Create.
The SAML Settings page appears.
-
Do one of the following:
-
To provide configuration details by uploading the metadata.xml file from your IdP:
-
In the first drop-down box, select Import XML.
Note: Import XML is selected by default.
-
The Type drop-down box specifies the type of identity provider you are using. Tenable One supports SAML 2.0 (for example, Okta, OneLogin, etc.).
This option is read-only. -
Under Import, click Add File.
A file manager window appears.
-
Select the metadata.xml file.
The metadata.xml file is uploaded.
-
-
To manually create your SAML configuration using data from the metadata.xml file from your IdP:
-
In the first drop-down box, select Manual Entry.
A SAML configuration form appears.
-
Configure the settings described in the following table:
Settings Description Enabled toggle A toggle in the upper-right corner that indicates whether the SAML configuration is enabled or disabled.
By default, the Enable setting is set to Enabled. Click the toggle to disable SAML configuration.
Type Specifies the type of identity provider you are using. Tenable One supports SAML 2.0 (for example, Okta, OneLogin, etc.).
This option is read-only.Description A description for the SAML configuration. IdP Entity ID The unique entity ID that your IdP provides.
Note: If you want to configure multiple IdPs for a user account, create a new configuration for each identity provider with separate identity provider URLs, entity IDs, and signing certificates.
IdP URL The SAML URL for your IdP. Certificate Your IdP security certificate or certificates.
Note: Security certificates are found in a metadata.xml file that your identity provider provides. You can copy the content of the file and paste it in the Certificate box.
Authentication Request Signing Enabled A toggle that indicates whether authentication request signing is enabled.
When this toggle is enabled, if:
-
a user is logged in via SAML and their session expires
-
a user logs out and tries to log back in directly via the Tenable One interface rather than their IdP
Tenable One automatically signs the SAML authentication request that is sent to the IdP to log the user back in.
Note: The authentication request can only be validated if the IdP is also configured to accept this setting. For more information, see the following resources:- Manage Signing Certificates in Okta
- Enforce Signed SAML Authentication Requests in Microsoft Entra ID
- Edit a SAML Application in Ping Identity (Enforce Signed AuthnRequest option)
User Auto Provisioning Enabled A toggle that indicates whether automatic user account creation is enabled or disabled. Automatic account provisioning allows users with an account for the IdP named in the SAML configuration to create a Tenable Vulnerability Management account the first time they log in via the IdP.
Note: This option only appears during intial configuration if the setup is manual. Otherwise, you must edit the configuration after initial setup to enable this option.IdP Assigns User Role at Provisioning To assign a user role during provisioning, enable this toggle. In your SAML identity provider, add an attribute statement with userRoleUuid as the attribute name and the user role UUID as the attribute value. To obtain the UUID for a user role, go to Settings > Access Control > Roles.
Note: This option only appears during intial configuration if the setup is manual. Otherwise, you must edit the configuration after initial setup to enable this option.Note: To access this option, you must first enable the User Autoprovisioning Enabled option.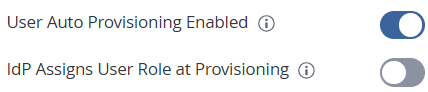 Important! The Tenable platform creates users at the exact moment of their first successful SAML login. They are not pre-populated by group assignment in the IdP. During the initial provisioning login, the platform prioritizes identity creation, which often results in the assignment of a default baseline role. Tenable does not fully process the userRoleUuid claim mapping until the user logs out and logs in a second time.
IdP Resets User Role at Each Login To assign a role each time a user logs in, overwriting the current role with the one chosen in your IdP, enable this toggle. In your SAML identity provider, add an attribute statement with userRoleUuid as the attribute name and the user role UUID as the attribute value.
To obtain the UUID for a user role, go to Settings > Access Control > Roles.
Note: This option only appears during intial configuration if the setup is manual. Otherwise, you must edit the configuration after initial setup to enable this option.Important! The Tenable platform creates users at the exact moment of their first successful SAML login. They are not pre-populated by group assignment in the IdP. During the initial provisioning login, the platform prioritizes identity creation, which often results in the assignment of a default baseline role. Tenable does not fully process the userRoleUuid claim mapping until the user logs out and logs in a second time.Group Management Enabled Enable this toggle to allow the Tenable One SAML configuration to manage user groups. You must enable this toggle for the Managed by SAML option to function successfully. -
-
-
-
Click Save.
Tenable Vulnerability Management saves your SAML configuration and you return to the SAML page.
-
In the row for the SAML configuration you just created, click the
 button.
An actions menu appears.
-
Click Download SAML SP metadata.
Your browser downloads the metadata.xml file. You can now use this file for final configuration in your IdP.
Optional: Configure One or More User Groups to Automatically Add a User upon SAML Login
User groups allow you to manage user permissions for various resources in Tenable One. When you assign users to a group, the users inherit the permissions assigned to the group. When you enable the Managed by SAML option for a user group, Tenable One allows you to automatically add any user that logs in via SAML to that group.
Before you begin:
Ensure you've enabled the Group Management Enabled toggle when configuring the SAML settings within Tenable One.
To enable the Managed by SAML option:
-
In Tenable Vulnerability Management, in the upper-left corner, click the
button. The left navigation plane appears.
-
In the left navigation plane, click Settings.
The Settings page appears.
-
Click the Access Control tile.
The Access Control page appears.
-
Click the Groups tab.
The Groups page appears.
-
In the user groups table, click the user group to which you want to automatically add your SAML users.
The Edit User Group page appears.
-
In the General section, select the Managed by SAML check-box.
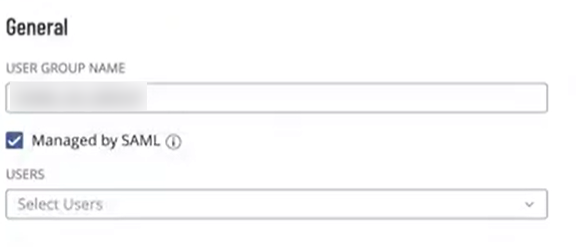
-
Click Save. Tenable Vulnerability Management saves your changes. Once you configure the related claim within your IdP, any time a user logs in via your SAML configuration, Tenable One automatically adds them to the specified user group.
Microsoft Entra ID: Configure Final Application and Upload Metadata
Now that you have downloaded the completed metadata file, you can upload that file to your Tenable application in Microsoft Entra ID.
-
In your browser, navigate to the Azure Admin portal.
-
In the navigation menu, navigate to All services > Enterprise Applications.
The application gallery appears.
-
Select the newly created application.

The application overview appears.
-
In the left navigation menu, click Manage > Single sign-on.
The SAML-based Sign-on options appear.
-
Click Upload Metadata file.

-
In your file manager, select the Service Provider metadata.xml file that you downloaded from Tenable Vulnerability Management.
Microsoft Entra ID imports the metadata from the file, including the Reply URL and Identifier specific to the SAML configuration.
-
Click Save.
Microsoft Entra ID saves your changes to the permanent application, and your SAML configuration is ready for use.
Optional: Finalize Configuration for Managed by SAML Group Option
If you configured the Managed by SAML option to automatically add any user that logs in via SAML to a user group, then you must configure a related group claim within the Microsoft Entra ID IdP.
To configure the IdP group claim:
-
In your browser, navigate to the Azure Admin portal.
-
In the navigation menu, navigate to All services > Enterprise Applications.
The application gallery appears.
-
Select the newly created application.
The application overview appears.
-
In the left navigation menu, click Manage > Single sign-on.
The SAML-based Sign-on options appear.
-
On the Attributes & Claims tile, click the
Edit button.The Attributes & Claims page appears.
-
Click Add a group claim.
The Group Claims pane appears.
-
Do one of the following:
-
 To map all users to the same group:
-
Select the Groups assigned to the application radio button.
-
In the Source attribute drop-down, select the best option based on your environment, such as Group ID.
 Tip: The source attribute options available vary based on the selected groups. For example, the Group ID source attribute does not divulge a group’s Display Name (for example, Developers), but rather its Object ID (for example, 11111111-2222-3333-4444-555555555555). As such, if you select Group ID, you must ensure that the name of the associated group configured within Tenable One matches the ID of the group listed within the Microsoft Entra ID portal (Home > Groups > All Groups).
Where available, you may instead choose to select Cloud-only group display names. If you sync with Active Directory, there are other available options within the Source Attribute drop-down.
Alternatively, you could create a custom claim using groups as the claim name and setting the group’s readable name (for example, Developers) as the source attribute.
This allows mapping to readable names within Tenable One, instead of IDs, while not accounting for groups assigned to an application within Microsoft Entra ID. To maximize your configurations and make sure that you’re familiar with all caveats, see Configure group claims for applications by using Microsoft Entra ID.
-
-
To map users to different groups:
-
Select the radio button for the option that best suits your environment, for example, Security Groups.
-
In the Source attribute drop-down, select the best option based on your environment, such as Group ID.
 Tip: The source attribute options available vary based on the selected groups. For example, the Group ID source attribute does not divulge a group’s Display Name (for example, Developers), but rather its Object ID (for example, 11111111-2222-3333-4444-555555555555). As such, if you select Group ID, you must ensure that the name of the associated group configured within Tenable One matches the ID of the group listed within the Microsoft Entra ID portal (Home > Groups > All Groups).
Where available, you may instead choose to select Cloud-only group display names. If you sync with Active Directory, there are other available options within the Source Attribute drop-down.
To maximize your configurations and make sure that you’re familiar with all caveats, see Configure group claims for applications by using Microsoft Entra ID.
-
-
-
Select Advanced > Customize the name of the group claim check box.
-
In the Name text box, type groups.

-
Click Save. Any time a user logs in via your SAML configuration, Tenable One automatically adds them to the specified user group in Tenable One.
Optional: Configure Managed by SAML Role Option
Roles allow you to manage privileges for major functions in Tenable One and control which Tenable One resources users can access. If you toggled on the SAML configuration options IdP Assigns User Role at Provisioning and/or IdP Resets User Role at Each Login (to automatically add and/or assign any user that logs in via SAML to a user role), then you must complete the following steps in Microsoft Entra ID:
To configure Managed by SAML role option:
-
In your browser, navigate to the Azure Admin portal.
-
In the navigation menu, navigate to All services > Enterprise Applications.
The application gallery appears.
-
Select the newly created application.
The application overview appears.
-
In the left navigation menu, click Manage > Single sign-on.
The SAML-based Sign-on options appear.
-
On the Attributes & Claims tile, click the
Edit button.The Attributes & Claims page appears.
-
Do one of the following:
-
To map all users to the same role:
-
Click Add new claim.
The Manage claim pane appears.

-
In the Name text box, type userRoleUuid.
-
In the Source attribute text box, type the UUID of the Tenable user role.
Tip: Tenable user role UUIDs can be found in Tenable Vulnerability Management, in the Settings > Access Control > Roles table.
-
-
To map individual users to different roles:
If each user should be assigned their own unique role, you can define their role with user attributes. Based on your level of experience with Microsoft Entra ID and Microsoft Graph, you may be most comfortable with one option or another. Some examples include:
-
Leverage extension attribute: Microsoft Entra ID offers a set of 15 extension attributes with predefined names, which can be edited with Microsoft Graph. You can learn to add and read these extension attributes by visiting Add Custom data to Resources Using Extensions.
-
Using Microsoft Graph, identify an available (unused) extension attribute.
-
For each user within the organization, update the selected extension attribute with the UUID of the Tenable user role.
Tip: Tenable user role UUIDs can be found in Tenable Vulnerability Management, in the Settings > Access Control > Roles table. -
Within the Attributes & Claims page of the newly created app, click Add new claim.
The Manage claim pane appears.

-
In the Name text box, type userRoleUuid.
-
In the Source attribute text box, find and select the appropriate extension attribute (for example, user.extensionattribute1).
-
-
Leverage existing attributes: You may opt to modify an existing and available (unused) attribute (for example, Fax Number). This can be useful for testing, small scale deployments, or until extension attributes can be leveraged.
-
Navigate to Home > Users.
-
For each user in scope, select Properties.
The Properties pane appears.

-
Select an available existing attribute and edit the value with the UUID of the Tenable user role.
Tip: Tenable user role UUIDs can be found in Tenable Vulnerability Management, in the Settings > Access Control > Roles table. -
Within the Attributes & Claims page of the newly created app, click Add new claim.
The Manage claim pane appears.

-
In the Name text box, type userRoleUuid.
-
In the Source attribute text box, and and select the appropriate extension attribute (for example, user.facsimiletelephonenumber).
-
-
-
To map user groups to different roles:
If users of a specific user group within Microsoft Entra ID should all be assigned the same role within Tenable One, (for example, Administrators), then you can leverage their existing group membership:
-
Click Add new claim.
The Manage claim pane appears.

-
In the Name text box, type userRoleUuid.
-
For each required role:
-
Under Claim conditions, in the User type drop-down, select the best option based on your environment, such as Members.
-
Click Select groups and then select the relevant user group.
-
In the Source drop-down, select Attribute.
-
-
In the Value text box, type the UUID of the Tenable user role.
Tip: Tenable user role UUIDs can be found in Tenable Vulnerability Management, in the Settings > Access Control > Roles table.
-
-
-
Click Save. Any time a user logs in via your SAML configuration, Tenable One automatically adds them the specified user role in Tenable One.
Tip: Alternatively, you can create separate applications in Microsoft Entra ID: one for each role and/or each user group (along with separate SAML integrations within Tenable One), where each user is assigned to an application based on their expected role/group mapping.


Additional Resources
For more information on Microsoft Entra ID IdP configuration, see the following resources: