Manage Reports
On the Reports page, you can manage your reports in the following ways:
Create a Report
Required User Role: Scan Operator, Standard User, Scan Manager, or Administrator
Note: To create a report, you must also have the Can Edit permission. For more information, see Permissions.
To create a report:
-
In the left navigation, click
 Reports.
The Reports page appears.

-
In the upper-right corner, click Create New Report.
The Report Templates page appears, with reports organized by category.
-
Do one of the following:
-
Create a report based on a template:
-
In the Report Templates list, select a template:
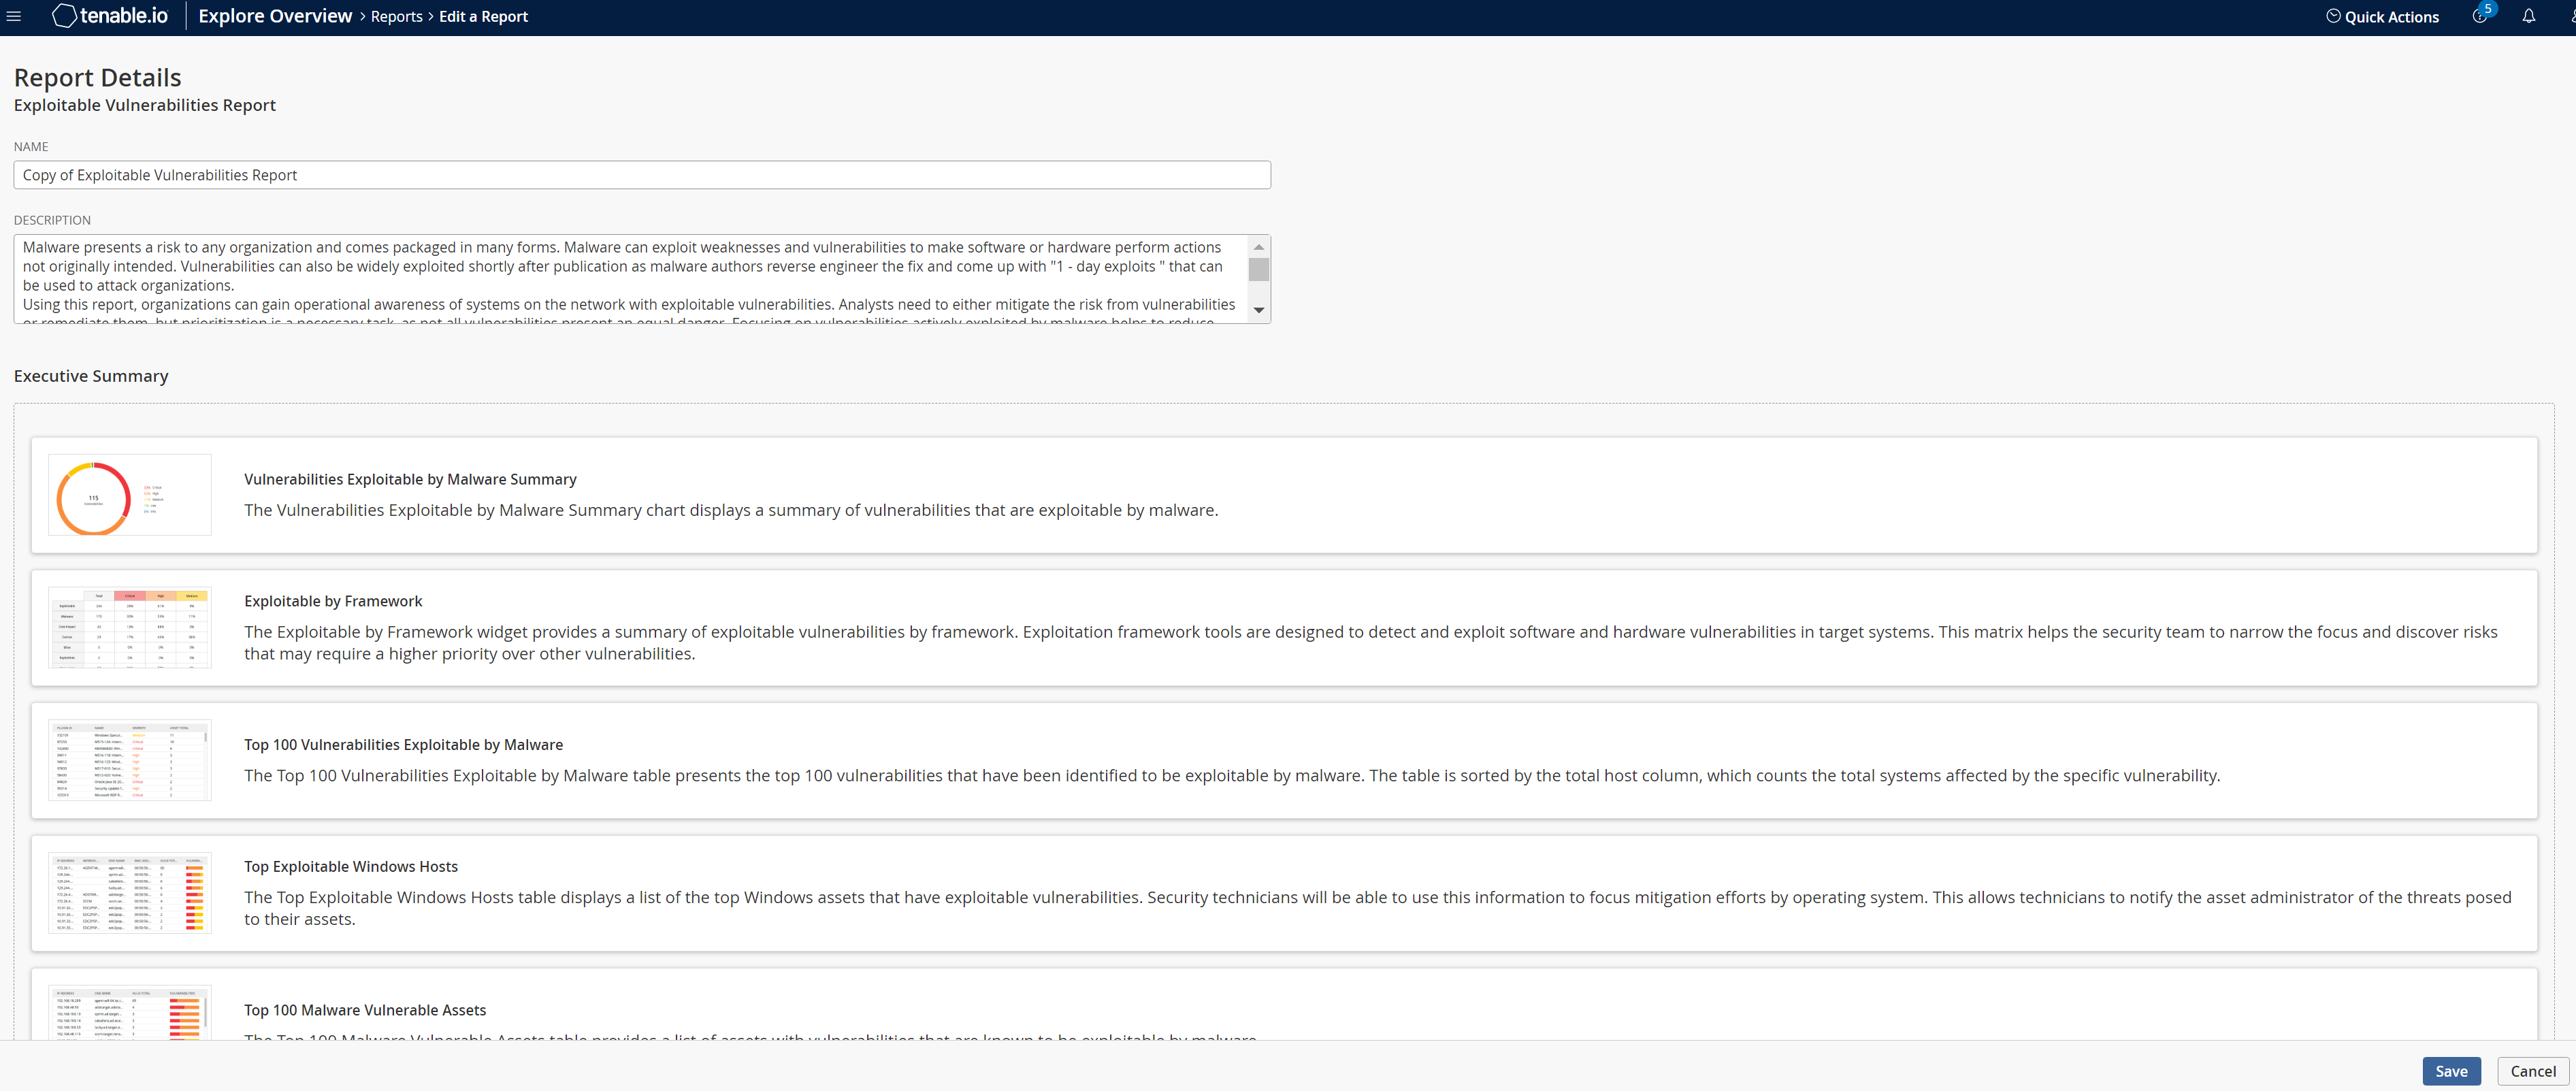
The Report Details page appears.
-
On the Report Details page, do the following:
-
(Optional) Click Update Logo to add a new logo to your report or select from a list of recently uploaded logos. Select the Set as default for all reports checkbox to set a logo as the default.
-
In the Name box, type a name for the report.
-
(Optional) In the Description box, type a description.
-
In the Executive Summary section, select from the available widgets or click Add New Widget to add a custom widget or a widget from the widget library to the report.
-
In the Additional Chapters section, select from the available chapters or click Add New Chapter to add report chapters from the Chapter Library.
-
(Optional) Add a filter to the reports. For more information, see Filter Reports.
-
-
-
Create a custom report:
-
In the upper-right corner of the Report Templates page, click Create Custom Report.
The Report Details page appears.
-
On the Report Details page, do the following:
-
(Optional) Click Update Logo to add a new logo to your report or select from a list of recently uploaded logos. Select the Set as default for all reports check box to set a logo as the default.
-
In the Name box, type a name for the report.
-
(Optional) In the Description box, type a description.
-
In the Executive Summary section, click Add New Widget to add a custom widget or a widget from the widget library to the report.
-
In the Additional Chapters section, click Add New Chapter to add report chapters from the Chapter Library.
-
(Optional) Add a filter to the reports. For more information, see Filter Reports.
-
-
-
-
Click Save.
Tenable Vulnerability Management creates a new report and it appears on the My Report Templates page.
Tip: Once created, you can generate an initial report and download a copy. For more information, see Generate Reports.
Edit an Existing Report
Required User Role: Scan Operator, Standard User, Scan Manager, or Administrator
Note: You can only modify a report if you are the owner, a user with an administrator account, or you have been given the Can configure permission for that report.
To edit a report:
-
In the left navigation, click
Reports.The Reports page appears.
-
Select the report that you want to edit:
Scope Action Edit a single report To edit a report from the Reports page:
-
On the My Report Templates or All Report Templates tab, right-click the row for the report you want to edit.
-or-
On the My Report Templates or All Report Templates tab, in the Actions column, click the
 button in the row for the report you want to edit.
The action buttons appear in the row.
- Click
 Edit.
Edit.
The Report Details page appears.
-
-
Modify the report settings.
-
Apply filters as needed.
-
Click Save.
Tenable Vulnerability Management saves the report and the Reports page appears.
Delete a Report
Required User Role: Scan Operator, Standard User, Scan Manager, or Administrator
Note: You can only delete a report if you are the owner or a user with an administrator account.
To delete a report:
-
In the left navigation, click
Reports.The Reports page appears.
-
Select the reports you want to delete.
Note: This procedure is applicable for both Report Results and Report Templates.Scope Action Delete multiple reports To delete reports:
-
Select the check box for each report you want to delete.
The action bar appears at the top of the list.
-
In the action bar, click
 Delete.
Delete a single report To delete a single report:
-
Right-click the row for the report you want to delete.
-or-
Select the check box next to the report you want to delete.
Tenable Vulnerability Management enables More in the action bar.
-or-
In the Actions column, click the
button in the row for the report you want to delete.The action buttons appear in the row.
-
Click
Delete.
The Delete Reports dialog box appears.
-
-
Click Delete.
Tenable Vulnerability Management deletes the report permanently.
Schedule a Report
Required User Role: Scan Operator, Standard User, Scan Manager, or Administrator
Note: You can only schedule a report if you are the owner, a user with an administrator account, or you have been given the Can configure permission for that report.
To schedule a report:
-
In the left navigation, click
Reports.The Reports page appears.
-
On the My Report Templates or All Report Templates tab, select the check box next to the report that you want to schedule.
The action bar appears at the top of the table.
- Do one of the following:
- Right-click on the row for the report that you want to schedule.
- In the action bar, click on the More button.
- In the Actions column, click the button in the row for the report that you want to schedule.
A menu appears.
- Click
 Schedule.
 -
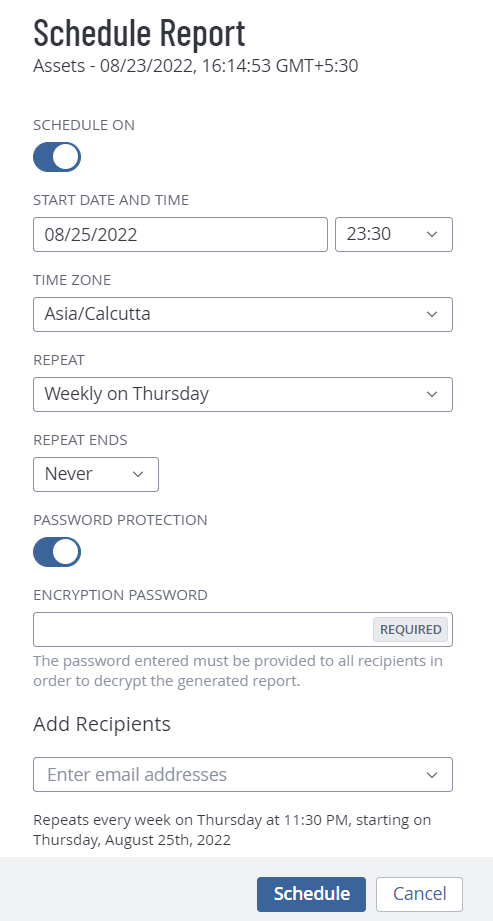
Modify the report schedule settings.
Setting Default Description Schedule On off A toggle that specifies whether the report is scheduled. By default, reports are not scheduled.
When you disable the Schedule toggle, the other schedule settings remain hidden.
Click the toggle to enable the schedule and view the remaining Schedule settings.
Start Date and Time varies Specifies the exact date and time when Tenable Vulnerability Management launches the report.
The starting date defaults to the date when you create the schedule. The starting time is the nearest half-hour interval. For example, if you create the report schedule on 09/31/2022 at 9:12 AM, Tenable Vulnerability Management sets the default starting date and time to 09/31/2022 and 09:30.
Time Zone varies The time zone of the value set for Start Date and Time. Repeat Once Specifies how often Tenable Vulnerability Management launches the report. Reports run at the time specified in Start Date and Time.
- Once: Schedule the report to run once.
- Daily: Schedule the report to run daily.
-
Weekly: Schedule the report to run on a weekly basis.
Note: The report runs on the day of the week that the schedule begins. For example, if you schedule the report to first run on Monday, 2/14/2021, the report runs on Monday every week.
-
Monthly: Schedule the report to run on a monthly basis.
Note: The report runs on the day of the week that the schedule begins. For example, if you schedule the report to first run on Monday, 2/14/2021, the report runs on the second Monday of every month.
- Custom: Schedule the report to run on a custom interval, based on a specific number of days, weeks, or months.
- Yearly: Schedule the report to run on a yearly basis.
Repeat Ends Never -
On: If you select this option, the End Date setting appears, where you can select the date you want the report schedule to end.
-
Never: The report runs on the schedule until you modify the report schedule.
Password Protection Off A toggle that specifies whether the report schedule is password protected.
To set a password for the report:
-
Click the Password Protection toggle to enable password protection for the report.
-
In the Encryption Password box, type the password for the report.
Note: Make sure that you provide this password to the recipients to open the report.Add Recipients In this box, type one or more email recipients with whom you want to send the report to. Be sure to press enter after each email address entry.
-
Click Schedule.
Tenable Vulnerability Management schedules the report and the recipients receive the report as an email. If you enable the password protection toggle, the recipient must provide the password when prompted.
The Schedule Report plane appears.
Edit a Report Schedule
Required User Role: Scan Operator, Standard User, Scan Manager, or Administrator
Note: You can only edit a report schedule if you are the owner, a user with an administrator account, or you have been given the Can configure permission for that report.
To edit a report schedule:
-
In the left navigation, click
Reports.The Reports page appears.
-
Select the report that for which you want to edit the schedule:
Scope Action Edit a single report schedule To edit a report schedule from the Reports page:
-
On the My Report Templates or All Report Templates tab, right-click the row for the report you want to edit.
-or-
On the My Report Templates or All Report Templates tab, in the Actions column, click the
button in the row for the report you want to edit.The action buttons appear in the row.
- Click Schedule.
The Schedule Report pane appears.

-
-
Modify the report schedule settings.
-
Click Schedule.
Tenable Vulnerability Management saves the report schedule and the Reports page appears.
Generate a Report
Required User Role: Scan Operator, Standard User, Scan Manager, or Administrator
Note: When you disable a user account, that user's scheduled reports are not disabled. If the disabled user shared reports, users with access can still generate them. For more information, see Disable an Active User Account.
Note: You cannot generate more than 50 reports at a time.
To generate a report:
-
In the left navigation, click
Reports.The Reports page appears.
-
On the Report Results tab, select the check box next to the report you want to generate.
The action bar appears at the top of the list.
-
In the action bar, click
 Generate Report.
Tenable Vulnerability Management starts to generate the report. You can track the report status on the Report Results tab.
Email Report Results
Required User Role: Scan Operator, Standard User, Scan Manager, or Administrator
To share report results via email:
-
In the left navigation, click
Reports.The Reports page appears.
-
Select the report results that you want to share:
Scope Action Share a single report To share report results from the Reports page:
-
On the Report Results tab, right-click the row for the report results you want to share.
-or-
On the Report Results tab, in the Actions column, click the
button in the row for the report results you want to share.The action buttons appear in the row.
- Click
 Email.
The Email Report plane appears.

-
-
In the Add Recipients box, type one or more email recipients for the report results, pressing enter after each entry.
The recipients you select receive an email with a PDF of the report results.
-
In the Encryption Password box, type the password for the generated report.
Important: Make sure that you provide this password to the recipients to open the report.
Note: If you provide a password at the time of scheduling the report, Tenable Vulnerability Management applies the same password when emailing the report. For reports for which passwords are applied at the time of scheduling, the Encryption Password box appears disabled with a message at the bottom that states that the password is the same as one created during the schedule process.
-
Click Email.
The report results are shared as an email and the Reports page appears. If you add a password for the report, the recipient must enter the password when prompted.