Connect an AWS Account
Use this procedure to onboard an individual account. If you are onboarding your entire AWS organization, you will need to first follow this procedure to onboard the management account individually before continuing to onboard the organization.
To onboard an AWS account:
- Navigate to Settings > Integrations and click Add Integration.
- In the Integrations Library, select AWS Account.
-
In Account Details, complete these steps:
Enter a Name for your account to be displayed in in the AI Exposure Console.
Note: You can choose whether to use the same naming convention in both the AWS Management Console and the AI Exposure Console. If you do use different names, make sure you can map the account names across the different consoles.- Verify that the appropriate AWS Partition is selected (AWS Global or AWS China). The partition that your AWS account belongs to. A partition is a group of AWS Regions. For more information, refer to AWS Documentation.
Select all relevant Active Regions where you have resources deployed.
Note: Verify that you select only the specific regions used by your organization. Unselected regions will be ignored. Enable all regions not disabled or blocked by SCPs or RCPs for scanning. If your deployment expands to additional regions at a later stage, you will need to edit the account in AI Exposure and add those regions.- Click Next.
-
In Permissions, choose which permissions to grant to Tenable that are required for different features to function.
Note: You can modify your selection after the initial onboarding. See AWS Required Permissions to learn more about why Tenable needs these permissions granted.- Monitoring (read-only) — Gain full visibility for all cloud assets, including information about permissions, account usage, and security configurations. Additional permissions may be required to read the CloudTrail for the onboarded account. For more information about required permissions, see the documentation.
-
Data Protection — Scan and classify cloud resources for sensitive data.
Note: This feature is relevant if you're working with AI Exposure Data Protection. See Data Protection for more information. See Data Resources Scanning Policy (Data Protection) to view the policy in JSON format. -
EC2 Instance and AMI Scanning (Workload and Data Protection): Scan EC2 instances and AMI (private and public machine images) for vulnerabilities, misconfigurations, secrets and sensitive data. For more information about required permissions, see the
documentation.Important:- This feature is relevant if you're working with AI Exposure Workload Protection. See Workload Protection for more information. See EC2 Instance Scanning (Workload Protection) to view the policy in JSON format.
- Tenable added exclusion rules by default to prevent scanning AMIs that are identified as backup AMIs based on their tags.
-
ECR Scanning (Workload Protection) — Scan container registries for vulnerabilities and misconfigurations.
Note: Relevant if you're working with AI Exposure Workload Protection (requires Standard/Enterprise license). See Workload Protection for more information. See ECR Scanning Workload Protection Policy to view the policy in JSON format. - Remediation (read-write) — Allow Tenable to make changes in your environment. This lets you automatically remediate findings with one click, for example (One-click remediation is still available via OTP without these permissions). For more information about required permissions, see the documentation.
- Just-in-time Access for Account Assignments (AWS Identity Center) — Grant users access to accounts for a predetermined period of time and on an as-needed basis. If the account you are onboarding is the management account, or has permissions to manage AWS Identity Center, additional permissions are required. For more information about required permissions, see the documentation.
- Just-in-Time Access for Application Assignments (AWS Identity Center) — Grant users temporary access to applications managed by AWS Identity Center, for a predetermined period of time and on an as-needed basis. If the account you are onboarding is the management account, or has permissions to manage AWS Identity Center, additional permissions are required. For more information about required permissions, see the documentation.
-
CloudTrail (S3) — To analyze cloud activity logs, permissions are required to read from the S3 bucket storing CloudTrail data. If the bucket belongs to the account you are currently onboarding, select this option. For more information, see AWS CloudTrail.
- Enter the Bucket name where the trail data is stored.
- Indicate whether the trail bucket is encrypted with AWS KMS, and if so, enter the KMS key ARN.
If the bucket belongs to a different account, you will need to do one of the following after completing this wizard:
- [When only onboarding individual accounts] Onboard the other account separately and grant Tenable CloudTrail permissions via the IAM role.
- [When onboarding your entire organization] Complete organization onboarding, and then edit the relevant account and grant Tenable CloudTrail permissions via the IAM role.
-
Amazon Bedrock Model Invocation Logs (S3) — To monitor AI activity in Amazon Bedrock, you need permissions to read from the S3 bucket that stores your model invocation logs. To monitor AI activity in Amazon Bedrock, permissions are required to read from the S3 buckets storing the model invocation logs. For more information, see Enable Amazon Bedrock Activity Monitoring.
Note: Before using this feature, turn on model invocation logging in Amazon Bedrock. See Step 1: Enable Amazon Bedrock Model Invocation Logging.Note: Amazon Bedrock activity monitoring is a runtime capability that completes the AI Security posture management (AI-SPM) coverage for Amazon Bedrock and Bedrock assets in Tenable One AI Exposure. Amazon Bedrock activity monitoring is currently available at no additional cost with the AI Governance add-on license.
- Click Next.
-
Create a new IAM role using either CloudFormation (via the AWS Console, or the AWS CLI) or manually in the AWS Console:
- CloudFormation (AWS Console):
- Log in to the AWS account that you want to onboard.
Click here to create a Stack, and then perform the following steps in the AWS Create stack wizard:
Important: You can use the link provided here, or the link in the wizard. However, if you use the link provide here, verify that the true/false values for each of the Tenable Policies reflect the permissions that you chose in step 2 of the wizard.- (Optional) Choose a different name for the IAM role by modifying the RoleName parameter.
- Select I acknowledge that AWS CloudFormation might create IAM resources with custom names and then click Create Stack.
- Wait until the Stack creation is complete. You can click on the Refresh button to track progress.
- Navigate to the Outputs tab and copy the Value that corresponds with the TenableRoleArn key.
- Paste the IAM Role ARN in the wizard and then click Next.
- CloudFormation (AWS CLI):
- Open a new shell session with the latest version of the AWS CLI. Administrator privileges are required to create the CloudFormation stack.
Copy the command that appears in step B of the wizard, and run it in your shell.
Important: The following is a command example, but be aware that the parameters and values may differ depending on the permissions you selected.CopyBash
aws cloudformation create-stack --stack-name TenableStack \
  --template-url https://tenable-utilities.s3.us-east-2.amazonaws.com/Onboarding/AWS/CloudFormation/Template.json \
  --capabilities CAPABILITY_NAMED_IAM \
  --parameters \
    ParameterKey=RoleName,ParameterValue=TenableRole \
    ParameterKey=RoleExternalId,ParameterValue=ba2edce3-d9e1-4ae4-8b33-ecd3961aed8c \
    ParameterKey=RoleTrustedPrincipalId,ParameterValue=<aws_account_id> \
    ParameterKey=RoleMonitoringPolicy,ParameterValue=true \
    ParameterKey=RoleRemediationPolicy,ParameterValue=false \
    ParameterKey=RoleJitPolicy,ParameterValue=false \
    ParameterKey=RoleWorkloadProtectionPolicy,ParameterValue=true \
    ParameterKey=CloudTrailBucketName,ParameterValue=- \
    ParameterKey=CloudTrailKeyArn,ParameterValue=-
aws cloudformation wait stack-create-complete --stack-name TenableStack
aws cloudformation describe-stacks --stack-name TenableStack --query "Stacks[].Outputs"- After completing stack creation, copy the OutputValue that corresponds with the TenableRoleArn key from the shell.
- Paste the IAM Role ARN in the wizard and then click Next.
- Manual (AWS Console):
- In the AWS Management Console, navigate to IAM > Roles and click Create role.
- For the trusted entity type, select AWS account.
For the AWS account, select Another AWS account and then enter one of the following numbers as the Account ID, depending on your AWS environment type, and reflecting the value that appears in Step 1 of the wizard:
- Public Cloud: 081802104111
- US Gov Cloud: 757023926892
This is Tenable’s account ID. The ID must be exactly twelve-digits; make sure not to include any extra spaces.
- Under Options, check Require external ID.
Enter the Role External ID provided in step 3 of the Add Account wizard.
Note: The Role External ID is a unique identifier that AI Exposure assigns to your customer account. This ID will be the same for each account you create for your organization. For more information, refer to https://docs.aws.amazon.com/IAM/latest/UserGuide/confused-deputy.html.- In the list of policies, search for and select the SecurityAudit permissions policy and then finish creating the role. See AWS Required Permissions to learn more about why Tenable needs these permissions granted.
- Open the newly created role.
-
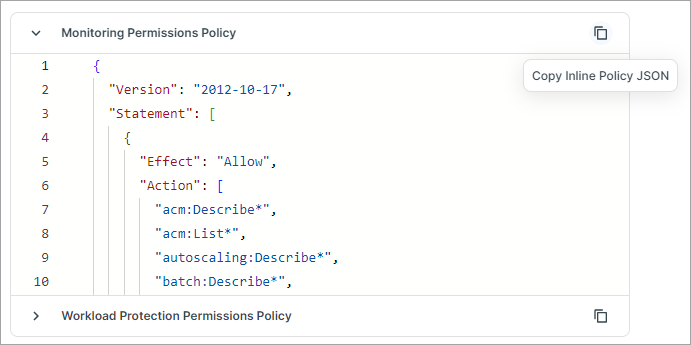
For each of the policies that appear in step 3 (IAM Role) of the wizard in the AI Exposure Console, perform the following to create an inline policy:
- Click Add permissions > Create inline policy.
Copy the policy that appears in the wizard and paste it in the JSON editor. For example:
- Click Next and then finish creating the policy.
- Paste the IAM Role ARN in the wizard and then click Next.
- CloudFormation (AWS Console):
- Select a CloudTrail. Select a CloudTrail for management events (required) and S3/Lambda data events (Step 5 in wizard). See AWS CloudTrail for important information and best practices related to granting Tenable access to trails.
Under Management events, select a primary CloudTrail with management events enabled for AI Exposure to read activity logs from:
Note: Only valid trails are displayed here. For more information, see AWS CloudTrail.- If you use a single CloudTrail with both management events AND data events (either S3, Lambda, or both) enabled, select that trail from the dropdown. The S3 Data events and/or Lambda Data events field will be automatically populated with the CloudTrail information that you select here.
- If you use separate trails for management events and data events (either S3, Lambda, or both), select the CloudTrail with management events enabled here, and the data event trail/s in the respective field.
- (Optional) Under S3 Data events and/or Lambda Data events, select the relevant CloudTrail. See Enable Granular Recommendations Based on Data Events for more information.
- If you haven’t yet granted permissions to the S3 bucket where the trail logs are stored, follow the on-screen instructions to do so.
- If the KMS key for the CloudTrail is located in a different AWS account than the one that contains the S3 bucket, you need to grant AI Exposure access to the key.
- Click Finish.
Next steps:
After your account is added successfully, the account appears in the table in Accounts > AWS. From here you can manage your account and view account details to see, for example, which features are enabled and whether the required permissions were granted.
Data about your account resources will start to appear in AI Exposure. The time it takes for all data to appear varies depending on the size of your cloud environment.
Onboard an AWS China Account
Onboard individual AWS China accounts to AI Exposure. When you onboard your account, AI Exposure doesn't copy any data from your account. Tenable only copies configuration metadata and CloudTrail event logs (optional). This information is saved in the region where you deployed AI Exposure.
- Onboarding is available for individual accounts only, and not organizations.
-
AWS China accounts support the following features and functionality:
- CIEM/CSPM
- Data Protection via onsite scanning (Enterprise license)
- Workload Protection via onsite scanning (Enterprise license)
- Tenable does not deploy servers in AWS China. Instead, asset configurations (and optionally, event logs) are copied from AWS China to another region in which Tenable is deployed (for example, the United States). This data is then stored alongside data synchronized from any of your non-China accounts.
To onboard an AWS China account:
- Create an IAM user:
In the AWS Management Console for one of your China accounts, navigate to IAM > Users.
Note: If you have more than one China account, you can create the user in any of your accounts. It doesn't matter which one.- Click Create user.
- Enter a meaningful User name.
- Verify that the Provide user access to the AWS Management Console checkbox is not selected.
- Click Next.
- On the Set permissions page, click Next without making any configuration changes.
- Review the user details and then click Create user.
- Add an inline policy:
- Find and click on the user you just created in the Users table.
- Under Permissions, click Add permissions > Create inline policy.
In the Policy editor, click JSON, and then paste the following code into the editor:
CopyJSON
{
  "Version": "2012-10-17",
  "Statement": [
    {
      "Effect": "Allow",
      "Action": "sts:AssumeRole",
      "Resource": "arn:aws-cn:iam::*:role/tenable-cs-role"
    }
  ]
}
Note: tenable-cs-role is used as the role name in the above policy, but you can change the name if needed. Save this role name (default: tenable-cs-role), since you will need it later during account onboarding.- Click Next.
- Enter a meaningul Policy name and then click Create policy.
-
Create an access key:
Note: You can create a single access key for multiple accounts. There is no need to repeat this step for each additional account.- For the user you created, under Security credentials, click Create access key.
- Select Third-party service and then click Next (select the checkbox to confirm).
- Click Create access key.
- On the Retrieve access keys page, securely save the Access key and Secret access key values and then click Done.
- Contact Technical Support and securely provide them with the access key and secret for the IAM role you created.
- With this information, Support will then enable AWS China to be used as a partition during account onboarding.
-
Connect your AWS China account, keeping in mind the following:
- In step 1 of the onboarding wizard, under AWS Partition, select China.
- In step 3 of the onboarding wizard, ensure that the IAM role you create is given the same name as the role in the policy you created earlier (default: tenable-cs-role).
Next steps:
After your account is added successfully, the account appears in the table in Accounts > AWS. From here you can manage your account and view account details to see, for example, which features are enabled and whether the required permissions were granted.
Data about your account resources will start to appear in AI Exposure. The time it takes for all data to appear varies depending on the size of your cloud environment.