Explorer
The Explorer page is the central place for investigating your cloud environment. Use queries across all your resources and findings to precisely identify, prioritize, and remediate risks using a wide range of filters and properties.
When you enter the Explorer page, you have several ways to begin a search:
- Select a query from the Popular Queries list. This list shows your recently used Saved Queries first, followed by a set of recommended built-in queries.
- Select a saved query from the Saved queries section.
- Build a new query by selecting an object and applying filters.
Once a query is open, you can modify it and choose to Save or Save as to create a new custom query.
The query results can be displayed in a table or graph. Learn more.
Saved Queries
Saved queries allow you to reuse a specific query configuration without rebuilding it each time.
To open a saved query from the:
- Explorer page:
- Go to Explore > Explorer.
- Click the Saved queries
 button.
-
Filter or search using any of the following:
- Categories
- Search bar
- View filters by query type: All, Built-in, Public, or Private
- Queries page:
- Go to Explore > Queries.
- Click on the query you want to open.
There are two types of saved queries that you can use:
- Built-in queries — Out-of-the-box queries provided by Tenable One AI Exposure. You cannot edit or delete these queries. You can modify and click Save as to create a custom query.
- Custom queries — Created by you or other users. A custom query can be Public or Private. You can update or duplicate any custom query.
Create a New Query
Create a new query by selecting an object to investigate and refining the results with filters, operators, and relationships. The sections below walk you through each step:
- Choose an Object
- Filter Results
- Combine Filters with Operators
- Add Relationships
- Aggregate Results with Group By
- Save query
- Edit query
Choose an Object
Every query starts with an object, such as a virtual machine, identity, container, or policy. The object determines which properties and relationships you can filter on.
To choose an object:
- Go to Explore > Explorer.
-
Select the Find Resource control to open the object selector. You can:
- Search for an object by name.
- Pick from recently used objects.
- Browse categories to view related objects (for example, selecting Kubernetes to see all Kubernetes resources).
- Scroll through the full list of available objects.
After you select an object, the query builder opens and you can add filters, operators, and relationships to refine the results.
Native vs Generic Objects
When building custom queries, you can select from different types of objects to explore your environment. These object types are distinguished by their icons, which indicate their scope:
- Native objects (Cloud-specific icon e.g., AWS
 , Azure
 ):
- These represent objects that are unique to a particular cloud provider or offer more granular details for a specific platform's service (for example, AWS EC2 Instance, Azure Virtual Machine Scale Set). Selecting a native object allows you to query only objects from that specific cloud environment. Use these when you need to target unique properties or details of a single cloud platform.
- While all available resources from your connected cloud environments are supported, not all of them will have every property available for filtering. Every resource you query will, at a minimum, have all the properties from the Cloud Resource object, in addition to any properties inherited from its specific unified resource type (for example., a GCP VM Instance inherits from both the Cloud Resource and the Virtual Machine types).
- Generic objects (Icon:
 ).
- These objects represent common resource types that exist across multiple cloud platforms (for example, Virtual Machine or Identity) or within a single platform (for example, Google Identity). When you query a generic object, you'll see all relevant instances (across platforms, or within a single platform) in a single, consolidated view. This is ideal for getting a broad, cross-cloud overview.
- The Cloud Resource object is the highest-level generic object. It defines a base set of properties applicable to every resource, whether it is a generic or platform-specific type.
Filter Results
After you select an object as the core of your query, you can start filtering based on the object's properties.
Filter by Object Property
To filter by object property:
- To the right of the selected object, click + (Add filter).
- In the Properties section, search or scroll to find the relevant property. For example, Name.
- Click the property name to add it as a criterion and then select a property operator and value. For example, for Name, you can select operator=Contains and value=dev.
Filter by Multiple Values
When you filter a text property with the Equals operator, you can enter several values at once. AI Exposure returns the resources that match any of the values. For example, use this to look up a list of hostnames from an incident ticket in one query.
To filter by multiple values:
- To the right of the selected object, click + (Add filter).
- In the Properties section, search or scroll to a property that contains text, such as Name, and click it.
- In the operator drop-down box, select Equals.
-
In the value box, type or paste the values, with each value on its own line. For example:
Copyweb-prod-01
web-prod-02
db-prod-01
The filter appears in the query with the values separated by commas, for example: Name equals web-prod-01, web-prod-02, db-prod-01.
AI Exposure applies the following rules to the values you enter:
- Each line is one value. Commas do not separate values, so if you paste a comma-separated list, it's treated as a single value.
- Leading and trailing spaces are removed from each value and blank lines are ignored.
To exclude the resources that match any of the values, click Not next to the operator drop-down box.
Filter by Entity Traits
Filter cloud resources and entities by functional capabilities (Traits) to quickly find resources that share common characteristics, regardless of their specific service type.
- To the right of the selected object, click + (Add filter).
- In the Properties section, search for or select Traits.
- Click the property name to add it as a criterion.
- Select an operator (for example, Is or Not).
- Select the specific traits you want to filter by, such as Encryptable or Taggable.
Query Property for Blank Values
Use the is empty operator to search for resources/findings where a specific property has no defined value. For example, use this operator to find all public-facing virtual machines across all cloud environments that are missing any tags.
Filter by Raw Cloud Provider Source Data
AI Exposure models the most common resource attributes as properties, such as Name or Operating System Type. When you need an attribute that is not a property, filter on Source Data instead. This property contains the JSON that Tenable received from the cloud provider for the resource.
The cloud provider defines the content and structure of this JSON. Tenable does not control it, and the provider can change field names, values, or structure at any time.
Source Data supports the following operators:
| Operator | Use It To |
|---|---|
| Contains | Find resources whose JSON contains a text string anywhere. Click Aa for a case-sensitive match. |
| Matches pattern | Find resources whose JSON matches a pattern. Click Aa for a case-sensitive match. |
| Matches JSON Path | Filter on the value at a specific location in the JSON. |
| Is empty | Find resources that have no raw JSON. |
To exclude matching resources, click Not next to any operator.
Before you begin:
- Open a resource of the type you want to query and click the JSON tab. Use it to find the exact key names and structure. Key names are case-sensitive and can differ from the cloud provider's API documentation.
To filter on a specific JSON value:
- To the right of the selected object, click + (Add filter).
- In the Properties section, search for and click Source Data.
- In the operator drop-down box, select Matches JSON Path.
- In the JSON Path box, type a JSONPath expression that starts with $. For example, to find AWS EC2 instances without detailed monitoring, type $.monitoring.state, select String and Equals, and type disabled. [TBC: run this once in the Console to confirm it returns results]
-
Under Conditional Logic, select how to handle a path that returns more than one value (for example, an array):
- Match all — every value must match. This is the default.
- Match any — at least one value must match.
- In the Type drop-down box, select the data type of the value: String, Number, or Boolean.
-
In the Operator drop-down box, select an operator. The available operators depend on the type. See the following table.
Type Operators String Equals, Contains, Starts with, Ends with, Matches pattern Number Equals, Greater than, Greater than or equal to, Lower than, Lower than or equal to Boolean Equals -
Set the value:
- For String or Number, type the value in the Value box.
- For Boolean, select True or False.
The filter appears in the query, for example: Source Data matches JSON Path $.monitoring.state equals disabled.
Filter by Multiple Object Properties
You can filter an object by as many properties as you want.
To filter by multiple properties:
- To the right of the selected object, click + (Add Filter).
- In the Properties section, search or scroll to find the relevant property. For example, Creation Time.
- Click the property name to add it as a criterion and then select a property operator and value.
- Repeat these steps to add additional properties.
Filter by Relations
In addition to filtering by an object's direct properties, you can filter based on its connections to other resources.
To filter by a relation:
- To the right of the selected object, click + (Add filter).
- In the Relations section, search or scroll to find the relevant relationship. For example, related to Cloud Resource.
- Next to the relationship click the inline Filter button. Alternatively, you can click Join to Create a Join.
Hide/Show a Query Group
You can temporarily disable a set of filters without deleting them from your query. This is a powerful feature for testing and troubleshooting. When you hide a group, its filters are removed from the query's logic and will no longer affect your search results. The group is still saved, allowing you to re-enable the filters instantly by selecting Show group at any time.
You can hide a group at any level of your query. For example, you can hide an entire parent group (which will also disable all filters nested within it) or you can hide individual filters within a group.
To hide/show a query group:
Click the three dots next to the relevant group and then click Hide group.
Combine Filters with Operators
When you add filters to your query, they interact using logical operators:
| Operator | Details | Example |
|---|---|---|
| And Logic | By default, when you add multiple property filters (for example, Name contains dev, and Labels is Privileged), they are automatically combined with an AND logic. This means an entity must match all of those specified filters to be included in your results. | To find all AWS EC2 Instances that are running AND in production: AWS EC2 Instance + Status is Running + Labels is Production (This query returns only running EC2 instances that are tagged as in Production.) |
| Or Logic | To broaden your search, use Or logic. Choosing this allows you to define an alternative set of filters. Your query will then return entities that match either the first set of conditions OR the alternative set you define. | To find AWS S3 Buckets that are either publicly accessible OR not encrypted: AWS S3 Bucket + (Access Level is Public + OR + Encrypted equals False) (This query returns S3 buckets that are publicly accessible, or not encrypted, or both.) |
| Of Type Logic | The Of Type operator refines a query on a generic object by filtering for a more specific resource type. This allows you to select properties that are unique to that specific resource type. | To find all Virtual Machines that are specifically of the AWS EC2 Instance type and have a public network exposure: Virtual Machine + Of Type + AWS EC2 Instance + Network Exposure is Public (This query returns only AWS EC2 instances that match the specified criteria, even though you started with the broader "Virtual Machine" resource.) |
| Not Logic | The Not operator allows you to exclude entities that meet specific criteria. Choosing this allows you to invert the logic for the filters or groups of filters that immediately follow it. Your query will only return entities that do not satisfy the conditions specified after the Not operator. | To find virtual machines that are NOT labeled as Privileged: Virtual Machine + NOT + Labels is Privileged (This query returns Virtual Machines that do not have the Privileged label.) |
| Complex Queries | By combining And (implicit), Or, and Not operators, you can create highly specific or broad queries to pinpoint exactly what you need. | To find virtual machines that are NOT a webserver with direct internet exposure OR a Windows machine with an Inactive label: Virtual Machine + NOT + OR ( Name contains webserver + Network Exposure is Internet (direct) + Operating System Type is Windows + Labels is Inactive). (This query returns virtual machines that are neither publicly exposed web servers NOR inactive Windows machines.) |
Add Relationships
The ability to query relationships between objects is at the heart of the Explorer. You can build powerful queries by leveraging these connections in two distinct ways:
Use Relationship Filters
This method allows you to find entities based on a specific property of a related object. When using this method, you are still querying a single object type, but you are filtering it based on its connections. You can add any number of relationship filters to your query to precisely narrow down your search.
Example query - Find all identities that have a critical finding:
- Select Identity as your primary object.
- Add a relationship filter and select has Finding.
- Within the has Finding filter, add a nested condition for Severity and select Critical.
Create a Join
This method allows you to combine data from two different object types into a single result set, with each row displaying a unique combination of data from the joined objects. You can add up to ten joins to a single query to create highly complex and detailed result sets. You can add multiple joins in parallel (multiple joins branching off the same object) or linearly (joins branching off subsequent joined objects).
Example query - Find all findings and their associated identities that have a critical finding:
- By using a Join, your query will return a single table with combined information. In this example, each row will display a unique combination of an Identity and a Finding that meets your criteria, showing data from both objects simultaneously.
- You can toggle the Join to a Left Join, which will return all results from the primary object (on the left side of the query) even if there is no matching data in the joined object. This is useful for seeing a complete list of all items from the primary object.
- Select Identity as your primary object.
- To the right of the selected object, click + (Add filter).
- In the Relations section, search or scroll to find the relevant relationship. For example, related to Finding.
- Next to the relationship, click the inline Join button.
- Within the joined Finding object, add a nested condition for Severity and select Critical.
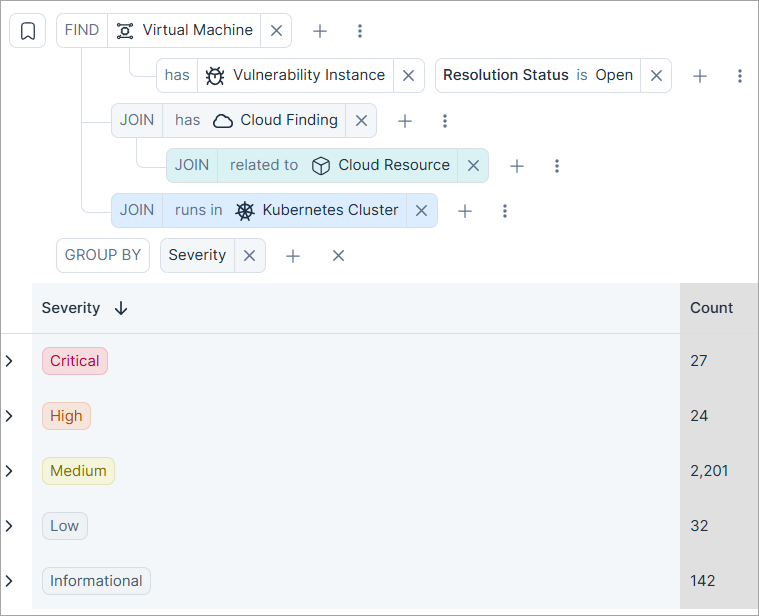
Aggregate Results with Group By
Summarize query data by specific properties, displaying results as counts in a simplified table view. For example, you can group a finding-related query by Severity to see a breakdown of results by severity level.
- Click the three dots icon next to the root entity and select Group by. A GROUP BY element is added to the bottom of the query.
-
Next to the GROUP BY element, click the + (Add) button and select the grouping target. You can choose to group data by the root entity or any joined objects.
Save a Query
After building or modifying a query in Explore > Explorer, you can save it for future reuse.
Changes you make to a saved query remain temporary until you save it.
To save a query:
-
Select Save or Save as:
- Save updates the current custom query. Save is disabled for built-in queries.
- Save as creates a new custom query.
-
In the Save Query window, enter:
- Name
- Category
-
Visibility:
- Public — Visible to everyone in the organization.
- Private — Visible only to you.
-
Monitor Query:
Monitor — Tenable captures a daily snapshot of query results starting from when you enable monitoring, enabling trend tracking and widgets on the query profile.
Note: To monitor a query, it must be Public and have no joins or group properties.- Don't Monitor (default)
- Click Save. They can later be managed in the Queries page.
Query Widgets
Monitored queries display historical data as widgets on the query profile, viewable in Explore > Queries. Widgets are also available in the widget bank for use in custom dashboards.
Edit a Query
Update the name, category, or visibility of a custom query directly from the Explorer page.
To edit a query:
- In Explore > Explorer, open the custom query you want to modify.
- Click the three dots icon next to the query name at the top of the page, and then click Edit.
-
In the Edit Query window, you can update:
- Name
- Category
- Visibility — Switch between Private (visible only to you) and Public (visible to the organization).
- Click Save.
Create a Custom Policy from Query
Convert a query into a custom policy, to transform an ad-hoc search into automated security monitoring. For example, create a policy for tracking publicly exposed EC2 instances with Sensitive tags.
Query-based policies let you:
- Assign names, descriptions, and custom remediation steps (including external links) to provide clear guidance for security teams.
- Improve remediation workflows by defining your unique environment constraints and avoiding the need for manual report sharing to resolve issues.
To create a custom policy from a query:
- In the Console, navigate to Explore > Explorer.
- (Optional) Select a scope in the Organization drop-down.
- Select an existing query, or create a new one. See Supported Objects for more information.
- Click Add > Custom Policy. The Add Custom Policy screen opens.
- Enter a meaningful Name and Description (Optional).
- Assign the policy a Severity, which determines the severity level of any findings triggered by the policy.
- (Optional) Enter custom Remediation steps to provide clear guidance for security teams.
- (Optional) Fine-tune your selected query, if needed, from the query editor.
- Click Save.
Supported Objects
You can create custom policies from queries for:
- Single-resource queries
- Cloud resources
Queries using the Join operator or targeting non-cloud entities, such as risks and policies, are not supported. The following objects are currently not supported:
| Category | Objects |
|---|---|
| Applications | Software Software Instance |
| Data | Data Object Data Type Database Table File |
| IAM | AWS Federated Permission |
| Network | Network Endpoint |
| Policies | Policy |
| Risks | Cloud Finding IaC Finding Vulnerability Instance |
Create a Report from Query Data
Beyond manual exports, you can transform your investigation results into automated reports for continuous monitoring.
To create a report from query data:
- In the Console, navigate to Explore > Explorer.
- (Optional) Select a scope in the Organization drop-down.
- Create your query, as relevant.
- Use the Column Picker to select the data that's included in the export.
- Click Add > Report. The Create Report screen opens.
- Enter a meaningful Name.
- Delivery time:
- Now — Generate a one-time report.
- Schedule — Define a cadence to generate a report at a specific time on either a daily, weekly or monthly basis.
- Add Delivery Method to send a copy of the report to specific recipients. See Slack or Teams for more information.
Email address
Note: When sending reports via email, the file size limit is 14.5MB. Larger reports are compressed or provided via a download link.- Slack channels
- Teams channels
- Click Create or Schedule.
Create a Finding Automation from a Query
Convert any finding-based query into a permanent rule by creating an automation.
- In the Console, navigate to Explore > Explorer.
- (Optional) Select a scope in the Organization drop-down.
- Create your query, as relevant.
- Click Add > Finding Automation. The Create Finding Automation page opens.
- Configure automation settings (Left pane):
- Enter a Name and Description (optional) that accurately describes the automation rule.
- Status: Select either Enabled or Disabled.
- Type: Define the type of findings this rule targets.
- Cloud Findings
- IaC Findings
- Query:
- Link to existing query — The automation stays synced with the original query. Once linked, the query cannot be deleted, made private, or edited with unsupported syntax.
- Standalone query — Create an independent copy or write from scratch.
- Select the Target Scopes for which you want to trigger the automation. Select an entire folder to trigger automations for all existing and future accounts within the folder.
Choose whether to apply to existing findings. Enabling this applies the automation to all current findings in the system, in addition to any new findings detected moving forward.
Note: This option is only available when creating a new finding automation, or if the automation was previously disabled.Delivery: Click Add Method to configure where you want to send notifications to. You must first integrate with third-party tools for a specific delivery method to appear in the integrations list (except for Email address, which appears automatically).
 Email address
Select Static to send to a fixed email list, or Dynamic by Owner to notify the resource owners. Sending to resource owners may include numerous recipients. For example, if the owner is a group with no associated email address, Tenable sends an email to all group members.
Slack channelsSelect Static to send to fixed channels, or Dynamic by Owner to notify the resource owners directly. This may include numerous recipients.
Teams channelsSelect Static to send to fixed channels, or Dynamic by Owner to notify the resource owners directly. This may include numerous recipients.
JiraEnable the integration, and then select a Project, Issue Type, Assignee (optional), Labels, Epic (optional), and Environment (URL of Jira instance). For labels, you can either choose from a list of labels already configured in the Jira instance, or manually add new labels, which will be sent to Jira. Label names can't contain spaces.
ServiceNowEnable the integration, and then select an Instance and Assignee.
Datadog organizations
QRadar servers
SQS queues
Splunk event collectors
Webhooks
- Click Create.
Export Query Data
You can export the results of any custom query to a CSV file for offline analysis, reporting, or sharing. This feature allows you to capture a complete snapshot of your query data based on your current view. The export will include all data for the columns that are currently selected and displayed on the page, ensuring that the exported file is tailored to your specific view. There is no limit to the number of rows you can export.
To export query data:
- In the Console, navigate to Explore > Explorer.
- (Optional) Select a scope in the Organization drop-down.
- Create your query, as relevant.
- Use the Column Picker to select the data that's included in the export.
- Click Export
 .
Display Query Results
Query results can be viewed in two formats: Table or Graph. Use the toggle  in the top-right corner of the results area to switch between views.
Table View
The table view displays query results in a structured, column-based layout. The columns automatically adjust based on the objects in your query.
You can add or remove columns to control which data appears in the table.
To customize columns:
- Run a query.
- Click the Column Picker
 .
-
Choose the columns you want to display.
- If you are using a Join, multiple objects appear in the column picker. Click to expand each one and then choose the columns.
- (Optional) Click to select all columns for a given object.
If you export query results, the CSV includes only the columns currently selected.
Graph View
The graph view visualizes the objects returned by your query and the relationships between them. This makes it easier to understand how resources connect, depend on each other, or relate through findings, identities, or configurations.
You can interact with the graph to explore the data structure:
- Drag nodes to reposition them
- Expand or collapse relationship branches (when available).
- Use the left-side controls to zoom, reset, or enter fullscreen.
To change how the graph is arranged, use Change layout and select one of the available visualization styles:
- Sequential — Arranges nodes in a clear top-to-bottom or left-to-right flow. Good for hierarchical paths.
- Organic — Spreads nodes evenly to reduce overlap. Good for exploring general relationships.
- Lens — Pushes highly connected nodes to the center and less connected ones outward. Highlights hubs in a network.
- Structural — Groups nodes with similar connections. Useful for spotting clusters or patterns.
Each layout provides a different way to organize nodes, making it easier to focus on the relationships that matter.
Sample Queries
The following sample queries provide a starting point for leveraging the full power of Unified Explorer. Use these examples to understand how to combine properties and operators to solve common security challenges and build your own custom queries.
Query for Findings That Violate Compliance Standards
Identify findings that violate a specific compliance standard. For example, query for all open cloud findings with critical severity that violate the SOC2 Type II standard.
Build the query:
- Start by selecting Cloud Finding to query across all cloud findings in your environment.
- Click the three dots to Add group.
- In the new group, add a filter for Severity and choose Critical.
- Add a filter for Status and choose Open.
- Add a relationship filter to find only those findings that are related to a Cloud Resource.
- Click JOIN and select violates Compliance.
- In the JOIN, add a filter for System ID and choose the relevant standard/s.
Query for Public-Facing Virtual Machines
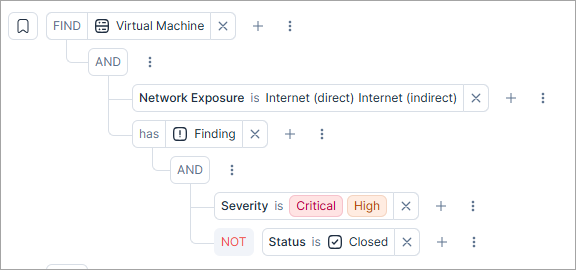
You can use this query to find virtual machines with public-facing risks that require immediate attention.
Build the query:
- Start by selecting Virtual Machine to query across all virtual machines in your environment.
- Add a filter for Network Exposure to include Internet (direct) and Internet (indirect).
- Add a relationship filter to find only those VMs that have an associated Finding.
-
Click Add group and use the And operator to apply a set of conditions specifically to the finding itself. In this nested group, filter by:
- Severity to include Critical and High findings.
- Status and select Closed findings, and apply the Not operator to exclude them.
Query for Resources with Inactive Owners
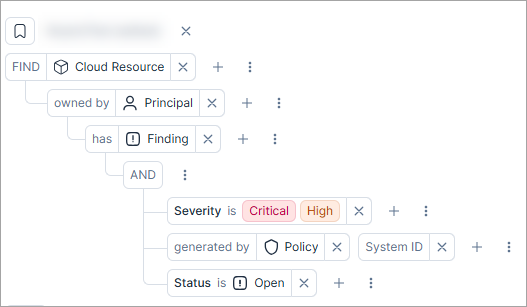
Find cloud resources with open, high/critical severity findings that are owned by a user linked to an inactivity policy.
Build the query:
- Start by selecting Cloud Resource to query across all cloud resource types in your environment. See Generic vs Platform-Specific Objects to learn more.
- Add a relationship filter to find resources that are owned by a Principal. A principal in this context represents the Resource Owner.
- Add a second relationship filter to find resources that have an associated finding.
-
Click Add group and use the And operator to apply a set of conditions specifically to the finding itself. In this nested group, filter by:
- Severity to include Critical and High findings.
- Findings that are generated by an inactivity-related Policy. To narrow the list of policies, you can use the System ID (or Search Policy) property to select specific policies.
- Status to include only Open findings.
Reference: Finding Properties
You can filter findings by the following properties:
| Property | Description |
|---|---|
| Ignore Expiration Date | When a finding is manually ignored, you can set a duration for how long it will be ignored. This duration can be permanent or "Until" a specified date (e.g., 1, 7, 30, or 90 days, or a custom date). If an ignored finding reaches its expiration date, its status transitions back to Open |
| Open Time | This property indicates when a finding was last opened. It provides clear visibility into when findings were, for example, reopened or unignored. |
| Severity | The risk level assigned to a finding, indicating the immediacy of action required. Possible values: Critical, High, Medium, Low, Informational |
| Starred | You can star important or significant findings to mark them for later review. |
| Status | The primary status of a finding, which helps you understand its overall state and progress. Possible values: Open, Ignored, Closed. |
| Status Update Time | The last time the finding status was updated. |
| Sub-Status | Provides added granularity to a finding's main status, describing the specific reason for that status. See Finding Status for more information. |
| System ID | The unique ID of the finding in AI Exposure. |
FAQ
What are "objects" in the Explorer page, and what is the difference between "Generic" and "Platform-Specific" objects?
Every query in the Explorer page starts with an object, which represents a resource type (like a virtual machine) or a policy that you want to explore. To learn more about different object types, see Generic vs Platform-Specific Objects.
What are "relationship filters" and "joins," and how do they differ in the query results?
These are two powerful ways to query relationships between objects. See Add Relationships to learn more.
Can I track how query results change over time?
Yes. When you Save a Query, you can enable monitoring to capture daily snapshots of results. Monitored queries display historical trend data as widgets on the query profile.