Cloud Findings
This is a how-to guide for viewing and managing cloud findings.
- For a conceptual overview of finding statuses and the finding lifecycle, see Finding Lifecycle.
- For a conceptual overview of how finding severity works, see Finding Severity.
- To configure how findings are created, see Cloud Policies.
Use the Cloud Findings page to effectively and efficiently perform a triage of findings in your cloud accounts. For example, you can:
- Discover and remediate critical findings in your production environment
- Discover and remediate public S3 buckets
- Discover and remediate findings that fail specific compliance standards
Navigate the Findings Page
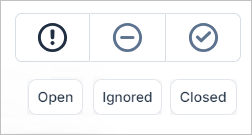
View findings from the Findings pages, grouped according to their current status:
- Open — See all active findings in your environment.
- Ignored — See findings that you may not want to handle right away. The associated resources are being excluded, either permanently, or for a set period of time.
- Closed — See findings that were closed, either manually or automatically by Tenable.
This image highlights the main navigational elements available on the Findings page, which allow you to narrow down and organize the results to easily find what you’re looking for.
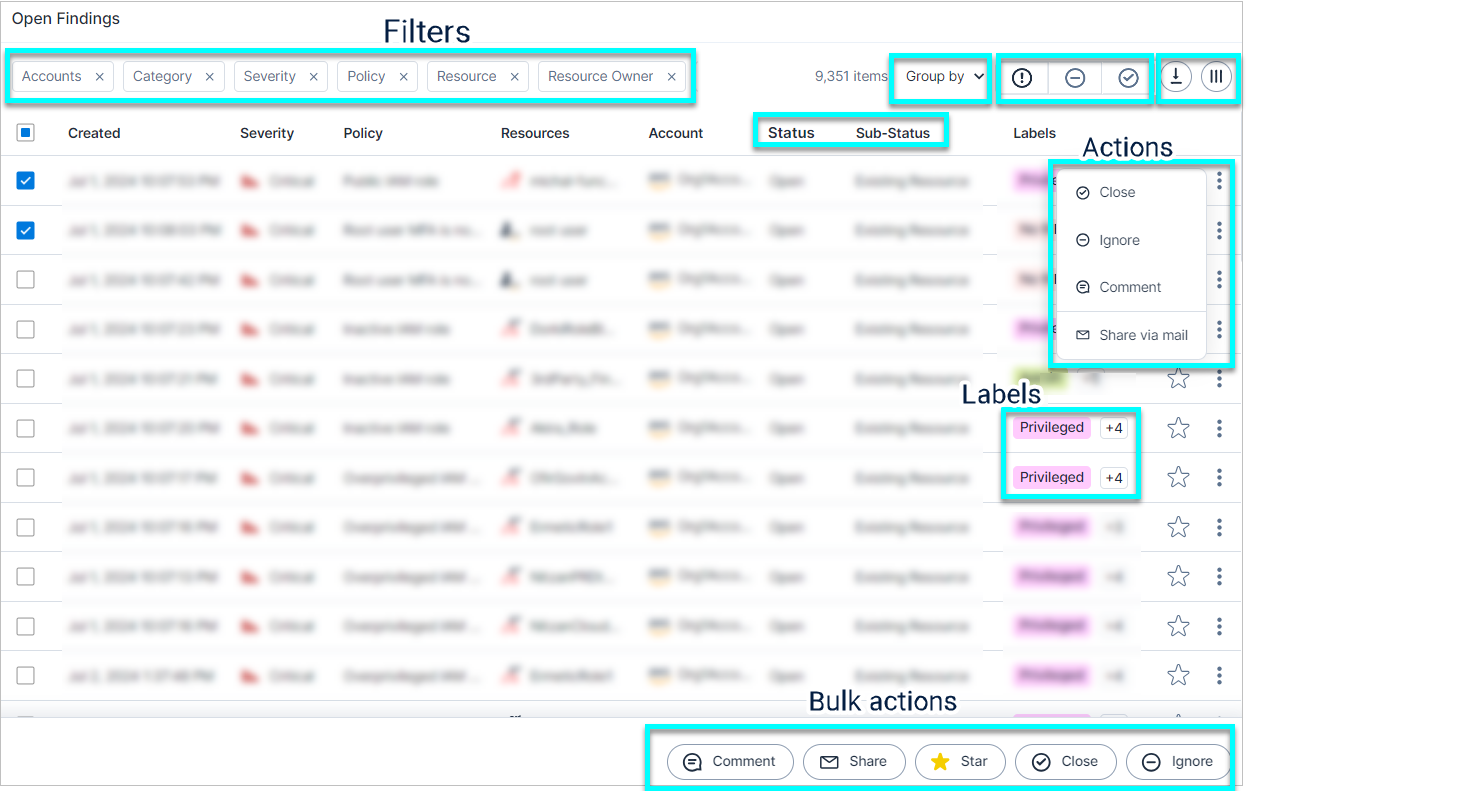
| Item | Description |
|---|---|
View by Status  |
View Open, Ignored, or Closed findings. |
| Severity | The color-coded risk severity of the finding, used to filter findings in the default view (when Group by is not applied). |
| Status / Sub-Status column/filter | See Finding Lifecycle for more information. |
| Select all | Select all findings (according to any applied filters), making it easier to perform bulk actions. For example, if you want to ignore or manually close a certain group of findings. Limited to 10,000 findings. |
| Filters |
Available filters differ slightly for each page, but include:
|
| Group by |
Group findings by:
For both filters, grouped findings are listed in order of the percentage of severe findings they contain. For example, a group of findings, of which 75% percent have critical severity, is listed before a group of findings, of which 100% have high severity. |
| Labels | Labels that were applied to a resource associated with the finding are propagated to the finding. Note: OOTB system labels that directly reflect the finding type aren't propagated to the finding, to avoid duplication. For example, an “Overprivileged IAM role” finding doesn't receive the Excessive or Privileged labels, even if they were applied to the associated resource. |
| Star | Star important or significant findings to help you remember to look at them later. |
| Actions |
|
| Bulk actions | Apply an action to multiple findings at once. |
| Export | Export the map data to a CSV for analysis or processing by an external tool. |
| Column picker | Choose which columns to display in the table. |
Export Finding Data
Export finding data to create a summary report of findings in your environment. The data is exported according to the current filters applied to the table. The output data is in CSV format, and contains all relevant finding data, including remediation steps.
For example, you can:
- Create a report of all closed findings, containing sub-status information about the reason for closure (for example, Resource Deleted), to share with relevant stakeholders in your company.
- Create reports for open/starred/ignored findings, or any other subset of findings (using filters).
To create a report of findings:
- In the Tenable One Cloud Exposure Console, navigate to the relevant Risks > Cloud Findings page (Open/Ignored/Closed).
- (Optional) Apply any additional filters to narrow down the list of findings according to your needs.
-
To export data for specific finding types that contain additional, non-standard information:
- Click the Group by dropdown, and then click Policy.
- Click on a relevant type to expand the section. For example Overprivileged IAM group.
- Click the Export button on the top right of the section.
- Click
 Export. A CSV summary report is created.
Create a Scheduled Report
Create a scheduled report directly from the Findings page, where the report contents are based on the specific filters you apply to the table. The output data is in CSV format, and contains all relevant resource data, including the URL of each resource page in the Cloud Exposure Console.
To create a scheduled report:
- In the Cloud Exposure Console, click on Risks > Cloud Findings.
- Apply any relevant filters.
- From the top-right corner of the table, click the Create Scheduled Report button.
- Fill out report details. See Reports for more information.
- Click Schedule or Generate.
- You can see the report details in the Reports page.
Ignore a Finding
Ignore open findings to exclude resources from the policy, either permanently or for a set period of time. For example, you may want to push off an existing finding to a later date if you don’t want it to appear on the Open Findings page now, but want to track it for later. When the date arrives, the finding status returns to Open.
Findings are ignored once they are targeted by an Exclusion. In the Findings page, you can ignore findings by:
- Creating a new exclusion that specifically targets those findings.
- Adding the findings to an existing exclusion.
Adding findings to a new or existing exclusion takes effect immediately. The targeted findings are ignored immediately.
Note: Before creating a new exclusion on the Findings page, check if the finding can be added to an existing exclusion or if it’s better to create one on the Exclusions page.
Exclusions created from the Findings page are reactive and focus on individual findings. Use this method only for quick, limited adjustments to avoid inconsistent coverage or duplicate exclusions. To scale your coverage, learn how to create pattern-based exclusions.
To add findings to a new or existing exclusion:
- Go to Risks › Cloud Findings or IaC Findings > Open.
-
From the Findings table:
- Single finding: Click the three-dot icon next to it and select Ignore.
- Multiple findings: Select the relevant findings and click Ignore at the bottom. You can ignore findings in bulk only if they belong to the same policy.
-
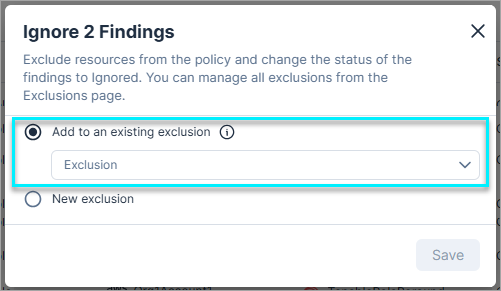
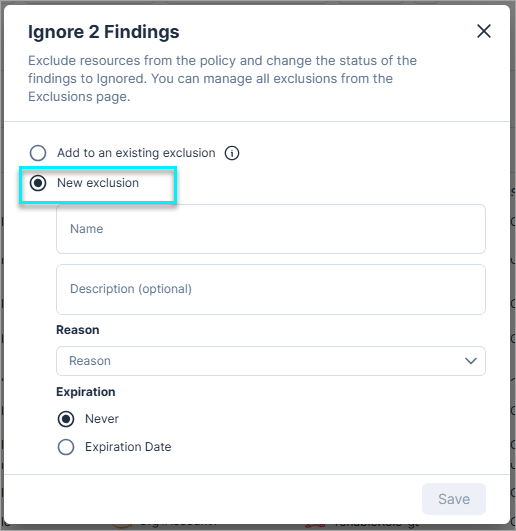
In the Ignore Findings dialog, choose:
Add to an existing exclusion.
- The dropdown lists only exclusions that already apply to the same policy and scope. If there no exclusions, you can create a new exclusion from the Exclusions page for them.
- If none qualify, the option is disabled. See Rules for Adding to an Existing Exclusion.
New exclusion — Keep in mind, the action for the exclusion is Ignore. You cannot change the finding's severity from the Findings page.
- Enter a Name such as Dev1 Lab public EC2s.
- Add a Description explaining the purpose. For example, Publicly accessible test instances used by QA.
- Select the reason for ignoring the finding: Exception, By design, or False positive
- In Expiration, select either No expiration or a specific end date. When an exclusion expires, it no longer applies to findings in subsequent scan cycles.
- Click Save.
Changes from the Findings page apply immediately. The ignored findings appear under Ignored Findings with their defined sub-status (reason).
Unignore a Finding
Ignored findings are suppressed by an exclusion. If there are findings that should no longer be ignored, the associated exclusion can be reviewed and updated. This can be done directly from the Findings page or from the Exclusions page. Learn how to audit and maintain exclusions.
To unignore findings:
- Go to Risks › Cloud Findings or IaC Findings.
- Click the Ignored tab.
- Find one of the ignored finding you want to unignore.
- Click the three-dot icon next to it and select Manage Exclusions.
- On the Edit Exclusion page, update the exclusion so it no longer targets the findings.
- Save the exclusion.
Manually Close a Finding
When you remediate a finding, and solve the underlying security issue, the finding is automatically marked as Closed (Fixed) in the Cloud Exposure Console. In some cases, however, you may want to manually close an open or ignored finding. For example:
- Since the automatic identification and marking of a finding as Resolved can take a while, you can choose to resolve the finding manually, to remove it from the Findings page sooner.
- Some finding types are never automatically marked as resolved by Cloud Exposure (for a complete list, see Finding Types That Don't Auto-Resolve). This is true for findings that serve primarily as alerts, such as anomaly findings. Due to the unique nature of anomaly findings, they cannot be traditionally remediated within Tenable like most other findings. Instead, you can manually mark them as resolved after investigating whether or not they represent a real threat to your environment.
When you manually close a finding, the finding is marked as Closed (Manually closed). If you do this, but the issue has not actually been fixed, the finding status is reverted to Open (Reopened) the next time the system synchronizes.
To mark and see closed findings:
-
From the Findings table:
- Single finding: Click on the three dots icon next to an individual finding, and then click Close.
- Multiple findings: Select multiple findings and then click Close at the bottom.
- In the Close Finding dialog, add a comment to indicate the reason for closing, which is added to the finding activity.
- Click Close.
- To see all closed findings, navigate to Findings > Closed.
Reopen a Finding
You can reopen a finding that was manually closed. If you do so, the finding is marked as Open (Reopened)
To reopen a finding:
-
From the Findings table:
- Single finding: Click on the three dots icon next to an individual finding, and then click Open.
- Multiple findings: Select multiple findings and then click Open at the bottom.
- In the Open Finding dialog, add a comment to indicate the reason for reopening, which will be added to the finding activity.
- Click Open.
- To see all reopened findings, navigate to Findings > Open, and then filter the Sub-Status by Reopened.
Trigger Actions Based on Findings
In addition to creating rules that automate the process of sending push notifications to third party tools, you can also manually trigger actions associated with ticketing Integrations and/or send email notifications for individual findings.
When you send a notification, you can include a copy of any revised policy suggestions (according to the remediation steps) in JSON, Terraform, or CloudFormation format so that your developers can manually apply them to your code. This is especially useful in infrastructure as code (IaC) workflows, where a remediation automatically performed by Cloud Exposure may be overwritten by developer code. Attaching revised policy suggestions allows you to directly implement Tenable's recommendations in a way that works for your coding environment.
Required Cloud Exposure User Role: You must have either the Collaborator or Administrator role in Cloud Exposure to perform this action. See Users and Groups for more information.
Trigger an Action for a Single Finding
To manually trigger an action for a single finding:
- In the Cloud Exposure Console, navigate to the Risk > Cloud Findings or Risk > IaC Findings page.
-
Click the three dots menu icon next to the finding and select the relevant action:
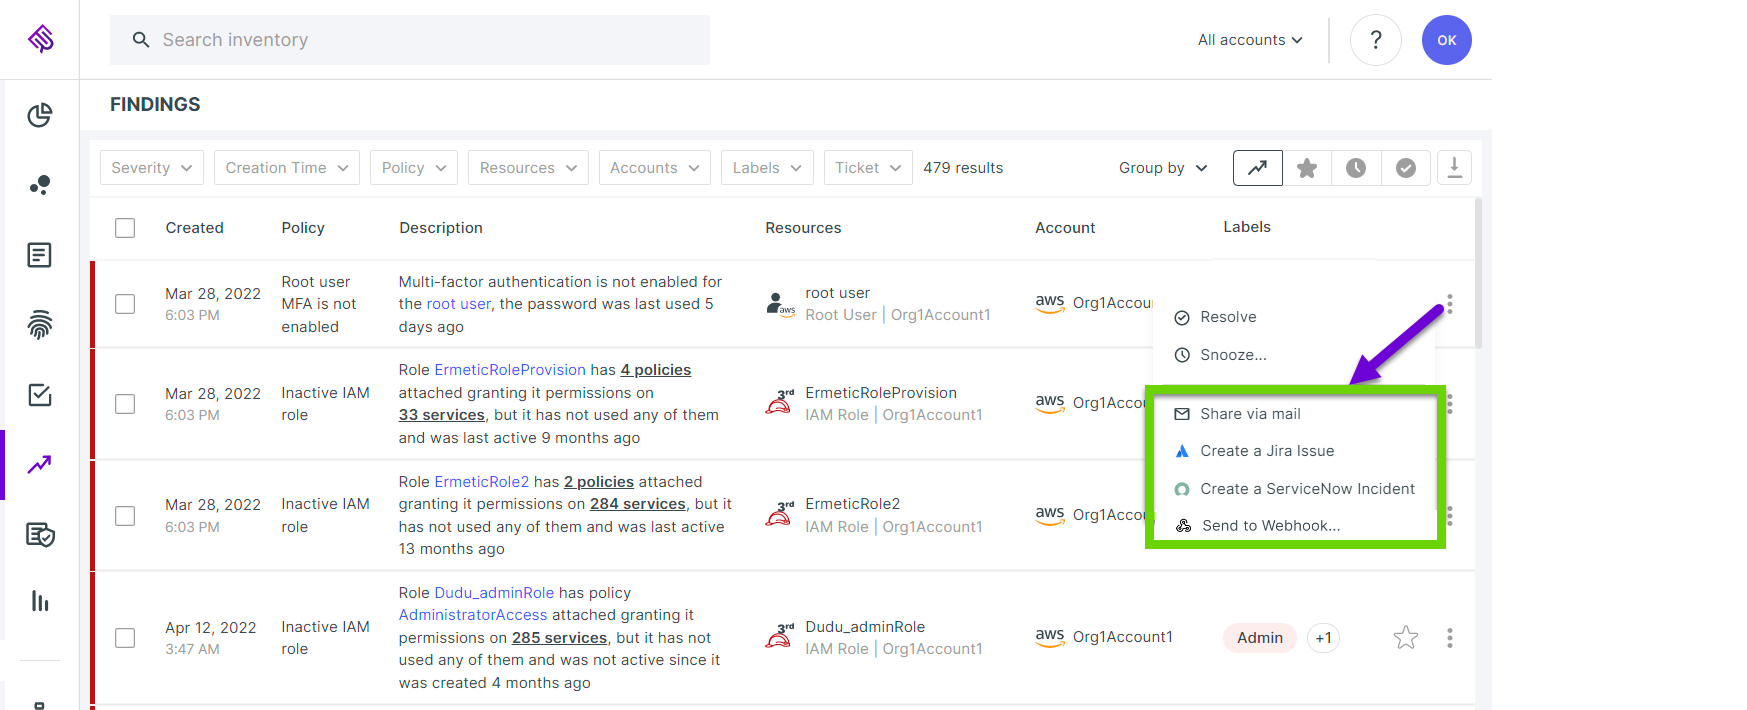
(Click the
 icon below for instructions, per action)
 Share via email
- Enter one or more email addresses. You can also choose to send finding information to any owners of the associated resources. This may include numerous recipients. For example, if the owner is a group with no associated email address, Tenable sends an email to all group members.
- (Optional) Enter a message to the recipient/s.
- Click Send.
Create a Jira issue
- Select a Project, Issue Type, Assignee (optional), Labels, Epic (optional), and Environment (URL of Jira instance). The Project you select determines which values are available in the other field dropdowns. For labels, you can either choose from a list of labels already configured in the Jira instance, or manually add new labels, which will be sent to Jira. Label names can't contain spaces.
- (Optional) Edit the predefined content in the Summary and/or Description fields.
- (Optional) Click Add Optional Field to include non-mandatory data like labels, assignees, or epics.
- (Optional) Add attachments to include a copy of any revised policy suggestions (according to the remediation steps) in JSON, Terraform, or CloudFormation format.
- Click Create Issue.
Create a ServiceNow Incident
- Select an Instance and an Assignee.
- Select an Impact and Urgency for the incident.
- (Optional) Edit the predefined content in the Summary and/or Description fields.
- (Optional) Add attachments to include a copy of any revised policy suggestions (according to the remediation steps) in JSON, Terraform, or CloudFormation format.
- Click Create Incident.
Send to Webhook
- If you have more than one webhook configured, select the webhook that you want to send the finding to.
- Click Yes to confirm.
Trigger an Action for Multiple Findings
Manually trigger an action for multiple findings. For Jira/ServiceNow, you can choose whether to:
- Create a single, unified ticket which includes all selected findings
-
Create separate tickets, one per selected finding
Note: When you trigger multiple Jira issues or ServiceNow incidents at once, you can’t edit the summary or description fields. Each issue/incident will contain the default summary/description provided by Cloud Exposure.
To manually trigger an action for multiple findings:
- In the Cloud Exposure Console, navigate to the Risk > Cloud Findings or Risk > IaC Findings page.
-
Select the checkboxes next to the findings that you want to trigger an action for.
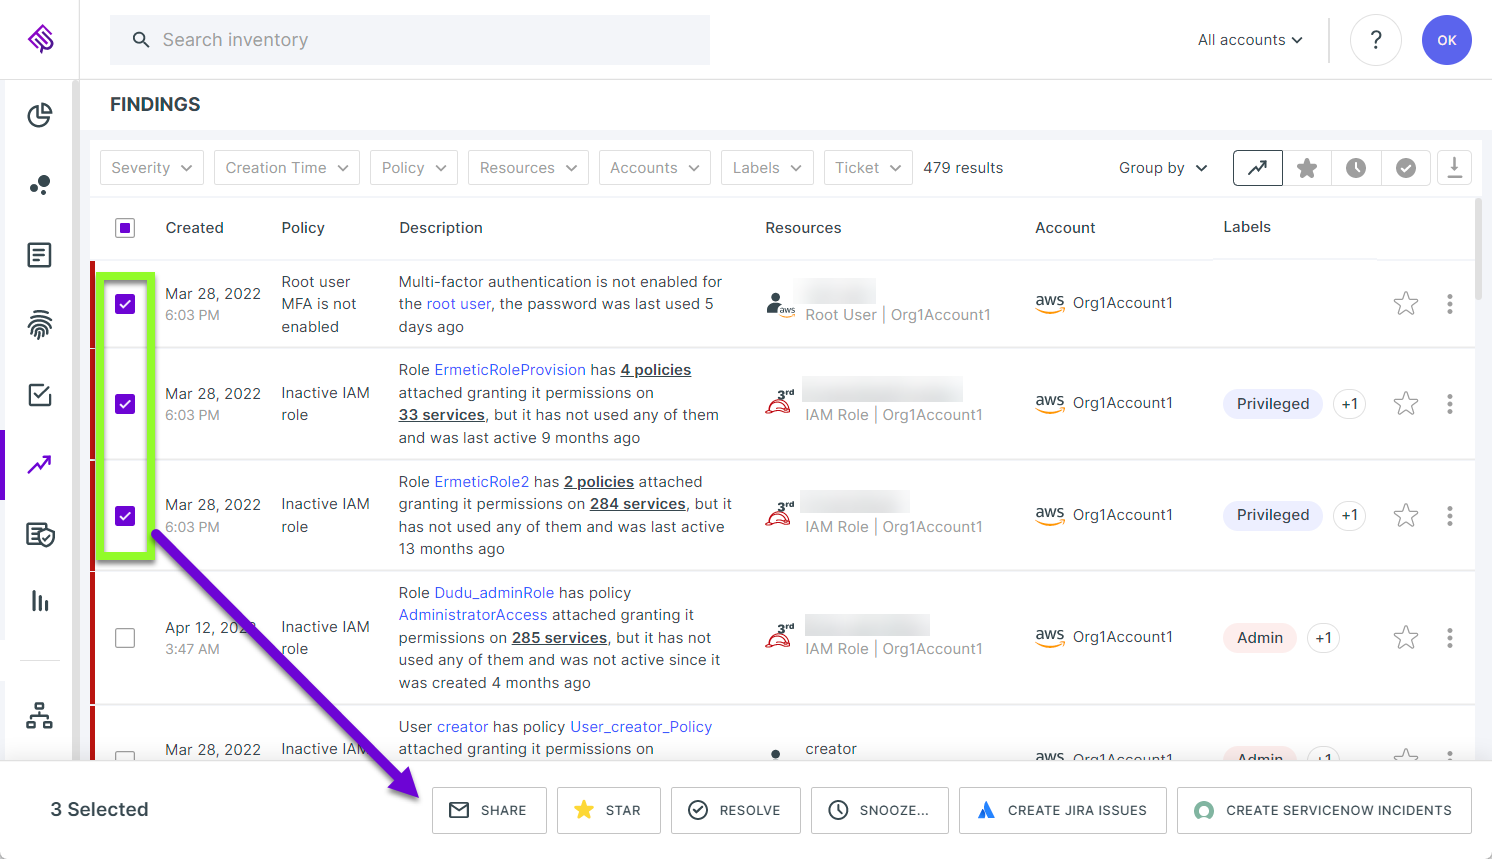
-
From the bottom menu panel that appears, select the relevant action:
- Send to Webhook
- If you have more than one webhook configured, select the webhook that you want to send the findings to.
- Click Yes to confirm.
- Share via email
- Enter one or more email addresses. You can also choose to send finding information to any owners of the associated resources. This may include numerous recipients. For example, if the owner is a group with no associated email address, Tenable sends an email to all group members.
- (Optional) Enter a message to the recipient/s.
- Click Send.
- Create Jira issues
-
Choose whether to:
- Create a unified Jira issue which includes all findings
- Create separate Jira issues, one per finding
- Select a Project, Issue Type, Assignee, Epic (optional), Environment (URL of Jira instance), and Labels. The Project you select determines which values are available in the other field dropdowns.
- (Optional) Click Add Optional Field to include non-mandatory data like labels, assignees, or epics.
- Click Create Issue/s.
-
Choose whether to:
- Create ServiceNow incidents
-
Choose whether to:
- Create a unified ServiceNow issue which includes all findings
- Create separate ServiceNow issues, one per finding
- Select an Instance and an Assignee.
- Select an Impact and Urgency for the incident.
- Click Create Incident/s.
-
Choose whether to:
- Send to Webhook
Track Jira and ServiceNow Tickets
When you connect your ticketing Integrations (Jira, ServiceNow) and create automation rules to streamline remediation workflows, external tickets are created in those systems. You can easily track these external tickets directly from the Findings page.
This integrated view streamlines your incident management, improves collaboration with your operations teams, and enhances traceability by providing direct access to external tickets linked to your security findings.
To track external tickets:
- In the Cloud Exposure Console, click on Risk > Cloud Findings.
-
Navigate to the Open, Ignored, or Closed Findings page, as relevant.
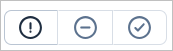
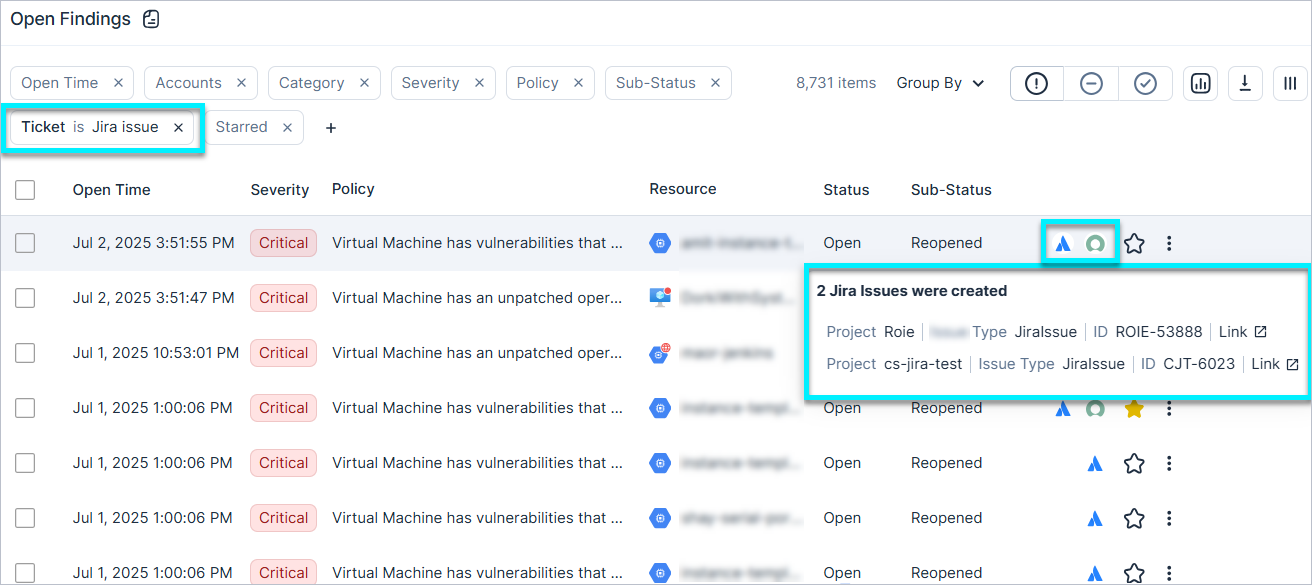
- In the Ticket Type filter, select one or more of the following to filter the table by findings that have tickets: Jira work item, ServiceNow incident, Azure Boards work item, or External ticket.
- (Optional) To narrow your search, apply any other filters, as needed.
- Hover over the ticket icon in the Tickets column next to the relevant finding to see the ticket details. For an external ticket, the details include the ticket ID and a link to the URL you entered.
Link External Tickets to Findings
Link a ticket from any ticketing system to a finding by entering the ticket ID and URL. Use this when you cannot connect a native ticketing integration, or when Cloud Exposure does not integrate with your ticketing system.
To link an external ticket to a finding:
- In the Cloud Exposure Console, click Risk > Cloud Findings.
- Click the relevant finding.
- In the slide-out panel, click the three dots icon, and then click Link external ticket.
- In the ID box, type the ticket ID.
- In the URL box, type the ticket URL.
- Click Link.
You can link more than one ticket to a finding. To link the same ticket to more than one finding, repeat these steps for each finding with the same ID and URL.
To unlink an external ticket from a finding:
- In the Cloud Exposure Console, click Risk > Cloud Findings.
- Click the relevant finding.
- In the slide-out panel, click the three dots icon, and then click Unlink external ticket.
You cannot edit a linked ticket. To change the ID or URL, unlink the ticket, and then link it again with the correct details.
View Finding Details
Click on a finding to view granular information about it and to remediate risk associated with it. View a detailed historical account of the event, an expanded rationale for the potential risk it imposes, and specific remediation instructions. Each finding displays different information depending on the finding type, and the specific circumstances that triggered its creation.
Review finding details and other relevant information to get a better understanding of, for example:
- What the root cause of the finding is.
- The scope of the finding.
- The potential risk it imposes on your environment.
- An explanation of the severity of the finding.
Exclude Secrets from Findings
Exclude secrets from findings to address detected false positives. Secrets are typically represented as pairs of keys and values, where either the key or the value may contain sensitive information.
By entering a pattern, you can exclude a specific secret from triggering a finding. If the pattern matches the secret, Cloud Exposure will exclude the secret. For example, use the value pattern https://* to exclude any URLs that were mistakenly flagged as secrets.
This option is available for findings related to exposing secrets. For example, CloudFormation stack is exposing secrets.
To exclude secrets from a finding:
- In the Cloud Exposure Console, click Risk > Cloud Findings.
- Click on the relevant finding to open it.
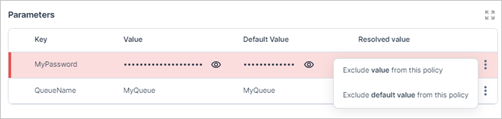
- On the Overview page, identify the secret you want to exclude. Secrets are highlighted in red. You can mask secrets to keep them hidden.
-
Click on the three dots icon and then click Exclude value/default from this policy.

-
Enter a Key Pattern and Value Pattern. These fields are automatically populated with the current key/value. You can use the following wildcard characters in the pattern:
- Asterisk * - Matches zero or more characters
- Question mark ? - Matches a single character
- (Optional) Add a Comment.
- Choose whether or not to Ignore case (treat upper- and lower-case letters the same).
- Click Exclude.
View and Manage Excluded Secrets
After excluding a secret from a finding, you may want to review or manage all excluded secrets for a given policy. You can do this directly from the Policies page by accessing the Secret Exclusion tab inside the relevant policy.
To view excluded secrets for a policy:
- In the Cloud Exposure Console, click Policies > Cloud Policies.
- Select the relevant account scope from the Organization tree dropdown.
- Locate the policy you want to review.
- Click the three dots menu icon next to the policy, and then Edit.
- In the policy editor, click the Secret Exclusion tab.
-
Review the list of excluded secrets for that policy. You can:
- View key/value patterns, comments, and manage or remove exclusions as needed.
- Mask secrets to keep them hidden.
View Source Code

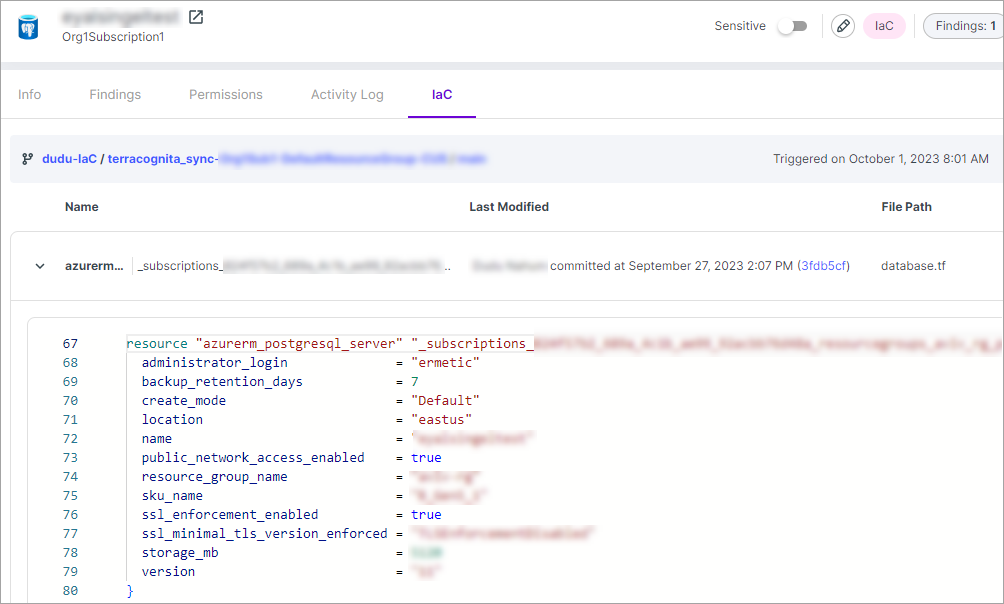
Cloud Exposure applies the IaC built-in label to findings related to resources that are detected as being managed by code in one your repositories. For such findings, you can click the IaC tab to see the relevant code snippet and trace the resource back to its code origins.
To view resource source code:
- In the Cloud Exposure Console, click on Risk > Cloud Findings.
- From the Label filter, select IaC, along with any other relevant filters. See Navigate the Findings Page for more information.
- Click to open a relevant finding, and analyze any pertinent information.
-
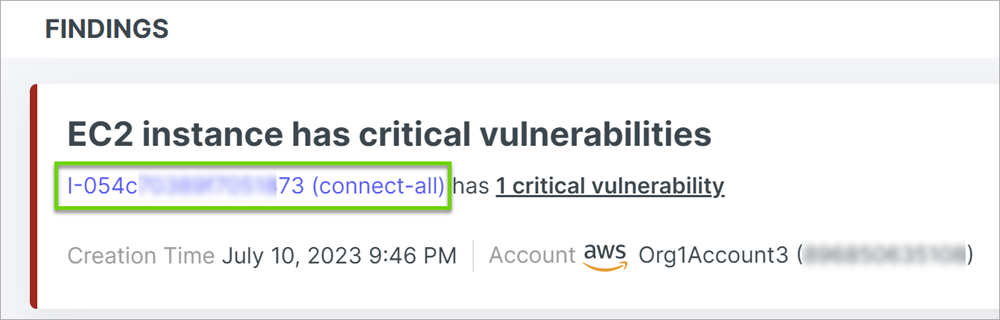
Underneath the finding title, identify and click on any affected resources.
- From the resource page, click on the IaC tab.
-
Expand an entry to see the source code for the resource.
View Finding Activity

View finding activity to see information about the life-cycle of the finding within Cloud Exposure. For example, see when:
- The finding was created.
- The status changed (either by the system, or manually by a user).
- Tickets were created for 3rd-party integrations.
To view finding activity:
- From the Findings table, click on a relevant finding.
- Click on Activity.
- (Optional) Write a comment and then click Save.
Remediate Findings
Cloud Exposure lets you automatically remediate findings with a single click, or perform manual remediation when preferred.
Manually Remediate Findings
For some findings, you may decide that it makes the most sense to remediate any relevant issues outside of Cloud Exposure, instead of letting Tenable Automatically Remediate Findings. This is especially useful in infrastructure as code (IaC) workflows, where a remediation automatically performed by Tenable may be overwritten by developer code. Attaching revised policy suggestions allows you to directly implement Tenable's recommendations in a way that works for your coding environment.
To manually remediate a finding:
- On the Findings page, click to open the relevant finding.
- Navigate to the Remediation area.
-
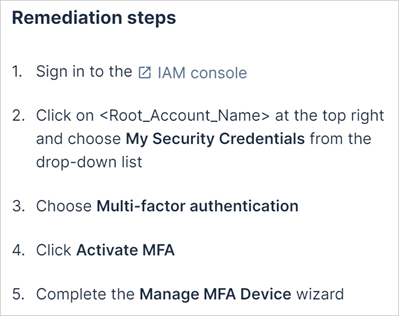
Follow the Remediation steps one at a time. For example:
-
When a remediation step includes suggested policy changes, you will see some or all of the following buttons next to the step, allowing you to view and download the revised policy in various formats, or a side-by-side diff view of the old and new policy:

- JSON
- Diff
- Terraform
- CloudFormation
You can send a copy of these suggestions to your developers (either via, for example, an email, or as attachments via notification actions) so that they can manually apply them to your code.
- Manually close the finding after you remediate it to remove it from the Open Findings page.
Automatically Remediate Findings
Cloud Exposure lets you automatically remediate findings at the click of a button (one-click remediation) to streamline the process of risk mitigation. Tenable will proactively perform the relevant remediation steps within your cloud environment, saving you time and energy. This allows you to quickly react to threats, and serves as an alternative to manual remediation, which requires step-by-step activities within the respective cloud service provider platform.
For example, you can automatically remediate findings related to overprivileged identities to remove excessive permissions and vulnerable configurations.
- If you granted Cloud Exposure management permissions (optional) during account connection, you can automatically remediate any finding associated with that account for which the feature is available, without additional configuration.
-
If you only granted Cloud Exposure read-only permissions during account connection, you can still automatically remediate findings, but you must first provide one-time credentials to Tenable.
Note: Even if you granted management permissions, the option to automatically remediate via one-time credentials is still available. - (GCP) Some findings require performing certain remediation steps above the project level (folder or organization-level). If Tenable only has management permissions on the project level, but not on the organization level, you can provide one-time credentials to Tenable to allow Tenable to perform these steps as well. Otherwise, Tenable will only perform remediation steps that it has permissions to.
Remediation actions that require Microsoft Entra ID modifications (for example, removing a user from a group) aren't performed automatically, since Tenable doesn’t have permissions to manage Microsoft Entra groups (due to their sensitive nature). Any such steps must be performed manually by a Microsoft Entra admin. When you start the automatic remediation process, such steps will appear on the page, but are grayed out.
To automatically remediate a finding:
- On the Findings page, click to open the relevant finding. See Supported Findings for Remediation via OTC for a complete list of supported findings.
- Navigate to the Remediation area.
- Click on the Remediate
 button.
-
Click on the various steps to, for example:
- View detailed information about the resource in question
- View and edit any suggested policy changes.
- To edit the suggested policy change, click Edit, make any relevant changes, and then click Save.
- Choose whether to disable or delete an access key (for example, for findings triggered by the IAM user unused credentials policy).
- Click Next.
-
If you only granted Cloud Exposure read-only permissions during account connection, you will be prompted to provide one-time credentials to Tenable by entering the following information:
- AWS:
- Access Key ID (relevant for IAM users)
- Secret Access Key (relevant for IAM users)
- Session Token (relevant for IAM roles)
GCP:
- Access token — Generate the token by running the following command via Google Cloud CLI while being authenticated with the required user credentials:
gcloud auth print-access-token
See relevant Google documentation for more information about this command.
- Decide whether or not to store credentials for the current session.
- AWS:
- Review the steps that will be applied, and then click APPLY.
Remediate with One-Time Credentials
As an alternative to granting Cloud Exposure management permissions during account connection, you can instead provide temporary, one-time credentials that allow Tenable to automatically remediate findings.
- For AWS IAM users, temporary credentials take the form of an access key, and, for IAM roles, an access key together with a session token. The IAM user/role must have sufficient permissions to perform the specific remediation actions within the account in question (oftentimes, Admin permissions are needed), such that the permissions required may vary from finding to finding.
- For GCP, temporary credentials take the form of an access token that you can generate via the Google Cloud CLI. See Automatically Remediate Findings for more information.
By default, the credentials you provide only apply to the remediation of the specific finding that you enter them for. To extend the credentials so that they last the duration of the current browser session, you can choose to store the credentials so that you don't have to enter them for each finding. This allows you to use the credentials to automatically remediate other findings until either: 1) you close the browser window, or, 2) you log out of the Cloud Exposure Console. Tenable supports storing credentials for multiple accounts.
Remediate Findings via IaC
See the exact code changes needed to remediate Cloud Exposure findings detected in your IaC, and then apply them automatically via pull requests opened in Tenable. This lets you easily get to the root of misconfigurations by fixing them in your code instead of after deployment via the relevant cloud console.
This helps:
- Easily get to the root of misconfigurations
- Allow developers to use their day-to-day tools instead of dealing with extra tickets
- Solve problems at scale
- Follow IaC security best practices
Prerequisites:
- Connect your code repositories and/or CI/CD
- Your Cloud Exposure user must have access to the relevant IaC scope. See Users and Groups for more information.
-
Support is currently available for resources managed in the following tools:
- Cloud: AWS/Azure/GCP (See Supported Policies)
- Code framework: Terraform
Review Code Changes
See the exact code changes needed to remediate Cloud Exposure findings detected in your IaC.
To review IaC code changes:
- On the Findings page, click on the relevant finding. See Supported Policies for a list of available finding types.
- In the finding profile view, click
 .
- Click on the IaC tab.
-
Review the code diff to see the code change recommendations. Click on the red/green indicators on the right to quickly navigate to relevant code snippets.
- Click copy
 to copy the revised code file.
Next step: Remediate Findings via Pull Requests
Remediate Findings via Pull Requests
Fix misconfigurations in your code by creating a pull request with the need changes.
- Remediating findings via pull requests is only available if you connected the relevant code repository to Cloud Exposure.
- You must have either the Collaborator or Administrator role to perform this action. See Users and Groups for more information.
- Bitbucket — due to a known Bitbucket limitation, remediating IaC findings via pull requests is only possible for files smaller than 2.5MB.
To remediate an IaC finding via a pull request:
- Review Code Changes.
- Click Create Pull Request.
-
Click on the various steps on the left-hand side to, for example:
- View detailed information about the resource in question
- View any suggested policy changes
- Click Next.
-
Enter pull request details:
- Enter a Commit Message, or use the automatically generated default message.
- Enter a Description, or use the automatically generated default message.
- Choose whether to snooze the finding for 7 days after pull request creation.
- Click Create.
Click the link in the success dialog to access the pull request. After the pull request is approved, the change is deployed to the cloud at the next release, and the status of the finding in Cloud Exposure will change to Resolved.
Supported Policies
Support is currently available for the following built-in Tenable cloud policies (not IaC policies).
AWS:
- IAM user unused password
- IAM User unused access keys
- Inactive IAM user
- Inactive IAM role
- Overprivileged IAM group
- Overprivileged IAM user
- Overprivileged IAM role
- Overprivileged SSO permission set
- Unused SSO permission set
- Unused security group
Microsoft Entra ID:
- Inactive Microsoft Entra ID application in subscription
- Inactive Microsoft Entra ID user in subscription
GCP:
- Inactive service account
Google Workspace:
- Inactive Google Workspace User
Reference: Finding Data
This section provides detailed reference information related to finding data.
Findings with Resource Deletion Recommendations
The following finding types include recommended remediation steps to delete the resource that violates policy rules. If the resource is deleted, the relevant finding sub-status is marked as Fixed, and not Resource deleted.
- Unused security group
- Unused SSO permission set
- Unused GCP project
- Inactive IAM role
- Inactive IAM user
- Inactive Microsoft Entra ID application in subscription
- Inactive Microsoft Entra ID user in subscription
- Inactive managed identity in subscription
- Inactive service account in project
- Inactive user in project
Finding Types That Don't Auto-Resolve
The following finding types (policies) are never automatically marked as Closed (Fixed) by Cloud Exposure:
| Cloud | Category | Policy |
|---|---|---|
| AWS | IAM | New privileged identity |
| Root user activity detected | ||
| Anomaly Detection | Unusual Data Access | |
| Unusual Network Access Management | ||
| Unusual Permission Management | ||
| Unusual Privilege Escalation | ||
| Unusual Reconnaissance | ||
| Azure | IAM | New privileged identity in subscription |
| Management | New Azure subscription | |
| Anomaly Detection | Unusual Network Access Management | |
| Unusual Permission Management | ||
| GCP | IAM | New privileged identity in project |
| Management | New GCP project | |
| Anomaly Detection | Unusual Permission Management |
Deleted Findings
In general, findings remain accessible within Cloud Exposure indefinitely, even after they are resolved. Occasionally, however, findings are deleted from Cloud Exposure. The following is a list of some of the reasons why a finding may be deleted.
| Reason | Description | Example |
|---|---|---|
| False-positive | Tenable deleted a finding that was mistakenly created due to a false-positive. Note: Tenable is continuously improving its identification mechanisms to avoid false-positives to the greatest extent possible. | Finding related to exposing secrets: A string was mistakenly identified as a secret. For example, the string rds_pass_reference_id was identified as a password, even though it is just a reference to a password. |
| Policy aggregation logic changed | Tenable modified the finding to create a separate finding per resource, as opposed to a single finding that aggregates all resources with the same issue. In doing so, the original, aggregated finding is deleted. | Public EC2 instance |
| Policy evaluation logic changed | Tenable modified the logic of a finding to improve the precision, adding additional detection criteria. In doing so, some previously created findings may be deleted. | Finding related to automatic rotation being disabled: Tenable improved the finding logic to only detect resources where more than one month has passed since creation time. |
Supported Findings for Remediation via OTC
Automatic remediation is available for the following findings:
| Provider | Policy |
|---|---|
| AWS | IAM User unused access keys |
| IAM user unused password | |
| Inactive IAM Group | |
| Inactive IAM role | |
| Inactive IAM user | |
| Overpermissive ECR repository | |
| Overpermissive S3 bucket | |
| Overpermissive Secrets Manager secret | |
| Overprivileged IAM group | |
| Overprivileged IAM role | |
| Overprivileged IAM user | |
| Overprivileged SSO permission set | |
| SSO group with unused permission set assignment | |
| SSO user with unused permission set assignment | |
| Unused SSO permission set | |
| Unused Security Group | |
| VPC Endpoint is using the default IAM policy (previously, "Overpermissive VPC Endpoint") | |
| Azure | Inactive Managed Identity |
| Overprivileged Microsoft Entra ID Application in subscription | |
| Overprivileged Microsoft Entra ID Group in subscription | |
| Overprivileged Microsoft Entra ID User in subscription | |
| Overprivileged managed identity in subscription | |
| GCP | Inactive Service Account |
| Overprivileged Google Workspace group in project | |
| Overprivileged service account in project | |
| Overprivileged user in project | |
| Google Workspace | Inactive Google Workspace Uֹser |
| Microsoft Entra ID | Inactive Microsoft Entra ID Application |
| Inactive Microsoft Entra ID User |