View Resource Details
Click on a resource in the Inventory to view granular information about it.
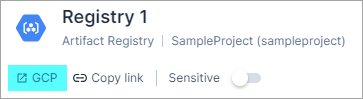
View Resource in Cloud Console
Click on the link underneath the resource name to view the resource in the relevant cloud console.
Mark Sensitive Resources
Mark resources as sensitive to:
- Elevate the priority of any findings associated with the resource, or identities that have access to the resource.
- Label a resource as sensitive within Tenable One Cloud Exposure
For example, you may want to mark compliance-related resources (such as PII, PCI, or HIPAA) as sensitive.
Marking resources as sensitive is available for most resource categories (excluding IAM) across all cloud service providers.
To mark a resource as sensitive:
- View Your Asset Inventory:
- In the Cloud Exposure Console, hover over Inventory to expand it.
- Click on the cloud provider or IdP inventory that you want to view (for example, GCP).
- From the Inventory view, select the relevant category and resource type that you want to view. For example, Containers > Artifact Registries (in GCP).
- Click on the resource to drill down into it.
-
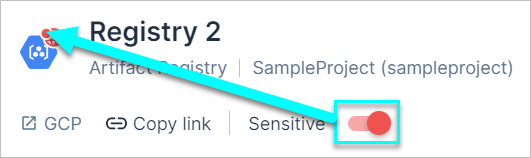
Click on the Sensitive toggle underneath the resource name at the top of the page.
A red circle is now displayed at the top right corner of the resource icon throughout the Cloud Exposure Console to indicate that this resource is marked as sensitive.
Apply Labels to Resources
Manually apply relevant, predefined custom labels to resources to add additional context for risk assessment, and to help further enrich your Cloud Exposure environment by correlating labels with factors like excessive permissions and network exposure. For example, you may want to apply labels to sensitive buckets/databases, or to instances with vulnerabilities.
Prerequisites:
To manually apply a label to a resource:
- View Your Asset Inventory:
- In the Cloud Exposure Console, hover over Inventory to expand it.
- Click on the cloud provider or IdP inventory that you want to view (for example, AWS).
- From the Inventory view, select the relevant category and resource type that you want to view. For example, Compute > EC2 Instances (in AWS).
-
From the relevant page, you can:
- Add labels to multiple resources:
- Select the checkbox next to the relevant resources.
- Click Add labels at the bottom of the page.
- Select any relevant label/s and then click Add.
- Edit labels for a single resource:
- Click on the three dots icon next to the resource and then click Edit labels.
- Select any relevant label/s to add or uncheck any selected labels, and then click Save.
- Add labels to multiple resources:
Get More Details about a Resource
Click Overview to see more details about the resource, including, for example:
- General resource details (resource type, account, assigned tags, etc.)
- Fields — Resources tagged in the relevant cloud provider environment with key-value pairs that match the pattern you defined in the field will be populated with values.
- The identity/originator who created the resource, if relevant (Created By).
- Any relevant networking information (for example, VPC, subnet, and security group)
- Associated policies, users, and groups
- Historical data
Many details associated with the resource are themselves resources within Cloud Exposure, which you can click to drill-down into. For example, when viewing an EC2 resource, you can click on the subnet in the Network area to learn more about it.
Explore Resource Relationships
The Graph tab under Explore shows the resource and its relationships to other cloud entities. Use the graph to trace how a resource connects to identities, findings, and related resources, so you can investigate access paths and assess the impact of a risk.
The resource from the profile appears as the central entity on the graph. You cannot remove this entity, and Cloud Exposure marks it differently from the entities you add.
To explore a resource's relationships:
- Click Explore > Inventory.
- Search for the resource and then click to open its profile page.
-
In the left-hand menu, under Explore, click Graph.
The Graph tab opens and displays the resource as the central entity.
-
Click the + button next to the entity.
A list of available relationships opens, grouped by category.
-
Select a relationship.
The related entities appear on the graph, connected to the resource by labeled edges (for example, has, relates to, or involved in).
- (Optional) Click the + button next to an entity to expand the graph further.
View and Manage Associated Risks
In the Risks left-hand menu section, click on any of the following to view potential risks associated with the resource, if relevant:
- Cloud Findings
- Threat Detections
- Vulnerabilities
- Malicious Files
View Sensitive Data
In the Data left-hand menu section, click on any of the following to view sensitive data detected on scanned resources.
- Overview
- Classified Data
See Assess Data Scans for more information.
View Network Data
Use the Network section to view and analyze the network connectivity of your cloud resources. This section is available for a range of important resources across all clouds, for example, AWS EC2 and RDS instances, Azure virtual machines, and GCP VM instances and instance groups. See Supported Resources for a complete list of resources.
Visualize Network Exposure (Graph)
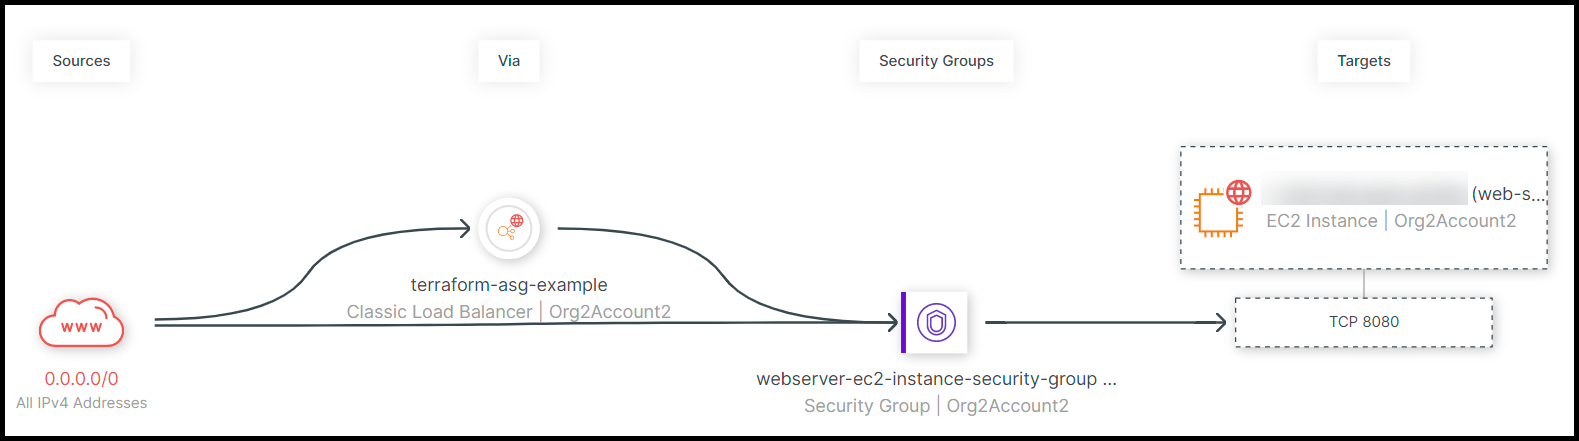
The Graph tab provides a visual map of the network path to your resource. This helps you understand how a resource is exposed to the internet, either directly or through intermediate components like load balancers.
The map is divided into four general areas:
- Sources — The IP address range/s (CIDR blocks) that can access the resource.
- Via — For resources that are indirectly exposed to the internet, via, for example, load balancers, an additional column (“Via”) is displayed showing the mechanism that routes traffic.
- Security Groups / Network Security Group / Security Perimeters. The virtual firewall that controls incoming and outgoing traffic to your resource instance.
- Targets — The target ports on the specified resource. Sensitive ports are marked in red.
To navigate the network map:
- In the resource profile view, click Network, and go to the Graph tab.
- To move around the map, click and drag the mouse .
- To zoom in and out of the map, hold down the [Ctrl] key while scrolling the mouse wheel (or double click in the map to zoom in). Click
 to zoom out and view the entire map.
- To learn more about a resource on the graph, or to filter the graph based on the resource, right click the resource icon.
-
To filter the map, use the filters available at the top of the map:
- Filter by IP address range, security group, or port.
- Click Wide Range to filter on ports that are exposed to a wide set of IP addresses (more than 255).
Network Endpoints
The Network Endpoints tab provides a list of confirmed, reachable entry points for the specific resource. This view only lists endpoints that have been validated by the Network Scanner.
| Column | Description |
|---|---|
| Network endpoint | The combination of destination host and port (for example, 10.0.0.5:443). |
| Source IP address range | The allowed source IP ranges defined in the resource's network rules. This is the range from which the resource can be accessed. |
| Protocol | The protocol tested (currently TCP). |
| Scan time | The timestamp of the most recent successful validation. |
To view confirmed endpoints:
- In the resource profile view, click
- Go to the Network Endpoints tab.
- Review the table for confirmed live exposures.
Network Scan Status
The Network Scan Status column/field indicates the current scanning status of the resource. The following table lists the various statuses, along with associated reasons for why the status might appear (some of these reasons appear as tooltips next to the status).
| Network Scan Status | Reasons |
|---|---|
| Disabled | Resource scanning is disabled in settings |
| Not Supported | Scanning is only supported for Supported Resources with a direct IP address and port. See Network Scanner for more information. |
| Pending | The resource is waiting to be scanned. |
| Scanned | Resource was scanned successfully. |
Supported Resources
The Network tab and Network Scan Status is available for the following resources:
| Cloud | Resource |
|---|---|
| AWS | Application Load Balancer |
| Auto Scaling Group | |
| Classic Load Balancer | |
| EC2 Instance | |
| ECS Services | |
| Network Load Balancer | |
| RDS Instance | |
| Redshift Cluster | |
| Azure | Application Gateway |
| CosmosDB Account | |
| Load Balancers | |
| MySQL Database Flexible Server | |
| MySQL Database Single Server | |
| PostgreSQL Database Flexible Server | |
| PostgreSQL Database Single Server | |
| SQL Server | |
| Virtual Machines | |
| Virtual Machine Scale Set | |
| GCP | Instance Groups |
| Load Balancers | |
| SQL Instances | |
| VM Instances |
Investigate Resource Activity
Click on the Events tab to view a complete list of all activities related to the resource. This includes the following categories of activities:
- All activities performed on the given resource by an identity or originator.
- Activities performed by the resource, acting as an identity or originator.
For example, to see all activities performed by the given resource acting as an identity, go to the Identity filter and select the resource itself from the dropdown.
Use this information during resource investigations and auditing. For more information, see Cloud Events.
Configuration Snapshots
For IAM resources, view a historical record of configuration changes made to the resource. This includes, for example, a complete listing of policies attached to the resource at multiple points in time. You can use this data as a reference in case you need to recover specific configuration data from a given point of time.
To view snapshots:
- In the resource profile view, click IAM.
- Click on the Policy Snapshots tab.
View Source Code for Resources

Cloud Exposure applies the IaC built-in label to resources that are detected as being managed by code in one your repositories. For such resources, you can click the IaC tab to see the relevant code snippet and trace the resource back to its code origins. See Code for more information.