Exclusions
Security and compliance programs often generate findings that are valid yet acceptable in specific business contexts. For example, a load balancer may be publicly accessible by design, or a development environment might intentionally use relaxed permissions. Managing these approved cases, called exclusions, keeps your risk picture accurate without unnecessary noise.
With exclusions, Tenable One Cloud Exposure provides an exception-management framework to acknowledge, track, and audit these decisions while preserving visibility and accountability.
By using exclusions, you can:
- Reduce noise — Remove false positives and intentional configurations from open findings.
- Apply at scale — Define one exclusion rule for a business need and apply it across all relevant findings.
- Maintain governance — Record who created each exclusion, when, and why.
- Improve focus — Ensure your open findings reflect only actionable risks.
Exclusion Lifecycle
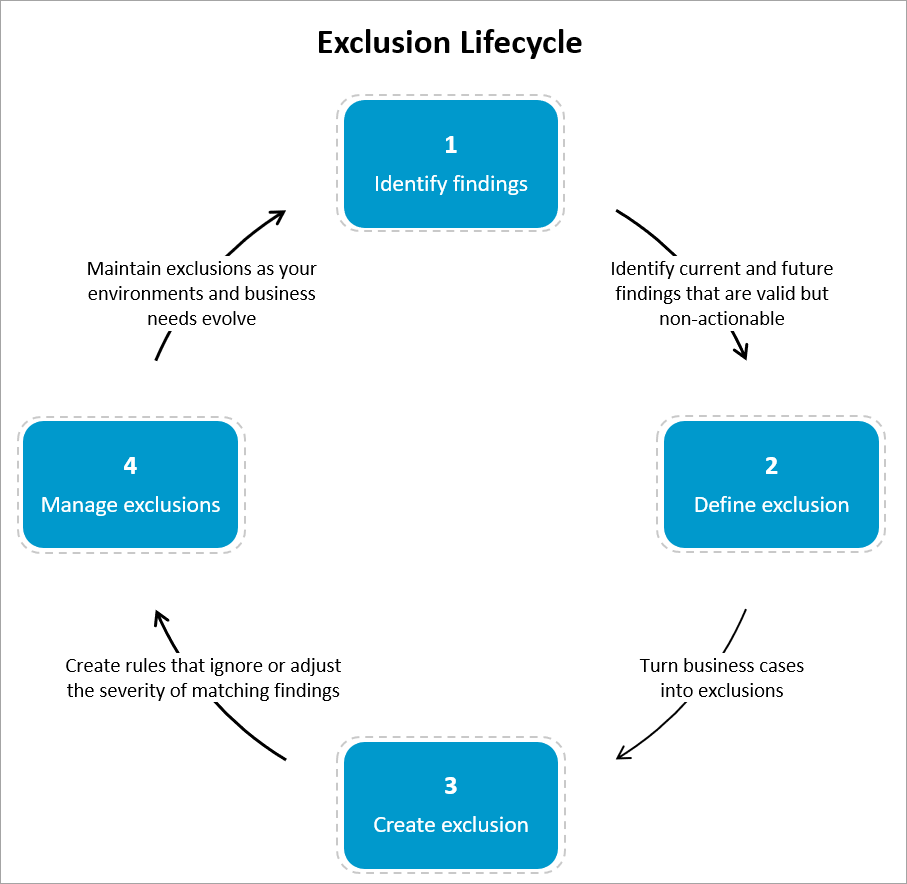
Exclusions follow a four-stage lifecycle. Each stage ensures exceptions are created intentionally, reviewed regularly, and aligned with your security model:
- Identify: Locate findings that are valid but non-actionable, and anticipate similar cases that may arise.
- Define: Group those findings into clear business cases and determine their scope, action, and reason.
- Create: Turn each business case into an exclusion that ignores or adjusts the severity of matching findings.
- Manage: Maintain, renew, or retire exclusions to keep your exception management current and auditable.
Identify Findings and Future Findings
Before ignoring or adjusting the severity of findings, review your configurations to identify current or potential findings that are valid but non-actionable. These may include intentionally public, permissive, or temporary setups that you plan to exclude or downgrade in severity.
Common examples:
- Environments — Dev, QA, or sandboxes that allow broader access for testing.
- Architectures — Public load balancers, internet-facing APIs, or demo tenants.
- Operational needs — Break-glass roles, temporary debug settings, migration windows.
- Data pipelines — Staging buckets, transient queues, or short-lived snapshots.
- Naming and tags — Conventions like env:dev, qa-*, or lab-* that signal intent.
Use filters on the Findings page to identify these patterns:
| Filter Type | Example | Purpose |
|---|---|---|
| Policy | Public EC2 Instance | Identify findings from a specific policy that may represent intentional or accepted configurations. |
| Environment or account | Medium findings in the Dev1 account | Focus on findings where risk tolerance or visibility needs differ by environment. |
| Severity adjustment | Change Critical findings in a staging environment to Medium | Reclassify findings that are valid but less risky in non-production settings. |
After reviewing these patterns, decide how to handle them:
- Ignore findings that are intentional or false positives. Learn how to Create Pattern-Based Exclusions from Ignored Findings.
- Change severity when findings are valid but lower risk in context.
Define Exclusions
After identifying existing or future findings, group them into exclusions that each represent a single, well-defined business case.
Typical exclusion use cases:
- Findings that reflect intentional configurations, such as public endpoints in a test environment.
- Findings confirmed as false positives after verification.
- Temporary exceptions granted while remediation work is in progress.
To define an exclusion, group findings and future findings by:
- Scope — Define where the exclusion applies (organization, account, or folder) and which policies, resources, or severity it covers.
- Action — Decide what happens to targeted findings within the defined scope: Ignore or Change severity.
A single finding can be affected by up to two exclusions, one for each action type. If multiple exclusions of the same action target the same finding, only one applies. See Conflict Resolution for details.
 Example: Group findings into exclusions
Your latest security scan reports 70 findings:
- 50 for a public load balancer that’s intentionally exposed to serve customer traffic.
- 5 for a break-glass IAM role used for emergency access and tightly controlled.
- 15 for public S3 buckets in the Dev1 account used by QA for testing.
All of these findings are valid from a security perspective, but they reflect approved design choices rather than misconfigurations.
Instead of ignoring each one manually, you create three exclusions that define the business justification, scope, and duration:
- By design — For the public load balancer.
- Exception — For the emergency IAM role, valid for one year.
- By design — For the Dev1 test buckets, limited to the Public S3 Bucket policy.
Best practices for defining an exclusion:
- Keep exclusions as specific as possible so you maintain clarity about what is and isn’t monitored.
- Avoid mixing unrelated policies or resource types in the same exclusion. For example, Public IAM Role and Public EC2 Instance. Each exclusion should address one problem or business case.
- Choose the right scope: overly broad exclusions can hide real issues and make audits difficult, while overly narrow exclusions can lead to unnecessary complexity and maintenance.
- Don’t use naming patterns that may unintentionally overlap. For example, excluding resources whose name starts with prod- could also capture newly added production resources you still want monitored.
- Don’t use exclusions as a shortcut to silence recurring alerts. For example, excluding all Critical findings in a project. Instead, investigate the underlying cause or apply a severity change with clear justification.
Scope
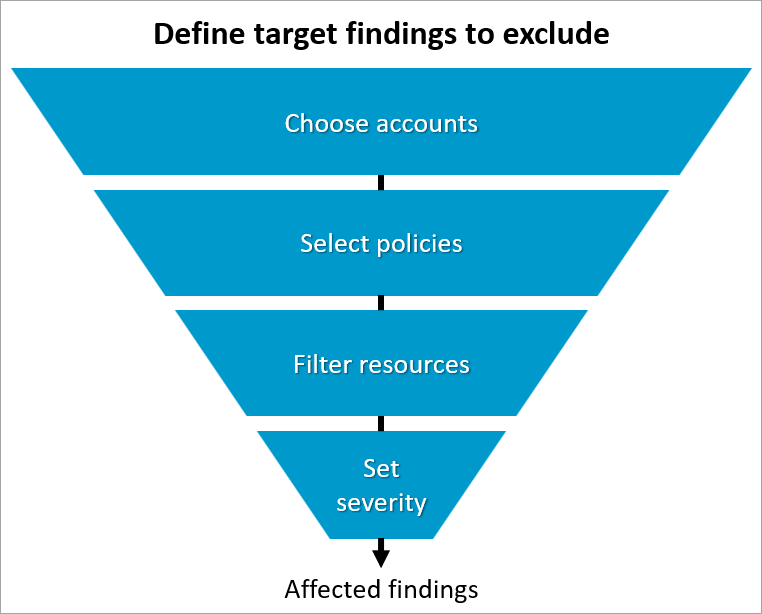
Defining the scope ensures the exclusion applies only where intended.
- A broad exclusion, such as one that covers multiple accounts or policies, can simplify management and reduce repetitive work when the same condition applies across many resources. However, broad exclusions also increase the risk of unintentionally hiding important findings and can make audits more difficult if they include unintended resources.
- A narrow exclusion offers more control and precision. It’s useful when the reason for exclusion applies only to a limited set of resources. However, too many narrow exclusions can be harder to track and maintain over time.
Choose the balance that fits your organization’s review and governance process. Each exclusion targets findings through defined conditions that limit its impact.
| Element | Description |
|---|---|
| Accounts | Select which accounts the exclusion applies to. You can apply it across the entire organization or limit it to a specific folder or individual account. |
| Policies | Choose Specific policies that align with the business reason, rather than broad All policies selections. Mixing unrelated policy types (for example, IAM and EC2) can cause overlap and add maintenance complexity. |
| Resources | Define which resources the exclusion should cover. For example, all EC2 instances whose names start with LabUs-, or resources tagged env:dev in us-east-1. |
| Severity | (Optional) Limit the exclusion to findings of certain severities, such as ignoring only Low or Medium findings while keeping High and Critical visible. |
Action
Each exclusion determines what happens to findings that match its conditions:
-
Ignore — Changes the status of matching findings from Open to Ignored. When ignoring findings, you also have to provide a reason:
- By design — The configuration is intentional and required for functionality.
- Exception — The finding is accepted temporarily until remediation is completed.
- False positive — The finding was verified as incorrect or irrelevant.
The selected reason also becomes the sub-status shown in the Findings table for each ignored finding.
- Change severity — Replaces the severity level of matching findings with the level you select. For example, change Critical findings to Medium. This keeps visibility into the issue while adjusting how it’s prioritized and reported. This can be configured only on the Exclusions page.
Create an Exclusion
After defining the business reason, scope, and action, the next step is to create the exclusion. This stage turns your plan into a working rule that ignores or adjusts the severity of matching findings.
You can create exclusions in two locations:
- Exclusions page (recommended) — Creating exclusions from the Exclusions page provides centralized visibility and full control. It lets you define precise filters, scope, and expiration to ensure each exclusion reflects a clear business case and supports accurate, auditable, and maintainable governance.
- Cloud Findings — Lets you quickly ignore findings by creating an exclusion that specifically targets the selected findings. Creating exclusions created from the Findings page take effect immediately, which is good for when you need to suppress specific items before the next scanning cycle, but offers limited configuration options. Frequent use of the Findings page for ignoring results may indicate that some exclusions should be defined or refined more broadly.
Creating exclusions from the Exclusions page ensures consistency and alignment with business purpose across your organization. Target findings update after the next scan cycle.
Example: Create an exclusion
You manage several AWS accounts under your organization. One of them, Dev1, hosts test environments that are intentionally exposed to the internet. Most of these EC2 instances follow a naming pattern that starts with LabUs-, used to identify lab resources. However, there’s also one manually created instance named JohnD that serves the same testing purpose but doesn’t follow the convention. Both should be ignored to keep risk reporting accurate.
To avoid repeated noise from these known, non-production resources, you decide to create an exclusion that ignores all findings for these instances.
- Business need — Public access to EC2 instances in the Dev1 account is intentional for testing.
- Goal — Ignore all Public EC2 Instance findings in Dev1 that match this pattern.
Exclusion configurations:
- Name: Known public EC2 instances
- Description: Publicly accessible test instances used by QA
- Action: Ignore
- Finding type: Cloud
- Policies: Specific policies > Public EC2 Instance
- Resources: Specific resources > Name starts with LabUs- OR resource name equals JohnD
- Expiration: Never
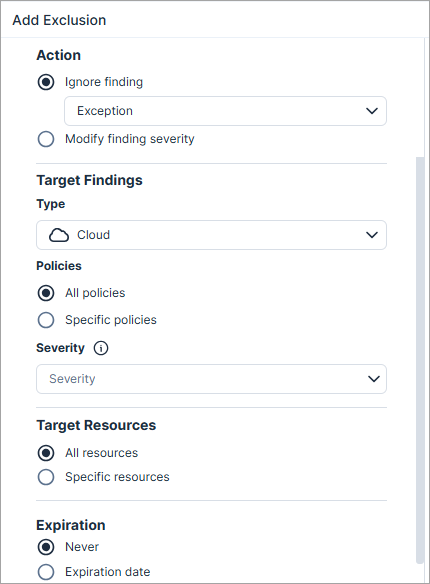
To create an exclusion:
- Go to Policies > Exclusions.
- Select an account scope in the Organization dropdown. By default, the entire Organization (all accounts) is selected.
- Click Add Exclusion. The account scope can’t be changed after you start creating an exclusion.
-
Enter a Name and Description.
- Use a clear, business-focused name (for example, Publicly known EC2 instances for QA).
- Describe the reason or justification for the exclusion.
-
Under Action, choose what happens when findings match the exclusion:
- Ignore — Exclude the matching findings from the Open Findings list.
- Provide a Reason for the findings to be ignored. When a finding is ignored, is the sub-status can be Exception, By design, or False positive.
- Change severity — Lower or raise the severity of matching findings.
- Ignore — Exclude the matching findings from the Open Findings list.
-
Define the scope of the Target Findings:
- Select the Type: Cloud or IaC.
- Under Policies, choose All policies or Specific policies to target. It’s recommended to select specific ones that match your defined business case.
- Optionally, add a Severity filter to include only findings of certain severities.
-
Define the Target Resources.
If you are creating an exclusion for:- Cloud: Select the relevant resources.
- Code: Use the following wildcard characters in the pattern:
- Asterisk * - Matches zero or more characters
- Question mark ? - Matches a single character
For example, names with the pattern aol-*
- In Expiration, select either Never or an Expiration date. After the expiration date, the exclusion no longer applies to the findings. If no other exclusion affects those findings, they are reopened or their severity reverts.
- Before creating the exclusion, carefully review your configuration. The Findings Preview panel lists all targeted open findings. Use it to verify that your filters, retention, and scope accurately target the intended results before saving.
- Click Save. After saving, the exclusion takes effect in the next scan cycle, updating all matching findings.
Manage Exclusions
Use the Exclusions page to review and maintain exclusions as your environments and business needs evolve. Regular review helps keep results accurate and prevents outdated rules from hiding valid risks.
To manage exclusions:
- Review monthly to confirm each exclusion still reflects your current configuration and risk tolerance.
- Edit exclusions to update filters, scope, or expiration as needed.
- Tighten filters if an exclusion covers too many findings, or split it into smaller, focused exclusions.
- Disable exclusions temporarily to assess their impact.
- Renew or delete exclusions that have expired or no longer represent valid business cases.
- Audit periodically to verify ownership, creation time, and justification using the audit log.
You can also manage exclusions directly from the Findings page by adding findings to existing exclusions. For more details about managing exclusions, see Conflict Resolution and Exclusion Statuses.
What You See on the Exclusions Page
The Exclusions page provides a centralized view of all exclusions, their configuration, and current status. Use it to verify how exclusions behave across your organization and ensure they remain accurate over time.
From this page, you can create, edit, duplicate, disable, or delete exclusions, as well as review who created them and which findings they affect.
Each row in the table represents a single exclusion with key information for audit and management.
| Column | Description |
|---|---|
| Name | The exclusion’s name. Click to open its full profile. |
| Description | The business reason or purpose for the exclusion. |
| Scope | Where the exclusion applies: organization, account, or folder. |
| Action | The action applied to matching findings: Ignore or Change severity. |
| Finding Type | The source of the finding: Cloud or IaC. |
| Policies | Either All or a list of targeted policies. |
| Expiration | The date the exclusion expires, or a dash (–) if there is no expiration. |
| Created By | The user who created the exclusion. |
| Creation Time | The date and time the exclusion was created. |
| Status | The current state of the exclusion. |
| Findings | Number of findings currently affected by the exclusion. Click to view the list. |
Exclusion Statuses
Each exclusion has a status that reflects its current state in the system. View them in the Status column on the Exclusions page and track how each exclusion is being applied.
| Status | Description |
|---|---|
| Enabled | The exclusion is active, and if it is not expired, applied in the next scan. Once the exclusion expires, findings it covered are reopened or reverted if no other exclusion applies. |
| Disabled | The exclusion is inactive but can be re-enabled. |
| Pending update | Modified and will update in the next scan. |
| Pending disable | Being disabled. Remains active until the scan completes. |
| Pending deletion | Queued for removal. Remains active until the scan completes. |
Rules for Adding to an Existing Exclusion
When you open the Ignore Findings dialog and select Add to an existing exclusion, the dropdown shows only exclusions that are compatible with the selected findings.
This ensures findings can be added only to exclusions that match their type, policy, and scope—preventing conflicts or unintended behavior.
An exclusion appears in the dropdown only if all of the following conditions are met:
| Rule | Description |
|---|---|
| Write permissions | You have write permissions for the exclusion’s scope. |
| Action set to Ignore | The Action of the exclusion is configured to Ignore. |
| Finding type | The exclusion’s finding type (Cloud or IaC) matches the selected findings. |
| Policy match | The exclusion targets the exact same policy as the selected findings. |
| Single-policy scope | The exclusion applies to one specific policy, not to multiple policies. |
| Severity filter | The exclusion has no defined severity filter. |
| Bulk selection rule | When multiple findings are selected, all must be from the same policy. |
Conflict Resolution
In some cases, more than one exclusion can target the same finding. When this happens, priority is determined by scope and creation time.
Exclusions are evaluated independently per action (Ignore or Change severity). A finding can have up to two active exclusions, one for each action type.
When multiple exclusions of the same action target the same finding, precedence follows this order:
- Scope specificity: The more specific exclusion takes precedence. For example, an exclusion defined at the account level overrides one defined at the organization level.
- Creation time: If two exclusions share the same scope and action, the exclusion that was created first takes precedence.
Example: Conflict resolution
Your organization runs multiple AWS accounts, including a shared OrgA and a development account called Dev1.
At first, you create an exclusion at the organization level to lower the severity of Public EC2 Instance findings in resources whose name starts with Test- to Low. This helps reduce noise from non-production instances used for QA.
Later, a security engineer creates another exclusion at the Dev1 account level for the same policy, setting the severity of those same Test-* instances to Medium, to keep better visibility into publicly exposed assets in that account.
Because the Dev1 exclusion is defined at a narrower scope, it takes precedence.
As a result:
- Findings for Test-* EC2 instances in the Dev1 account appear with Medium severity.
- Findings for the same pattern in other accounts remain Low.