Connect Code Repositories
This is an integration guide for connecting repos to Tenable One Cloud Exposure.
- For a how-to guide about managing already connected repos in Tenable, see Manage Code Accounts.
- For a how-to guide about monitoring IaC findings, see IaC Findings.
- For an overview of CI/CD and code capabilities in Tenable, see Code.
To get started with code repo scanning:
- Connect Your Repository. Connect your organization to add entire code repositories to Cloud Exposure.
- Manage repositories. Manage and troubleshoot repositories, organize them via folders, and perform related tasks.
- Monitor IaC findings. Track and monitor circumstances within your code repository that pose a calculated risk to the security of your infrastructure.
Connect Your Repository
As an alternative to connecting individual CI/CD pipelines, you can connect your organization to add entire code repositories to Cloud Exposure:
When you connect a repository, Tenable periodically connects to the relevant service (for example, Azure Repos), checking for new commits to the main branch since the last connection. If they exist, Tenable scans all code in the main branch and surface issues in the Cloud Exposure Console. If the same commit was scanned both via CI/CD and via repository scanning, both appear as separate scans.
See the IaC Compatibility Matrix to see which IaC features are supported for each repository type.
Add an Azure Repos Organization
Add an Azure Repos organization to get full visibility into IaC-related issues across code repositories in your organization. To add one a repository, grant permissions to the Cloud Exposure app and connect your Azure Repos organization with Tenable.
Required Permissions
The following permissions are required by the Tenable Azure Repos app:
- Code (read) — Grants the ability to read source code and metadata about commits, changesets, branches, and other version control artifacts. Also grants the ability to search code and get notified about version control events via service hooks.
- Project and team (read) — Grants the ability to read projects and teams.
- Sign in and read user profile — Allows users to sign in to the app, and allows the app to read the profile of signed-in users. It also allows the app to read basic company information of signed-in users.
To connect your Azure Repos organization:
- In the Cloud Exposure Console, navigate to Settings > Integrations and click Add Integration.
- In the Integrations Library, click Azure Repos Organization. The Add Azure Repos Organization wizard opens.
- Grant Admin Consent (Step 1 in wizard):
- Click Grant consent to approve the Cloud Exposure Azure Repos app in Azure and grant the necessary permissions. You need to sign in as a user that is authorized to consent on behalf of the organization.
Click Accept. Once the consent is approved, you are redirected back to the Cloud Exposure wizard.
Note: You can verify that consent was successfully granted in the Azure portal, by navigating to Entra ID > Enterprise Applications and searching for Cloud Exposure Azure Repos.
-
[Cloud Exposure Console] Select Organization (Step 2 in wizard). Select the organization you want to add from the drop-down menu and then configure the following settings:
- Automatically update folder structure — Mirror your repository's structure as folders within Tenable, preserving its hierarchy and keeping the view synchronized (enabled by default). Learn more about account hierarchy.
- Sync Cloud to Code — Trace your cloud resources back to their code origins (enabled by default). See Sync Cloud to Code for more information.
- Scan Pull Requests — Enable automated security scanning for all pull requests to evaluate code changes against your security policies. When active, this feature can block merges if they contain security misconfigurations that meet or exceed your defined Scan Failure Threshold. For more details, see Pull Request Scanning.
-
In the Scan Failure Threshold section, choose whether to:
- Inherit the configuration of the parent-level account scope (default).
- Override the configuration of the parent-level scope for this account scope.
If you Enabled the setting, select a policy severity from the dropdown.
Note: This feature is in early availability and is subject to change. Functionality and support may be limited. To request access or share feedback, contact your Tenable representative.Note: If you have an existing CI/CD integration, the Scan Failure Threshold configured here will override the threshold setting in your CI/CD pipeline. You can update the Scan Failure Threshold in Settings > Cloud Exposure > IaC.
-
In the Scan Failure Threshold section, choose whether to:
- Click Next.
-
(Azure DevOps portal) Grant Organization Permissions (Step 3 in wizard):
- Log into Azure DevOps, and click Organization settings at the bottom left.
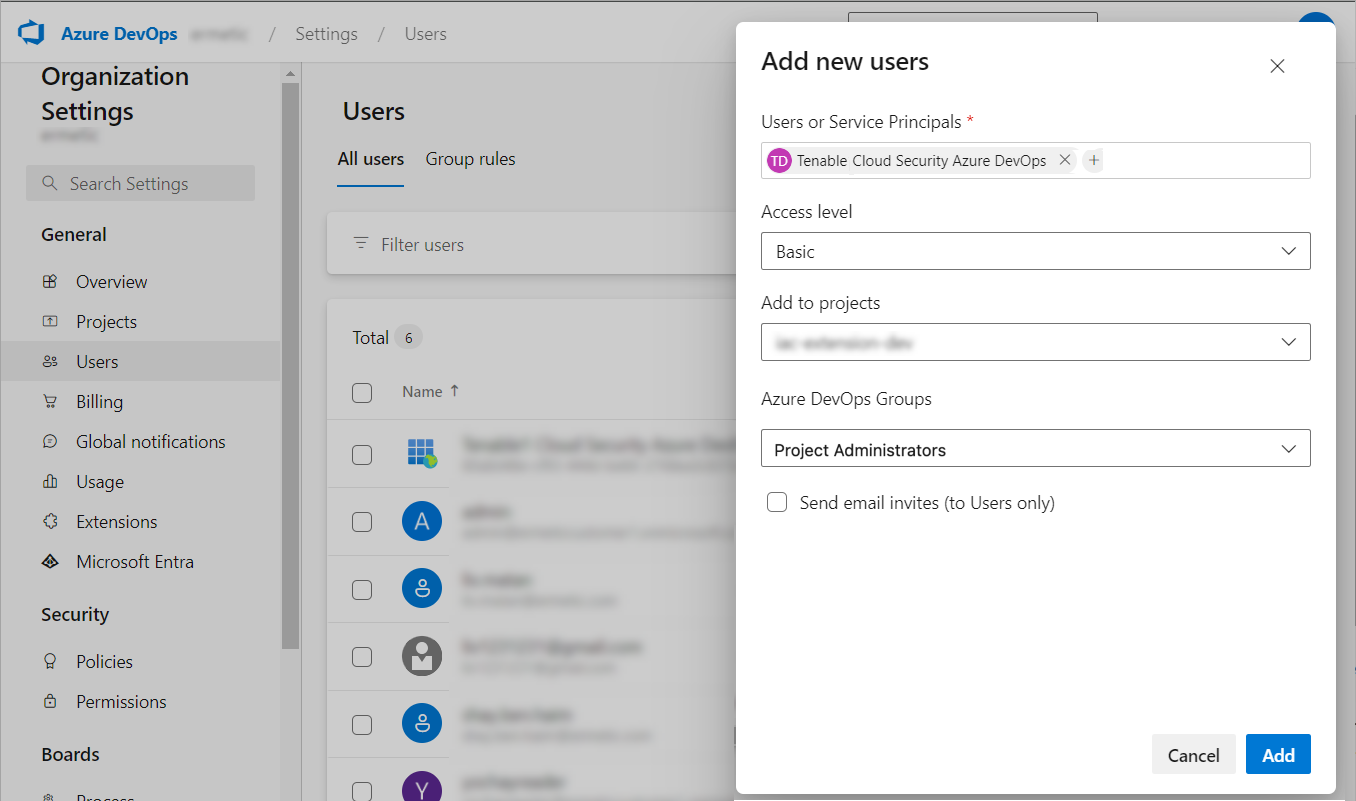
- Navigate to General > Users and click Add Users.
-
Enter the following user details:
Users or Service Principals: Select Cloud Exposure Azure DevOps, making sure to click on the service principal popup that includes the objectID.
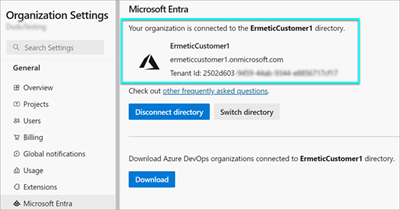
If this service principal doesn't appear, verify that your Azure Repos organization is connected to the same Azure Active Directory (Microsoft Entra) tenant that you used to grant admin consent earlier (step 3). You can verify this in the Azure DevOps portal, under Organization Settings > General > Microsoft Entra.
- Access level: Select Basic.
- Add to projects: Select any projects you want to use with Cloud Exposure.
- Azure DevOps Groups: Select Project Administrators.
Click Add.
-
Select Repositories (Step 4 in wizard). Select which repositories you want Tenable to scan (in permitted projects):
- Sync all repositories (recommended)
- Include specific folders and repositories
- Exclude specific folders and repositories
Note: If you sync all repositories, or include/exclude an entire folder, all current and future repositories within the folder/s are included/excluded. If you include/exclude specific repositories in a folder, only the selected repositories will be included/excluded. - Click Finish.
Add a Bitbucket Workspace
Add a Bitbucket Workspace to get full visibility into IaC-related issues across code repositories in your workspace.
Requirements
- Bitbucket Cloud Premium plan
-
The following workspace access token permissions are required:
- Account > Read
- Repositories > Write
- Pull requests > Write
To connect your workspace:
- In the Cloud Exposure Console, navigate to Settings > Integrations and click Add Integration.
- In the Integrations Library, click Bitbucket Workspace. The Add Bitbucket Workspace wizard opens.
- Configure Workspace (Step 1 in wizard):
- Log into Bitbucket, and then go to the workspace page of the workspace you want to connect.
- In the top-right corner, click Settings > Workspace settings.
- In the sidebar, click Security > Access Tokens.
- Click Create Workspace Access Token.
-
Enter the following details:
- Name: The name to assign to the Cloud Exposure application in Bitbucket.
- Scopes: Select Repositories > Write, and Pull requests > Write.
- Click Create.
- Copy the Workspace access token using the 'Copy' button, and paste it in the Cloud Exposure Console wizard.
-
In the Tenable wizard, configure the following settings:
- Sync Cloud to Code. Trace your cloud resources back to their code origins (enabled by default). See Sync Cloud to Code for more information.
- Automatically update folder structure. Mirror your repository's structure as folders within Tenable, preserving its hierarchy and keeping the view synchronized (enabled by default). Learn more about account hierarchy.
- Click Next.
-
Select Repositories (Step 2 in wizard). Select which repositories you want Tenable to scan (in permitted projects):
- Sync all repositories (recommended)
- Include specific folders and repositories
- Exclude specific folders and repositories
Note: If you sync all repositories, or include/exclude an entire folder, all current and future repositories within the folder/s are included/excluded. If you include/exclude specific repositories in a folder, only the selected repositories will be included/excluded. - Click Finish.
Add a GitHub Organization
Add a GitHub repository by installing the Cloud Exposure GitHub app, giving you full visibility into IaC-related issues across code repositories in your organization. If your repository is self-hosted on a GitHub Enterprise Server, or hosted on a GitHub Enterprise Cloud with data residency, you need to add the server to Cloud Exposure before you proceed to add your organization.
Required Permissions
To scan your repositories, use auto-remediation features, and report check statuses, Tenable GitHub app requires the following permissions:
- Repository Scanning Permissions
- Read access to metadata
- Read access to code
- Auto-Remediation Feature Permissions
- Write access to code
- Write access to commit statuses
- Write access to pull requests
- Pull Request Status Reporting Permissions
- Read and write access to checks
- Read access to commit statuses
- Read access to pull requests
To connect your GitHub repository:
- In the Cloud Exposure Console, navigate to Settings > Integrations and click Add Integration.
- In the Integrations Library, click GitHub Organization. The GitHub Organization wizard opens.
- Select GitHub Server (Step 1 in wizard). Select where your repository is hosted:
- GitHub.com
- GitHub Enterprise Server (self-hosted) or GitHub Enterprise Cloud with data residency (GHE.com). If your server doesn't appear in the drop-down, you need to add it to Tenable before you proceed to add your organization.
- Authenticate with GitHub (Step 2 in wizard). Authenticate with a GitHub user that has access to app installations on the organization you would like to connect. Click Authenticate GitHub User.
- Install the Cloud Exposure App (Step 3 in wizard):
- Click here to go to the Cloud Exposure app page.
- Click Install/Configure.
- On the Install Cloud Exposure page, click on your organization name.
- If you want to grant Tenable access to all your repositories, select All Repositories. Otherwise, select Only select repositories, and then select at least one repository.
- Click Install. If necessary, enter your password, and then confirm that the app was installed. You can see a full list of permissions required by the app above.
- [Cloud Exposure Console] In the wizard, click Next.
- Select Organization (Step 4 in wizard). From the drop-down, select the organization you want to add and then configure the following settings:
- Automatically update folder structure — Mirror your repository's structure as folders within Tenable, preserving its hierarchy and keeping the view synchronized (enabled by default). Learn more about account hierarchy.
- Sync Cloud to Code — Trace your cloud resources back to their code origins (enabled by default). See Sync Cloud to Code for more information.
- Scan Pull Requests — Enable automated security scanning for all pull requests. When active, this feature can block merges if they contain security misconfigurations that meet or exceed your defined Scan Failure Threshold. For more details, see Pull Request Scanning.
- Select a Code account scope in the Organization tree dropdown.
In the Scan Failure Threshold section, choose whether to:
Inherit the configuration of the parent-level account scope (default).
Note: If you selected the entire Organization as the scope, the Inherit option is not available.- Override the configuration of the parent-level scope with a unique configuration (Enabled/Disabled) for this account scope. The unique configuration will remain on the child-level scope, regardless of any changes made in the parent-level scope.
If you Enabled the setting, select a policy severity from the dropdown.
Note: This feature is in early availability and is subject to change. Functionality and support may be limited. To request access or share feedback, contact your Tenable representative.Note: Keep the following in mind about the Scan Failure Threshold:- If you have an existing CI/CD integration, the Scan Failure Threshold configured here will override the threshold setting in your CI/CD pipeline.
- You can update the Scan Failure Threshold in Settings > Cloud Exposure > IaC
- Click Next.
-
Select Repositories (Step 5 in wizard). Select which repositories you want Tenable to scan:
- Sync all repositories (recommended)
- Include specific folders and repositories
- Exclude specific folders and repositories
Note: If you sync all repositories, or include/exclude an entire folder, all current and future repositories within the folder/s are included/excluded. If you include/exclude specific repositories in a folder, only the selected repositories will be included/excluded. - Click Finish.
Add a GitHub Enterprise Server
If your repository is self-hosted on a GitHub Enterprise Server, or hosted on a GitHub Enterprise Cloud with data residency (GHE.com), you need to add the server to Cloud Exposure before you proceed to add your organization.
This integration supports:
- GitHub Enterprise Server, both internet-facing and network-isolated. See Connect Network-Isolated Servers for more information about working with network-isolated servers.
- GitHub Enterprise Cloud with data residency in the EU region.
If your enterprise uses an IP allow list, add the Cloud Exposure IP addresses for your region. See Tenable IP Addresses to Allow.
- In the Cloud Exposure Console, navigate to Settings > Integrations and click Add Integration.
- In the Integrations Library, click GitHub Enterprise. The Add GitHub Enterprise wizard opens.
- Configure Server Details (Step 1 in wizard):
- Enter the Name of the server to be displayed in the Cloud Exposure Console.
-
Select how Tenable connects to your server. If your server is network-isolated, use a Tenable Endpoint Connector to establish connection. For GitHub Enterprise Cloud with data residency, select Endpoint (internet-facing). Neither an Endpoint Connector nor SSL certificate settings are required.
- Endpoint (internet-facing) — Enter the GitHub Enterprise Server endpoint (without the https:// protocol prefix). For example, github.tenable.com or 192.82.156.1:8443.
- Endpoint Connector (network-isolated) — Select the relevant connector from the dropdown. If this option is disabled, it means you haven't yet added a connector. See Connect Network-Isolated Servers for information about how to add one.
- Check Accept any server SSL certificates if SSL is enabled for the server.
- In the Cloud Exposure Console, click Next.
- Configure App details (Step 2 in wizard):
- Enter the Application Organization Name of the organization where you want to host the Cloud Exposure GitHub App. This can be different from the organization that you connected to Tenable.
Click Register GitHub App.
Note: If you already successfully added your organization to Cloud Exposure, the GitHub app is already configured, and you can skip this step.(GitHub) On the Register new GitHub App page that opens, scroll down and click Create GitHub App.
Important: Do not edit or change the pre-populated settings. Doing so may cause the integration not to work.Note: The following details for the Cloud Exposure GitHub app are available in your GitHub Enterprise Server or GHE.com organization settings (Settings > Developer settings > GitHub Apps, on the General page of the app):- Enter the App ID.
- Enter the Client ID.
- Generate and copy a Client Secret, and then enter it in the wizard.
- Generate and download a Private Key, and then enter it in the wizard.
- Click Finish.
- When finished successfully, you can now Add a GitHub Organization, if you haven't done so already.
Add a GitLab Group
Add a GitLab Group to get full visibility into IaC-related issues across code repositories in your group. If your repository is self-hosted on a GitLab Self-Managed Server, you need to add the server to Cloud Exposure before you proceed to add your organization.
Requirements:
- Premium SaaS Plan, or above
To connect your GitLab Group:
- In the Cloud Exposure Console, navigate to Settings > Integrations and click Add Integration.
- In the Integrations Library, click GitLab Group. The Add GitLab Group wizard opens.
- Select GitLab Server (Step 1 in wizard). Select where your project is hosted:
- GitLab.com
- GitLab Self-Managed Server — If your server doesn't appear in the drop-down, you need to [add it to Cloud Exposure] before you proceed to add your organization.
- Click Next.
- Configure Group (Step 2 in wizard):
- Log into GitLab, and click on Groups.
- Click on the root, parent group that you want to connect. You can't connect a subgroup.
- In the left-hand menu, click on Settings > Access Tokens.
- Click Add new token.
-
Enter the following details:
- Token name.
- Expiration date: After this date, you will need to renew the token and update the configuration in Tenable.
- Select a role: Select Developer.
- Select scopes: Select api.
- Click Create group access token and then copy the token.
- [Cloud Exposure] Enter the Root Group access token that you copied.
-
In the Tenable wizard, configure the following settings:
- Sync Cloud to Code — Trace your cloud resources back to their code origins (enabled by default). See Sync Cloud to Code for more information.
- Automatically update folder structure — Mirror your repository's structure as folders within Tenable, preserving its hierarchy and keeping the view synchronized (enabled by default). Learn more about account hierarchy.
- Click Next.
-
Select Projects (Step 3 in wizard): Select which projects you want Tenable to scan:
- Sync all repositories (recommended)
- Include specific folders and repositories
- Exclude specific folders and repositories
Note: If you sync all repositories, or include/exclude an entire folder, all current and future repositories within the folder/s are included/excluded. If you include/exclude specific repositories in a folder, only the selected repositories will be included/excluded. - Click Finish.
Add a GitLab Self-Managed Server
If your group is self-hosted on a GitLab Self-Managed Server, you need to add the server to Cloud Exposure before you proceed to add your group.
This integration supports both internet-facing and network-isolated servers. See Connect Network-Isolated Servers for more information about working with network-isolated servers.
- In the Cloud Exposure Console, navigate to Settings > Integrations and click Add Integration.
- In the Integrations Library, click GitLab Self-Managed Server. The Add GitLab Self-Managed Server wizard opens.
- Configure Server Details (Step 1 in wizard):
- Enter the Name of the server to be displayed in the Cloud Exposure Console.
-
Select how Tenable connects to your server. If your server is network-isolated, use a Tenable Endpoint Connector to establish connection.
- Endpoint (internet-facing) — Enter the GitLab Self-Managed Server endpoint (without the https:// protocol prefix). For example, gitlab.tenable.com or 192.82.156.1:8443.
- Endpoint Connector (network-isolated) — Select the relevant connector from the dropdown. If this option is disabled, it means you haven't yet added a connector. See Connect Network-Isolated Servers for information about how to add one.
- Check Accept any server SSL certificates if SSL is enabled for the server.
- In the Cloud Exposure Console, click Next.
- When finished successfully, you can now Add a GitLab Group, if you haven't done so already.
Sync Cloud to Code
To trace issues back to their code origins, sync the code associated with your cloud resources (Cloud to Code) by connecting your code repository to Cloud Exposure.
See the IaC Compatibility Matrix to see which platforms/repositories are supported for tracing issues back to code.
Grant Tenable permissions to read from the cloud storage resource (for example, the S3 bucket) storing the Terraform code state data file. The state file must have a backend configured, which defines the data file is stored.
- AWS: Grant Terraform Permissions
- Azure: Grant Terraform Permissions
- GCP: Grant Terraform Permissions
AWS: Grant Terraform Permissions
- Verify that any S3 buckets containing Terraform state data that you want to trace are visible to Cloud Exposure. The bucket must be in an account that is connected to Tenable.
- Connect your code repository to Cloud Exposure. Verify that the Sync Cloud to Code checkbox is enabled.
-
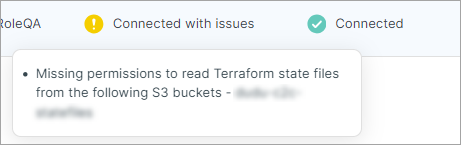
Navigate to Settings > Accounts > AWS and find the account/s where the S3 bucket/s are located. The Status column should indicate missing permissions to read Terraform state files, along with a list of relevant buckets.
- Click the three dots icon next to the account, and then click Edit.
- In the wizard, click Next to navigate to step 2 (Permissions), and then enable
Terraform (S3). A list of buckets associated with your connected accounts is displayed. - Click Next to navigate to step 3 (IAM Role), and copy the Terraform Permissions Policy JSON that appears (3B).
- In the AWS Management Console, navigate to IAM > Roles and search for the role that you created when you connected the account (The role name appears in step 3 of the Cloud Exposure wizard).
- In the Permissions tab, click Add permissions > Create inline policy.
- Paste the policy that you copied earlier into the JSON editor.
- Click Next and then finish creating the policy.
JSON
{
  "Version": "2012-10-17",
  "Statement": [
    {
      "Effect": "Allow",
      "Action": [
        "s3:GetBucketLocation",
        "s3:GetObject",
        "s3:ListBucket"
      ],
      "Resource": [
        "arn:aws:s3:::<bucket_name>",
        "arn:aws:s3:::<bucket_name>/*",
      ]
    }
  ]
}
Azure: Grant Terraform Permissions
- Verify that any blob containers containing Terraform state data that you want to trace are visible to Cloud Exposure. The container must be in an subscription that is connected to Tenable.
- Connect your code repository to Cloud Exposure. Verify that the Sync Cloud to Code checkbox is enabled.
-
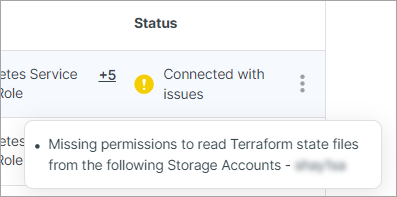
Navigate to Settings > Accounts > Azure and find the subscription/s where the blob container/s are located. The Status column should indicate missing permissions to read Terraform state files, along with a list of relevant storage accounts where the blob containers are located.
- Click the three dots icon next to the subscription, and then click Edit.
- In the wizard, click Next to navigate to step 3 (Permissions), and then enable
Terraform (Blob Container). A list of blob containers associated with your connected subscriptions is displayed. Copy the storage account/s and blob container name/s. - In the Azure portal, navigate to the storage account listed in the previous step.
- Navigate to Containers (under Data Storage) and then click on the blob container listed in the Cloud Exposure wizard.
- Navigate to Access Control (IAM) and then click on Add > Add role assignment.
- Search for and select the Storage Blob Data Reader role from the list in the wizard and click Next.
- Click + Select members.
- Search for and select Cloud Exposure Connector and then click Select.
- Click Next and then click Review + assign to finish. Repeat these steps for all additional roles.
GCP: Grant Terraform Permissions
- Verify that any buckets containing Terraform state data that you want to trace are visible to Cloud Exposure. The bucket must be in a project that is connected to Tenable.
- Connect your code repository to Cloud Exposure. Verify that the Sync Cloud to Code checkbox is enabled.
-
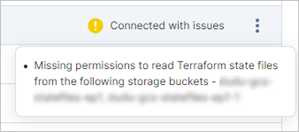
Navigate to Settings > Accounts > GCP and find the project/s where the bucket/s are located. The Status column should indicate missing permissions to read Terraform state files, along with a list of relevant buckets.
- Click the three dots icon next to the account, and then click Edit.
- In the wizard, click Next to navigate to step 3 (Permissions), and then enable
Terraform State (Storage Bucket). A list of buckets associated with your connected accounts is displayed. - Click Next twice to navigate to step 5 (Assign Roles). Keep this page open, as you will need the information here in the upcoming steps.
- In the Google Cloud Console, navigate to Cloud Storage > Buckets.
- Check the boxes next to the names of the buckets listed in step 5 (Assign Roles) of the Tenable wizard.
- In the buckets selected bar on the top, click PERMISSIONS.
- In the side view on the right, click ADD PRINCIPAL.
- Copy the service account email value listed in step 5 (Assign Roles) of the Tenable wizard value and paste it in the New principals field:
-
Copy the following roles and paste them into the Role field, one by one. Click +ADD ANOTHER ROLE for each additional role.
- Storage Insights Collector Service
- Storage Object Viewer
- Click Save.
- (Cloud Exposure Console) Click Next in the wizard and then click Finish.
Pull Request Scanning
To prevent misconfigurations from reaching production, automate security gates by scanning every pull request directly within your developer workflow.
For more details about the feature capabilities, see Pull Request Scanning
Setup and Requirements
To enable PR scanning and enforce it as a security gate, ensure the following requirements are met.
| Code Repository | Required Permissions | Required Configuration for Gating |
|---|---|---|
| GitHub | Read/Write access | Create a Repository Ruleset and select Require status checks to pass. Add the Tenable scan status as a mandatory requirement. |
| Azure DevOps (ADO) |
|
Add a Status Policy to your branch protection settings. Select the continuous-integration/TenableCloudSecurity option and set it to Required. |
How It Works
Tenable uses an event-driven architecture to scan code on Tenable’s infrastructure, eliminating the need for local compute resources.
- Event trigger: When the integration is enabled, Tenable creates a webhook in your repository that notifies the platform of every new or updated PR.
- Remote scan execution: Upon receiving the event, Tenable securely clones and analyzes the code without the need for manual pipeline configuration.
- Result delivery: Scan results are reported to the Cloud Exposure Console and posted as inline comments directly within the PR.
Disable Pull Request Scanning
If you need to disable scanning for a specific repository or remove the integration:
- Disable the setting: Toggle off the Pull Request Scanning setting within the Cloud Exposure Console for the specific repository.
- Webhook removal: Tenable automatically removes the webhook created for your code repository once the integration is disabled.