Manage Dashboards
The following is not supported in Tenable FedRAMP Moderate environments. For more information, see the Tenable FedRAMP Product Offering.
In Tenable Exposure Management, you can manage dashboards in the following ways:
Create a Dashboard
Required User Role: Administrator or Custom Role
In Tenable Exposure Management, you can create a dashboard to highlight key performance indicators (KPIs) for yourself and others within your organization.

To create a new dashboard:
-
At the top of the Dashboards page, click the
 Create New Dashboard button.
The create dashboard page appears.
-
In the Dashboard Name text box, type a name for the dashboard.
-
 (Optional) To add a description to the dashboard, click the
  button.
A text box appears.
-
In the Dashboard Description text box, type a brief description of the dashboard.
-
Click the
 button to save the description.
-
-
From the date range drop-down, select the date range for which you want to view data on the dashboard.
Tip: Choose a Quick pre-defined date range, or select your own date range on the Custom tab. -
(Optional) Click the
 Filters button to apply one or more filters to the dashboard.Note: This filter applies to all individual widget data on the dashboard.
 -
Add widgets to the dashboard:
-
On the create dashboard page, click
Add Widgets.The Widgets Library appears.

-
Do one of the following:
-
Select a widget from the Widgets Library:
-
In the Widgets Library, for the widget you want to add to the dashboard, click the
 button.Tip: Use the search box to search for a specific widget in the library.
The widget appears in the dashboard preview pane.
-
Repeat for each widget you want to add from the Widgets Library.
-
-
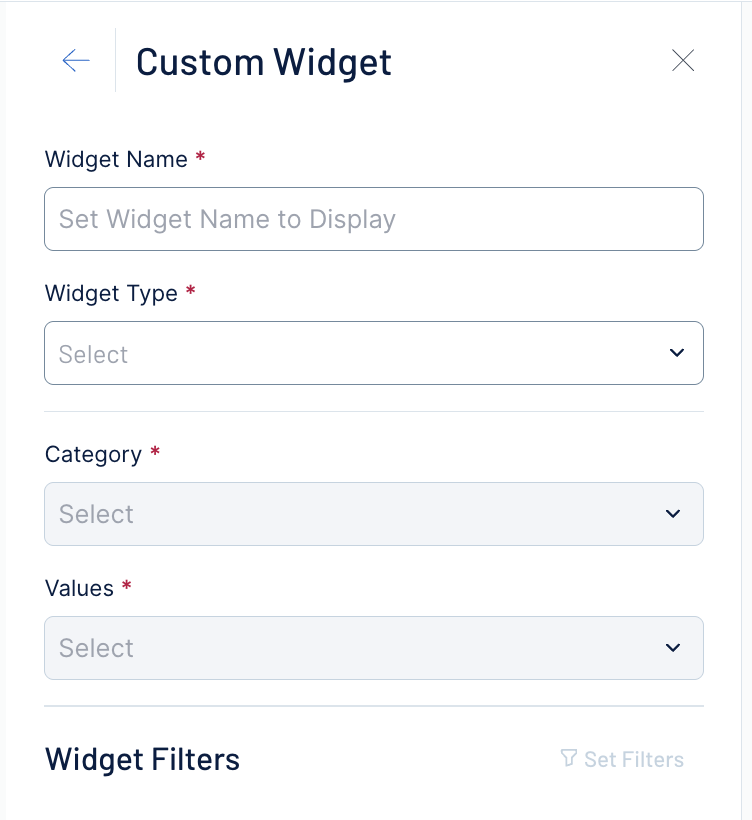
Create a new custom widget:
-
In the upper-right corner of the Widgets Library, click New Custom Widget.
The Custom Widget pane appears.

-
In the Widget Name text box, type a name for the custom widget.
-
From the Widget Type drop-down, select the type of data graph you want to use on the widget, for example, Pie Chart or Table.
The custom widget configuration options update depending on the type of data graph you select.
-
Configure the data according to your preferences. For example, if you select Scatter Chart, you can configure the Values, X axis, Y axis, and Legend for the chart.
The widget updates automatically within the dashboard preview.
Important! For information on what values and fields you can configure based on your chart selection, see Valid Custom Widget Combinations. -
(Optional) In the Chart Filters section, to apply filters to the data within the custom widget, click
Apply Widget Filters.Note: This filter only applies to the data within this custom widget. -
Click Save.
-
-
-
(Optional) Rearrange the widgets on the dashboard as desired.
Tip: Use the View > Show gridlines option to toggle gridlines on or off to suit your design preference. Additionally, select a widget and click View > Snap to grid to automatically align the widget with the nearest gridlines.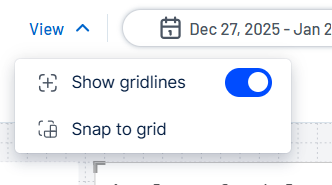
-
Click Create.
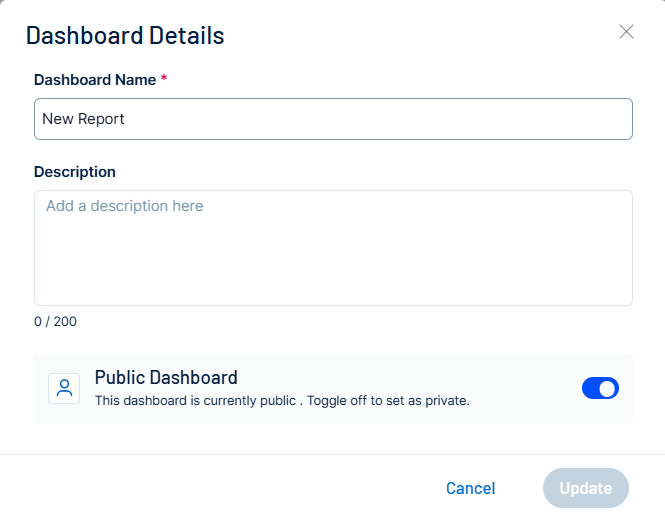
The Dashboard Details window appears.
-
In the Private Dashboard section, enable or disable the toggle to set the dashboard as Public or Private.
Note: Public dashboards can be seen by all users within your Tenable Exposure Management container.
-
Create a Copy of a Dashboard
Required User Role: Administrator or Custom Role
In Tenable Exposure Management, you can make a copy of any dashboard on the Dashboards page.
To copy a dashboard:
-
Do one of the following:
-
On the Dashboards page, in the lower-right corner of the tile for the dashboard you want to copy, click the
 button.
 -
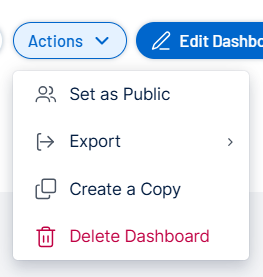
On the dashboard details page, in the upper-right corner, expand the Actions drop-down.
A menu appears.
-
-
Click
 Create a Copy.
The Create a copy window appears.

-
In the Dashboard Name text box, type a name for the copied dashboard. By default, Tenable prepends "copy of" to the original dashboard name.
-
(Optional) In the Description text box, edit the dashboard description.
-
In the dashboard privacy section, select whether you want the dashboard to be Public or Private.
Note: Public dashboards are visible to all users within your Tenable Exposure Management instance. -
Click Create.
Tenable Exposure Management adds the copy of the dashboard to the Dashboards page.
Edit a Custom Dashboard
Required User Role: Administrator or Custom Role
In Tenable Exposure Management, you can edit custom dashboards by either quick-editing their name and description, or accessing the Edit Dashboard page to fully edit the dashboard's configuration options.
To edit a custom dashboard's name and/or description:
-
On the Dashboards page, in the lower-right corner of the tile for the custom dashboard you want to edit, click the
button.A menu appears.
-
Click
Edit Name or Description.The Dashboard Details window appears.
-
Edit the Dashboard Name and/or Description.
-
(Optional) Edit the dashboard's privacy (for example, Public or Private).
-
Click Update.
Tenable Exposure Management saves your changes to the dashboard.
To fully edit a custom dashboard including its widgets:
-
On the dashboard details page for the custom dashboard, in the upper-right corner, click
Edit Dashboard.The dashboard configuration options appear.
-
Make any desired changes to the dashboard or its widgets.
-
Click Update.
Tenable Exposure Management saves your changes to the dashboard.
Change the Privacy of a Custom Dashboard
Required User Role: Administrator or Custom Role
You can set the privacy of custom dashboards to either Public or Private.
To change the privacy of a custom dashboard:
-
Do one of the following:
-
On the Dashboards page, in the lower-right corner of the tile for the custom dashboard you want to copy, click the
button. -
On the dashboard details page for the custom dashboard, in the upper-right corner, expand the Actions drop-down.
A menu appears.
-
-
Do one of the following:
-
If the dashboard is currently private, click
 Set as Public.
 -
If the dashboard is currently public, click
 Set as Private.
A confirmation message appears.
-
-
Click Set as Public/Private.
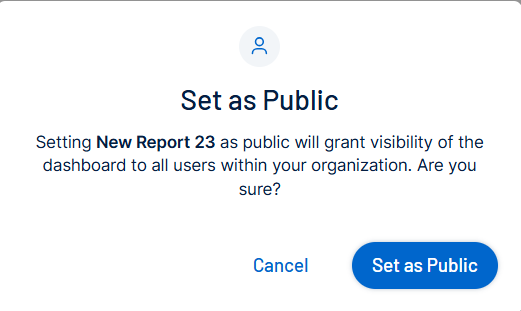
Tenable Exposure Management updates the privacy of the selected dashboard.
Delete a Custom Dashboard
Required User Role: Administrator or Custom Role
In Tenable Exposure Management, you can delete custom dashboards.
To delete a custom dashboard:
-
Do one of the following:
-
On the Dashboards page, in the lower-right corner of the tile for the custom dashboard you want to delete, click the
button. -
On the dashboard details page for the custom dashboard, in the upper-right corner, expand the Actions drop-down.
A menu appears.
-
-
Click
 Delete Dashboard.
A confirmation message appears.
-
Click Delete Dashboard.
Tenable Exposure Management removes the dashboard and its data from the user interface.
Edit a Widget
Required User Role: Administrator or Custom Role
In Tenable Exposure Management , you can edit both built-in and custom widgets on your dashboards. You can modify all widget configuration parameters, including Widget Type, Categories, Values, Data Labels, Stacking, and Filters.
Editing widgets allows you to quickly adjust visualizations without creating a new widget from scratch.
Before You Begin
Note that you can only create up to five instances of a particular widget per dashboard. Once you save an instance, it permanently counts toward the five-instance limit, even if you later delete it. This limit applies per widget per dashboard.
Tip: Only save widget instances you plan to keep; deleting one does not free up a slot.
To edit a dashboard widget:
-
On the dashboard details page, in the upper right corner, click
Edit Dashboard.The dashboard configuration options appear.
-
Hover over the widget you want to edit.
Options appear.
-
Click the More Options button.
A menu appears.
-
Click Edit.
The Custom Widget panel opens on the left side of the page.

-
Edit the widget attributes as needed. For example, change the visualization type, adjust the data categories and values, or update filters.
-
Click Update Widget.
Tenable Exposure Management saves the changes to the selected widget instance.
-
Click Update to save the Dashboard.
A confirmation message appears.
-
Click Update Dashboard.
Note: Keep the following caveats in mind:- You can only edit widgets on dashboards that you own.
- Changes apply only to the selected widget instance on the current dashboard.
- Editing a widget does not modify the original widget in the Widgets Library.
- You cannot save an edited widget as a new widget in the Widgets Library.
- You can add up to five instances of the same widget to a single dashboard. You can edit each instance independently to match specific requirements.
- The Edit Widget feature is supported only on dashboards saved after this feature is released. Older dashboards and copies of older dashboards do not support widget editing. This feature is not backward compatible.
Drill Down to Inventory Data
Required User Role: Basic User, Scan Operator, Standard User, Scan Manager, Administrator, or Custom Role
In Tenable Exposure Management, you can navigate from specific dashboard widgets directly to the relevant pages in the Inventory section. This allows you to view the underlying assets or findings data that make up the widget's results.
To view widget data in the Inventory section:
-
On the Dashboards page, open the dashboard containing the widget you want to investigate.
-
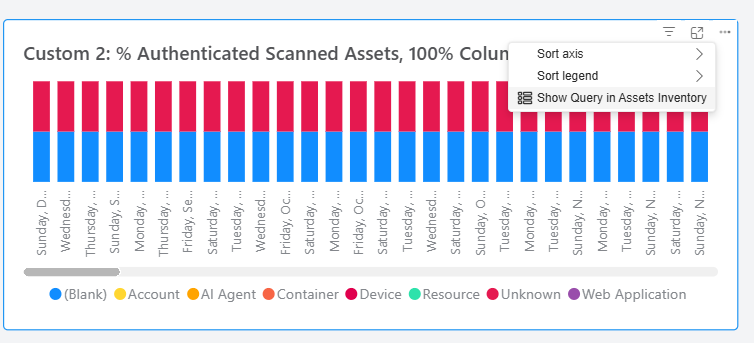
Hover over the widget.
In the upper-right corner of the widget, click More Options.
ِA menu appears. -
Click Show Query in [Inventory Name] Inventory (for example, "Show Query in Findings Inventory" or "Show in Query in Assets Inventory).
Note: The Show Query in... options are determined solely by the measure configured in the widget, regardless of whether the widget is built-in or custom. You may see:One option (e.g., only Show Query in Assets Inventory).
Both options (if the configured measure relates to both assets and findings).
No options (if the configured measure does not support inventory drill-down).
Tenable Exposure Management redirects you to the relevant Inventory page filtered by the specific data displayed in the widget. The destination depends on the measures configured in the widget:
-
(Optional) On the Inventory page, click the
Filters button.The Filters pane appears. By default, the pane shows the predefined filters from the widget query.
 Note: Dashboard widgets refresh every 24 hours, whereas Inventory pages update more frequently. Consequently, the data counts you see in the Inventory section may differ slightly from the numbers displayed in the widget.
Tip: For a complete list of supported measures, their destination inventory pages, and the specific filters applied during the drill-down, see Widget Drill-Down Reference .

Remove a Custom Widget
Required User Role: Administrator or Custom Role
To remove a custom widget from a custom dashboard:
-
On the Dashboards page, open the custom dashboard you own that contains the widget you want to remove
-
Click Edit Dashboard.
-
Hover over the widget you want to edit.
Options appear.
-
Click More Options.
A menu appears.
-
Click Remove.