Assets
The Assets tab on the Inventory page allows you to view and manage all of your assets. You can quickly see which assets are new or updated, which class the asset belongs to, and other useful asset information.
To access the Assets tab:
Required User Role: Basic User, Scan Operator, Standard User, Scan Manager, Administrator, or Custom Role
-
Access the Inventory page.
The Assets tab appears by default.

On the Assets tab, you can:
-
View the Total Number of Assets within your container.
-
View the total number of New Assets discovered within the last 7 days.
-
View the total number of Updated Assets within your container in the last 7 days.
-
Use the search box above the asset list to search for a specific asset in the list. For more information, see Global Search.
-
To the right of the asset list, in the Filters section, use quick filters to sort the asset list by:
-
Sources — Filter the asset list by the selected data source.
-
Asset classes — Filter the asset list by the selected asset class.
Tip: Use the search box to search for a specific source or class. Click the result to automatically filter the list by the selection. -
-
View a list of your assets, including the following information:
-
Name — The asset identifier. Tenable Exposure Management assigns this identifier based on the presence of certain asset attributes in the following order:
-
Agent Name (if agent-scanned)
-
NetBIOS Name
-
FQDN
-
IPv6 address
-
IPv4 address
For example, if scans identify a NetBIOS name and an IPv4 address for an asset, the NetBIOS name appears as the Asset Name.
-
-
Sources — The data source from which the asset originates.
Tip: If there are several sources associated with the asset, you can click the button to view the full list of sources.
-
Class — The class type associated with the asset.
-
AES — The Asset Exposure Score for the asset. The AES represents the asset's relative exposure as an integer between 0 and 1000. A higher AES indicates higher exposure.
Note:Tenable Exposure Management does not calculate an AES for unlicensed assets.
-
Active Finding Count — The number of active findings associated with the asset.
Important: This count includes all findings that are not in the Fixed state (i.e., Active, Resurfaced, and New findings).Tip: Click on a finding count to navigate directly to the Findings tab. -
Top Attack Techniques — Instances of attack techniques associated with this asset that are used in attack paths leading to critical assets. For more information, see Top Attack Techniques.
Tip: Click on a count to navigate directly to the Top Attack Techniques page filtered automatically by attack path techniques related to the asset. -
Top Attack Paths — Attack paths related to the asset that also lead to critical assets. For more information, see Top Attack Paths.
Tip: You can sort by this column to view which assets lead to the greatest number of attack paths.Tip: Click on an attack path count to navigate directly to the Top Attack Paths page, where the Top Attack Paths table is automatically filtered by attack paths that feature the asset. -
Associated tags — The number of tags applied to the asset. For more information on tagging an asset, see Tag Assets via the Assets Page.
-
Last updated — The date and time at which the asset was last updated.
-
Click See details to view more details about an asset. For more information, see Asset Details.
-
You can also manage the page in the following ways:
Filter the Asset List
To filter the asset list:
-
Click the
 button.
The Add filter
button appears. -
Click Add filter
.A menu appears.
-
Do one of the following:
-
To search the asset list by tag, click Tags.
Note: Filtering by multiple tags simultaneously is not currently supported. This is a known limitation pending engineering resolution. To narrow results by asset group, apply a single tag filter or combine a tag filter with other filter criteria. -
To search the asset list by asset property, click Properties.
Tip: See Asset Filters for additional information on available filter types. -
-
In the search box, type the criteria by which you want to search the asset list.
Tenable Exposure Management populates a list of options based on your criteria.
-
Click the tag or property by which you want to filter the asset list.
A menu appears.
-
Select how to apply the filter. For example, if you want to search for an asset whose name is Asset14, then select the contains radio button and in the text box, type Asset14.
-
Click Add filter
.The filter appears above the asset list.
-
Repeat these steps for each additional filter you want to apply.

-
Click Apply filters.
Tenable Exposure Management filters the asset list by the designated criteria.
Export the Table or the Page
Required User Role: Administrator or Custom Role
To export the data on the table or the page:
-
(Optional) To export only specific table rows, in the table, select the check box next to the rows you want to export.
-
Click the
 button.
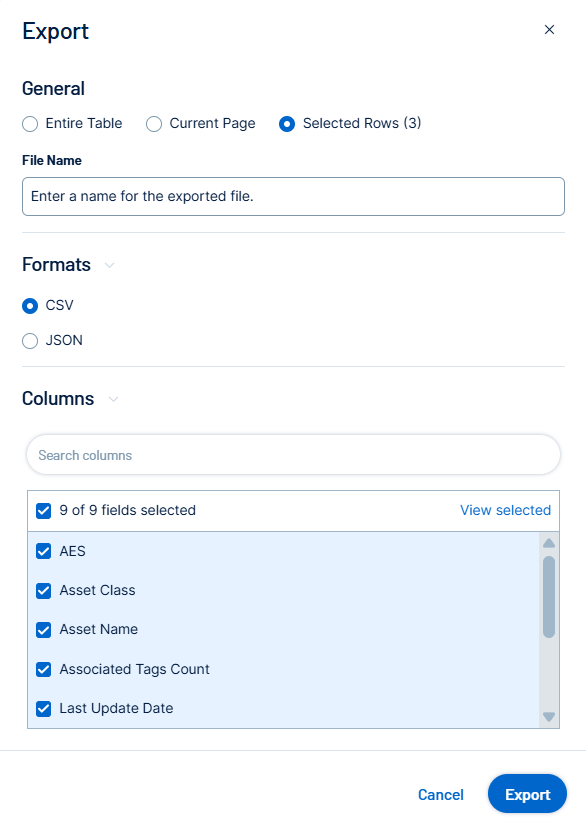
The Export window appears.
-
Do one of the following:
-
To export the entire table, select the Entire Table radio button.
Note: When you export the entire table, Tenable Exposure Management only includes the first 50 columns. To view asset data for a larger number of assets, use the Search Assets API call. -
To export the current page, select the Current Page radio button.
-
To export the selected rows, select the Selected Rows radio button.
Note: This option is only available if you select individual rows in the list before clicking the button.
-
-
In the File Name text box, type a file name to give the exported file.
-
In the Formats section, select the format in which you want to export the data.
-
In the Columns section, select the check box for each column you want to include in the export file.
-
Click Export.
Tenable Exposure Management downloads the export file to your computer. Depending on your browser settings, your browser may notify you that the download is complete.
Customize the Columns in the Table
Required User Role: Basic User, Scan Operator, Standard User, Scan Manager, Administrator, or Custom Role
To customize the columns in the table:
-
Click the
 button.
The Customize columns window appears.
-
(Optional) In the Reorder added columns section, click and drag any column name to reorder the columns.
-
(Optional) In the Show/Hide section, select/delesect the check boxes to show or hide columns in the table.
-
(Optional) In the Remove section, click the
 button to permanently remove a column from the table.
 -
(Optional) To add columns to the table, click Add Columns.
The Add columns to table window appears.
-
(Optional) Use the search bar to search for a column property.
The list of column properties updates based on your search query.
-
Select the check box next to any column or columns you want to add to the table.
-
Click Add.
The column appears in the Customize columns window.
-
-
(Optional) Click Reset to Defaults to reset all columns to their defaults.
-
Click
 Apply Columns.
Tenable Exposure Management saves your changes to the columns in the table.
Create a Tag Based on the Asset List
Required User Role: Scan Manager, Administrator, or Custom Role
To create a tag based on the asset list:
-
Above the list, click
Create.A menu appears.
-
Click Tag.
You navigate directly to the Create New Tag page. By default, the tag type is set to Dynamic.
Tip: For more information, see Tag Types, Format, and Application.
Create an Exposure Signal Based on the Asset List
Required User Role: Administrator or Custom Role
To create an exposure signal based on the asset list:
-
Above the list, click
Create.A menu appears.
-
Click Exposure Signal.
You navigate directly to the New Exposure Signal page.