Asset Details
Required User Role: Basic User, Scan Operator, Standard User, Scan Manager, Administrator, or Custom Role
On the Assets page, you can view additional details for any asset in the assets list.
To view asset details:
-
Access the Assets page.
-
In the row of the asset for which you want to view details, click See details.
The asset details page appears.

On the asset details page, you can:
-
View the Asset Name.
-
View the asset class, for example, Device.
-
View the number of and the icons for each exposure category associated with the asset.
-
Click Show Details to view additional asset information:
-
Info — A brief description of the asset, when it was created, and when it was last seen.
-
Tenable Data Sources — The data sources associated with the asset. Click on a data source name to navigate directly to that application.
-
-
View the Asset Exposure Score for the asset.
Note: Tenable Exposure Management does not calculate an AES for unlicensed assets. For more information, see Tenable Exposure Management Metrics.
-
View the Asset Criticality Rating for the asset.
-
View the number of Findings Identified on the asset. Click
 See in Findings to navigate directly to the Findings page.
 -
View high-level Key Properties, including:
-
Asset Class — The asset class associated with the asset, for example, Device.
-
Owner — The owner of the asset.
-
Drivers — The key drivers of (that is, plugins that have the biggest effect on) the asset.
-
Location — The physical location of the asset.
-
Last Observed At — The date and time at which a scan most recently identified the asset.
-
You can also manage the page in the following ways:
Export One or More Tabs from the Asset Details Page
Required User Role: Administrator or Custom Role
You can export data from any table-based tab within the asset details page, which allows for easy data sharing amongst your team.
To export data from the asset details page:
-
In the upper-right corner of the page, click
 Export.
The Export window appears.

-
(Optional) In the File Name text box, type a new name for the export file.
-
In the Formats section, select the radio button for the format in which you want to export the data.
-
In the Pages to export section, select the check box next to each table-based tab whose data you want to include in the export file.
-
Click Export.
Tenable Exposure Management downloads the export file to your computer. Depending on your browser settings, your browser may notify you that the download is complete.
Generate and View an AI Summary of the Asset
Required User Role: Basic User, Scan Operator, Standard User, Scan Manager, Administrator, or Custom Role
The following is not supported in Tenable FedRAMP Moderate environments. For more information, see the Tenable FedRAMP Product Offering.
Tenable Exposure Management allows you to generate a summary of your asset using AI. Summaries are generated at the container level, and only apply to licensed assets within your container.

Do one of the following:
-
To generate an AI summary for the asset for the first time, in the upper-right corner of the page, click
 Summarize.
Tenable Exposure Management uses AI to generate a summary of the asset including general details and specifics about the asset's weaknesses.
-
To view an existing AI summary for the asset, in the upper-right corner of the page, click
Show Summary.Tenable Exposure Management displays the previously generated AI summary for the asset.
View and Interact with Asset Details Tabs
Required User Role: Basic User, Scan Operator, Standard User, Scan Manager, Administrator, or Custom Role
When viewing the asset details page, you can click on the following tabs to view additional asset information:
The Properties section highlights details about the asset's properties.

Here, you can view asset details including:
| Key Properties | |
| Item | Description |
|---|---|
| Asset Class | The asset class associated with the asset, for example, Device. |
| Created Date | The date and time at which the asset source first created the asset record. |
| Host Fully Qualified DNS | The Host Fully Qualified Domain Names, or FQDNs, of the asset host. |
| Host System Type | The type associated with the asset's host system, for example, general-purpose. |
| Last Observed At | The date and time at which a scan most recently identified the asset. |
| Show information order |
Click to view the source order in which Tenable Exposure Management pulls asset property data for multi-source assets.
Tip: Click Configure Information Order to configure the merge order via the Information Order Configuration option on the Settings page.
|
| Asset Cluster Logic (Multi-source assets only) | |
| Description | |
|
An explanation of why a third-party asset was merged with one or more other sources. For each merged asset, you can view the matching criteria and value (e.g., hostname, IP address, MAC address etc.) that triggered the merge. Merging criteria is based on a set of predefined asset properties relevant to the asset’s class. Icons indicate the individual sources from which the asset data was clustered. Tip: Hover over the icon to view details about the asset source.
 |
|
| Asset Information | |
| Item | Description |
| ACR | The Asset Criticality Rating associated with the asset. For more information, see Tenable Exposure Management Metrics. |
| AES | The Asset Exposure Score associated with the asset. For more information, see Tenable Exposure Management Metrics. |
|
Application SSL Enabled |
Indicates whether or not Application SSL is enabled on the asset. |
| Asset ID | The asset's UUID. |
| Asset Name |
The asset identifier; assigned based on the presence of certain attributes in the following logical order:
If none of the above attributes are present, then FQDN is selected as the name for the asset. |
| Cloud is Autoscale | Indicates whether or not the asset is part of a cluster that can automatically scale its size. |
| Cloud is Iac | Indicates whether or not the asset is Infrastructure as Code (IaC). |
| Cloud is Real | Indicates whether or not the asset is actively running in the cloud. |
| Device Sub Classes | Where applicable, the subclass associated with the asset device. |
| Device System Type | Where applicable, the system type associated with the asset device. |

Connectors Details
Connectors are how Tenable Exposure Management syncs and integrates with tools and third-party data. The Connectors Details section shows details about all third-party connectors associated with the asset.

Click Show raw data to view the raw data for the third-party connector.

Each tile includes the following information:
-
Key Properties:
-
Class — The asset class associated with the asset, for example, Account.
-
Category — The category associated with the asset, for example, ACCOUNT.
-
Description — Where available, a description of the account.
-
-
Network and Administrator Profile:
-
OU — The Organizational Unit (OU) associated with the account.
-
Domain — The domain associated with the account. For more information, see Domains in the Tenable Identity Exposure User Guide
-
Forest Name — The forest name associated with the account. For more information, see Forests in the Tenable Identity Exposure User Guide.
-
-
Account Provider — The provider of the account, for example, Azure Active Directory.
-
Account AES — The overall Asset Exposure Score associated with the account.
-
Last Use — The date on which the account was most recently accessed by a user.
-
Last Location Used — The physical location of where the account was most recently used.
-
Account Activity — The activity status of the account, for example, Active.
-
Weakness — A graphical representation of weaknesses on the account. This section includes a line graph and an individual count of each weakness and its criticality. For more information, see Weaknesses.

Devices
The Devices section shows all devices associated with the asset. This list highlights the hosts used by an account. Each device and its relevant information is listed as a tile on the page.

On each tile, you can view the following device information:
-
Key Properties:
-
Class — The asset class associated with the device.
-
Category — The category associated with the device, for example, general-purpose.
-
Description — Where available, a description of the device.
-
Drivers — A list of drivers installed on the device.
-
-
Network and Administrator Profile:
-
Static IP Assignment — The static IP address associated with the device.
-
OU — The Organizational Unit (OU) associated with the device.
-
Domain — The domain associated with the device. For more information, see Domains in the Tenable Identity Exposure User Guide
-
Forest Name — The forest name associated with the device. For more information, see Forests in the Tenable Identity Exposure User Guide.
-
-
Device AES — The overall Asset Exposure Score associated with the device.
-
Weakness — A graphical representation of weaknesses on the device. This section includes a line graph and an individual count of each weakness and its criticality. For more information, see Weaknesses.
-
Last Use — The date on which the device was most recently accessed by a user.
-
Last User — The last user account to access the device.
-
Last Location Used — The physical location of where the account was most recently used.
-
Identities associated with the Device — Where applicable, any Active Directory or Microsoft Entra ID Identities associated with the device.
-
Devices Using MFA — Indicates if the device requires multi-factor authentication (MFA) for user login.
-
Device OS — The operating system (OS) running on the device. In the upper-right corner of the box, view a color-coded status of the OS, for example, Active.
Attack Paths
The Attack Paths section shows a table list of the top attack paths in which the asset is present.

The attack paths list includes the following information:
-
Name — The name of the attack path.
-
Path Priority Rating — The priority of an attack path. Tenable Exposure Management calculates the PPR based on the relative number of attack paths to critical assets. Tenable Exposure Management categorizes priority levels as Low, Medium, High, and Critical.
-
Nodes — A visual representation of the nodes involved in the attack path that indicates the node type and the order in which the nodes might be accessed.
-
See in APA — Click See in APA
in the row of any attack path to navigate directly to the Top Attack Paths page with the selected attack path displayed by default.

The weaknesses table includes the following information:
-
Finding Name — The name of the finding.
-
Severity — The severity of the finding, for example, Critical.
-
State — The state of the active finding, for example Active or Resurfaced.
-
Last seen — The date at which the weakness was last seen in a scan on the asset.
-
Solutions — Where applicable, a brief description of how you can remediate the finding.
-
Click See details to view more details about a finding. For more information, see Finding Details.
Weaknesses
The Weaknesses section shows a table list of all weaknesses associated with the asset.
The weaknesses table includes the following information:
Weakness Name — The Common Vulnerability Exposure (CVE) ID associated with the weakness.
Type — The type of weaknesses: Misconfiguration or Vulnerability.
Description — A brief description of the weakness.
Severity — The severity of the weakness, for example, Critical.
Note: At this time, Tenable Exposure Management does not include information for Info level severity weaknesses.VPR — The Vulnerability Priority Rating (VPR) of the weakness.
Impacted Assets — The number of assets impacted by the weakness. For more information, see Assets.
Source — The application the weakness' asset originated from, for example, Tenable Vulnerability Management.
Last seen — The date at which the weakness was last seen in a scan on the asset.
Click See details to view more details about a weakness. For more information, see Weakness Details.
Tags
The Tags section shows a table list of all tags applied to the asset.
Tag name — The name of the tag value or tag category.
CES — The Cyber Exposure Score for the tag value or tag category. The CES represents Cyber Exposure risk as an integer between 0 and 1000, based on the Asset Exposure Score (AES) values for the assets to which the tag is applied. Higher CES values indicate higher risk.
Related Assets — The number of assets to which the tag is applied.
Weaknesses — The weaknesses associated with the asset. For more information, see Weaknesses.
Source — The application the tag originated from, for example, Tenable Vulnerability Management.
Last updated — The date on which a user last updated the tag.
Click See details to view more details about a tag. For more information, see Tag Details.
Entitlements
The Entitlements section shows entitlement information for assets who have roles, either:
Enabled by Tenable cloud scanning the Active Directory and adding the appropriate domain.

The entitlements section includes the following information:
Entitlements — The name of the asset entitlement.
Trustees — The number of trustees associated with the asset entitlement. Click the number to navigate directly to the page filtered by all assets to which these trustees have entitlements.
Accessible Resources — The number of accessible resources associated with the asset entitlement. Click the number to navigate directly to the Access tab for the asset.
Roles — The number of accessible resources associated with the asset entitlement. Click the number to navigate directly to the Roles tab for the asset.
Account — The name and type of the account asset associated with the entitlement. Click the name to navigate directly to view details for that specific asset.
Last Use — The date on which the entitlement was last used by the asset.
Roles
The Roles section shows all roles assigned to the asset. For example, if this identity has roles assigned in Microsoft Entra ID, their details appear here.

The roles list includes the following information:
Roles — The name of the role assigned to the asset.
Origin — An icon that indicates the origin provider of the account (for example, Azure AD).
Severity — The overall severity of the asset, for example, Critical.
Trustees — The number of trustees associated with the asset role.
Entitlements — The number of entitlements to which the role has access.
Last Use — The date on which the role was most recently used on the asset.
Groups
The Groups section shows a list of groups to which the asset belongs. For example, if this asset is a member of groups in Microsoft Entra ID or Azure Active Directory, they appear here.

The groups list includes the following information:
Group — The name of the group to which the asset belongs.
Account — The name of the account on the asset that belongs to the group.
AES — The overall Asset Exposure Score associated with the account.
Members — The total number of assets that belong to the group.
Origin — An icon that indicates the origin provider of the group (for example, Azure AD).
Click See details to navigate directly to the asset details page for the selected group.
Access
The Access section shows access information for assets who have roles, either:
Enabled by Tenable cloud scanning the Active Directory and adding the appropriate domain.

The access list includes the following information:
Asset Name — The asset identifier of the asset.
AES — The overall Asset Exposure Score of the asset.
Asset Class — The asset class associated with the asset, for example, Account.
Entitlements — The directory path to which the asset has entitlement access.
Entitlement Origin — An icon that indicates the origin provider of the entitlement (for example, Azure AD).
Trustees — The number of trustees associated with the asset.
Exposure Cards
The Exposure Cards section shows all exposure cards associated with the asset. Assets can be part of global exposure cards, or custom cards created by users on the Exposure View page.

Click on any card to navigate directly to the Exposure View page with the selected card data displayed by default.
For more information on exposure cards and how to create them, see the following:
Relationships
The Relationships section shows a list of all assets with a known relationship to the current asset for which you are viewing details.

The relationships list includes the following information:
Relationship Type — The type of relationship between the two assets.
Direction — Indicates whether the related asset is the Source or the Target of the asset relationship.
Asset Name — The asset identifier of the related asset.
Asset Class — The asset class associated with the asset, for example, Account.
AES — The overall Asset Exposure Score of the related asset.
Weaknesses — The weaknesses associated with the asset. For more information, see Weaknesses.
Last Updated — The date at which a scan most recently identified the asset.
Click See details to navigate directly to the asset details page for the selected asset relationship.
Software
The Software section shows, where available, the installed software on the asset.
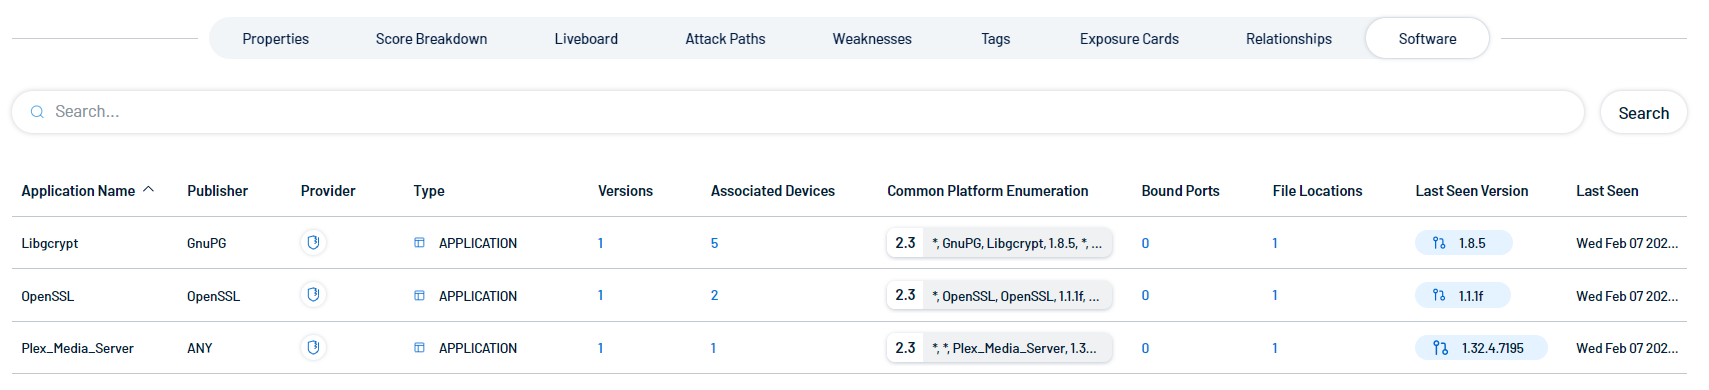
The software list includes the following information:
Application Name — The name of the software application installed on the asset.
Publisher — The group or company that published the software application.
Provider — The provider, or Tenable application, that discovered the software application.
Type — The software type, for example, Application.
Versions — The number of versions of the software installed on the asset.
 Click a number to open the Installed Versions panel:
In the Installed Versions panel, you can view the following information:
Tip: Use the Search box to search for a specific version of the installed software.Last Seen Version — The version of the software that was most recently seen on an asset.
Associated Devices — The number of assets that have this version of the software installed.
Last Seen — The date and time at which the software was most recently seen on an asset.
Associated Devices — The number of assets that have this software application installed.
Common Platform Enumeration — The Common Platform Enumeration (CPE) associated with the software application.
Click a CPE to open the CPE panel, where you can view information such as the CPE Version, Vendor, and Product for each version of the installed software.

Bound Ports — The number of ports on the asset that are bound to the software application.
Note: The Bound Ports option is only available for remotely detected devices.Click a number to open the Bound Ports panel, where you can view the ports bound to the application as well as their associated devices:
 Tip: Use the Search box to search for a specific port or associated device.
File Locations — The locations on your machine where the software application stores files.
Click a number to open the File Locations panel, where you can view the file paths for all locations where the software stores files.
 Tip: Use the Search box to search for a specific location.
Last Seen Version — The version of the software that was most recently seen installed on an asset.
Last Seen — The date and time at which the software was most recently seen on an asset.
Users
The Users section shows a list of users with access to the device. Each user and its relevant information is listed as a tile on the page.

On each tile, you can view the following information about each user:
Key Properties:
Class — The asset class associated with the user.
Sources — The application(s) the user originated from, for example, Tenable Vulnerability Management.
Created Date — The date and time at which the user was created.
Last Observed At — The date and time at which the user last accessed the device.
AES — The overall Asset Exposure Score associated with the asset.
Weakness — A graphical representation of weaknesses on the asset. This section includes a line graph and an individual count of each weakness and its criticality. For more information, see Weaknesses.
Device Accounts
The Device Accounts section shows a list of all accounts present on a host. Each account and its relevant information is listed as a tile on the page.

On each tile, you can view the following information about each account on the account:
Key Properties:
Class — The asset class associated with the account.
Sources — The application(s) the account originated from, for example, Tenable Vulnerability Management.
Created Date — The date and time at which the account was created.
Last Observed At — The date and time at which the a user last accessed the account.
AES — The overall Asset Exposure Score associated with the asset.
Weakness — A graphical representation of weaknesses on the asset. This section includes a line graph and an individual count of each weakness and its criticality. For more information, see Weaknesses.
Exposure Signals
The Exposure Signals section shows a list of tiles with information about exposure signals associated with the asset. An Exposure Signal can be defined as a combination of risks that could make any weakness potentially dangerous to your business.
Each tile includes the following information:
Severity — Each card is color coded to indicate the severity associated with the exposure signals, for example:
Dark Red — Critical
Light Red — High
Orange — Medium
Yellow — Low
Blue — Info
Violations — The number of assets found in violation of the exposure signal.
Exposure Mgmt. — The exposure category associated with the exposure signal.
Trends — The trend and percentage of change in violations within the last 7 days. For example, if the violations for this combination have increased by 5.45%, you'd see
 .
.
Click on a tile to navigate directly to the Exposure Signals page filtered by the selected exposure signal.