Static File Upload in Tenable One Open Connector
The following is not supported in Tenable FedRAMP Moderate environments. For more information, see the Tenable FedRAMP Product Offering.
You can use the Tenable One Open Connector to ingest asset and finding data from third-party sources through a flat file upload interface. This self-service connector normalizes raw data to align with the asset and finding models in Tenable Exposure Management.
Configure Static File Upload
To configure static file upload:
- In the Data pulling configuration section, select the Static File Upload option.
- Click Upload & Map File.
- Browse and select a supported file format (CSV, Excel, or ZIP containing a single file).
-
In the Data Update Mode section, select how the connector should process future data syncs:
-
Override data (Full Fetch): Every new file sync fully overrides the data ingested from the previous sync. Use this mode to replace all existing asset records and findings for the connector on each sync.
-
Update data (Incremental Fetch): Every new file sync updates the existing set of data in Tenable Exposure Management after an initial full sync. This mode optimizes for bandwidth by processing only the assets and findings updated since the previous sync.
For files containing both assets and findings, you must select one of the following reconciliation modes:
- Additive Only Mode: Keeps all existing assets and findings active in the platform. Tenable Exposure Management only processes new or updated data; no records are removed or archived.
- Strict Inventory Mode: Archives assets missing from the file to maintain a clean inventory. Existing findings for these missing assets remain until the asset is fully decommissioned.
- Dynamic Remediation Mode: Automatically marks findings missing from the file as Resolved if the asset is still detected. Assets not mentioned in the file remain active to preserve historical context.
Note: If your file contains only asset data (inventory-only), the platform defaults to Stable Inventory Mode. This mode keeps existing assets active even if they are missing from the new file, and the Incremental Sync Mode Selection window does not appear.
Tip: You can switch between data update modes at any time by editing the connector configuration. For more information, see Manage Data Sources and Update Modes in Tenable One Open Connector.
-
-
Once the upload is complete, a data preview appears.
(Optional) To replace the file, click Replace file and upload a new one. You can only upload one file at a time.
Tip: To learn more about how file replacement works, see Upload a New File.
-
Click File Preview to view the first 100 rows of the discovered file.
-
From the Asset type drop-down box, select the category that matches your data (e.g., Devices).
-
Click Next.
Note: This selection defines the mapping attributes available in the next step.
-
Define how the connector interprets and aligns your source data with the Tenable Exposure Management standardized data model:
-
Review the auto-suggested mappings and manually adjust as needed. You must map the mandatory fields (like Asset Name or Finding ID) to continue.
-
(Optional) Use the + button to add new mappings.
TIP: To learn about the expected behavior and logic rules of how Tenable Exposure Management maps the source file columns, see Tenable One Open Connector Mapping . -
Click Save and continue.
The Data Aggregation and Uniqueness page appears.
-
-
On the Data Aggregation and Uniqueness page, fill in the answers for the required questions to define how Tenable Exposure Management identifies unique assets, weaknesses, and findings.
Question Description Which fields uniquely identify a single asset? Define what constitutes a unique device or resource in your file (e.g., using Asset ID alone, or a composite key like Asset Name + IP Address). This ensures that Tenable Exposure Management consolidates multiple rows referencing the same device into a single asset record for deduplication.
Which fields uniquely define a weakness? Define which fields determines a unique security issue (the 'vulnerability'). This ensures a correct aggregation of all instances of that weakness across your entire asset inventory.
Which fields uniquely define a finding? A finding is the combination of a unique asset and a unique weakness, plus any extra context. This key defines the single instance of a detection (e.g., CVE-123 on Server-A, Port 80).This field is automatically pre-populated with the unique key fields selected in Question 1 (Asset) and Question 2 (Weakness). You can then add fields like Port or Protocol to make the Finding more granular. If you want to change the foundational keys, you must change your answers to Question 1 or 2 first.
Which Tenable Exposure Category best describes the data in this file? Tenable Exposure Management
calculates the Asset Exposure Score (AES) using specialized risk models designed for Vulnerability Management (VM), Cloud Security Posture (CSP), Web Applications or Operational Technologies (OT). Select the category that best fits your data to ensure Tenable Exposure Management calculates risk accurately according to the established scoring methodology.
Note: If your data does not align with one of the available categories,Tenable Exposure Management cannot calculate the specific AES for those assets. -
Click Save.
-
In the Test connectivity section, click Test Connectivity. Tenable Exposure Management validates the credentials and accessibility of the file path. You must pass this test before you can create the connector.
If successful, Tenable Exposure Management displays the name of the file pulled by auto-discovery (for example, Recent File: abc.csv 2026-01-27).
Note: If you change the credentials, you must test the connectivity before you can save the connector.
-
In the Asset Retention box, type the number of days after which Tenable Exposure Management removes assets. The default is 460 days. Exposure Management determines the removal date based on the data available in your uploaded file.
Tip: To learn more, see How Asset Retention works for the Tenable One Open Connector.
-
Click Create & Sync .
The data begins syncing. Tenable Exposure Management reflects the changes after processing completes.
-
If you selected Incremental Fetch and your file contains findings, the Incremental Sync Mode Selection window appears. Select a mode for reconciling missing data:
- Additive Only Mode: Keeps all existing assets and findings active; only adds new or updated data.
- Strict Inventory Mode: Archives assets missing from the file while keeping existing findings for active assets.
- Dynamic Remediation Mode: Automatically marks findings missing from the file as Resolved if the asset is still detected.
Upload a New File
After the initial baseline is established, you can upload subsequent files to update your data. The platform handles data reconciliation based on your selected sync mode.
To upload a new file:
- On the Connectors page, click the Tenable One Open Connector you want to edit.
- Click Upload New File.
- From the drop down list, select the file asset type.
- Browse to and select your updated source file.
- (Optional) Click File Preview to view the first 100 rows of the file.
- Click Next.
Tenable Exposure Management compares the new file structure with your previous configuration. If the structures match, the platform displays your existing mappings automatically.
-
Click Next.
- On the Data Aggregation and Uniqueness page, identify and apply any required changes to your unique identifiers.
-
Click Save & Sync.
- Identify if a Data Sync Conflict alert appears.
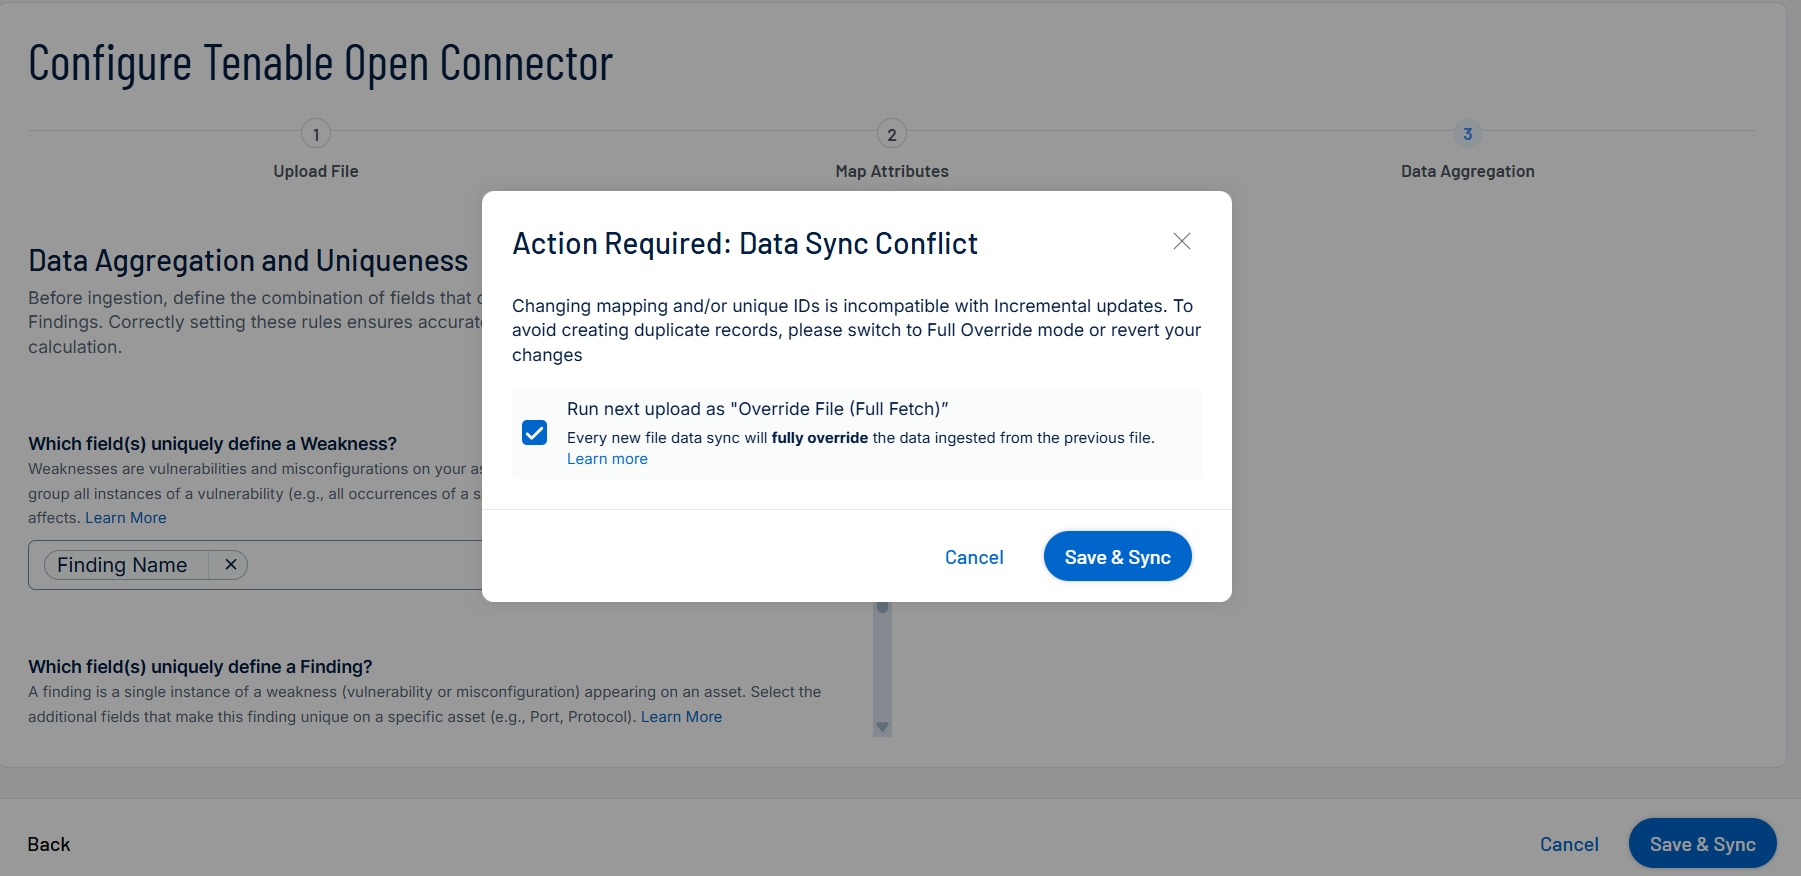
Important: If you use Incremental Fetch and modify field mappings or unique identifiers, you must force a baseline reset. Changing these IDs prevents Tenable Exposure Management from recognizing existing records and can cause data duplication.
- To proceed, select the Run next upload as "Override File (Full Fetch)" check box to force a baseline reset. After this initial full fetch, Tenable Exposure Management automatically resumes incremental syncs using your selected mode for all future updates.
- Click Update & Sync.
Note: If you need to switch your data source from manual upload to automated pulling, see Manage Data Sources and Update Modes in Tenable One Open Connector.
Tenable One Open Connector Data in Tenable Exposure Management
Locate Connector Assets in Tenable Exposure Management
As the connector discovers assets, Tenable Exposure Management ingests those devices for reporting.
To view assets by connector:
-
In Tenable Exposure Management, navigate to the Assets page.
-
In the Filters section, under Custom, click the connector name for which you want to view assets.

The asset list updates to show only assets from the selected connector.
-
Click on any asset to view Asset Details.
Locate Connector Weaknesses in Tenable Exposure Management
As the connector discovers weaknesses, Tenable Exposure Management ingests those weaknesses for reporting.
To view weaknesses by connector:
-
In Tenable Exposure Management, navigate to the Weaknesses page.
-
In the Filters section, under Custom, click the connector name for which you want to view weaknesses.
The weaknesses list updates to show only weaknesses from the selected connector.
-
Click on any weakness to view Weakness Details.
Locate Connector Findings in Tenable Exposure Management
As the connector discovers individual findings, Tenable Exposure Management ingests those findings for reporting.
To view findings by connector:
-
In Tenable Exposure Management, navigate to the Findings page.
-
In the Filters section, under Custom, click the connector name for which you want to view findings
The findings list updates to show only assets from the selected connector.
-
Click on any asset to view Finding Details.
Expected Post-Sync Behavior
After a successful synchronization, Tenable Exposure Management performs the following actions based on your selected sync mode:
-
Full fetch (override): Replaces all existing asset records and findings for the connector instance with the content of the new file. Tenable Exposure Management archives assets and marks findings as Fixed if they are missing from the latest upload.
-
Incremental fetch (update): Updates the existing baseline with only the new or changed data found in the file. Tenable Exposure Management reconciles missing assets or findings based on your selected delta mode (Additive Only, Strict Inventory, or Dynamic Remediation). If you upload an asset-only inventory file, the platform defaults to Stable Inventory Mode automatically.
-
Uniqueness and mapping changes: Applies updated uniqueness criteria or field mappings only after a mandatory Full Fetch baseline reset. Tenable Exposure Management does not retroactively modify data already ingested with previous uniqueness logic.
-
Data cleanup: Disregards previous values for any non-mandatory fields removed from the latest mapping.