Install a Tenable Agent on Windows
Use the following procedure to install Tenable Agent on a Windows system. During the installation process, you link the agent to its manager Tenable Vulnerability Management or Tenable Nessus Manager) so that it can begin sending scan data once the installation is complete.
Before you begin:
- Retrieve the Tenable Agent linking key. For more information, see the Tenable Nessus User Guide or the Tenable Vulnerability Management User Guide, depending on what manager you use.
- If you previously had the Tenable Agent installed on your system, see the knowledge base article on how to avoid linking errors.
Caution: If you install a Tenable Agent on a system where an existing Tenable Agent, Tenable Nessus Manager, or Tenable Nessus scanner is running nessusd, the installation process kills all other nessusd processes. You may lose scan data as a result.
Download Tenable Agent
On the Tenable Agent Download Page, download the package specific to your operating system.
Once you download the agent package, you can install and link the agent using the command line, or you can install and link the agent with the GUI installation wizard.
Install and Link via the Command Line
You can install and link Tenable Agents via the command line with a number of linking parameters. For example:
msiexec /i NessusAgent-<version number>-x64.msi NESSUS_GROUPS="Agent Group Name" NESSUS_SERVER="192.168.0.1:8834" NESSUS_KEY=00abcd00000efgh11111i0k222lmopq3333st4455u66v777777w88xy9999zabc00 /qn
The following are available linking parameters:
| Parameter | Description |
|---|---|
| ADDLOCAL=ALL | Install the Tenable Agent system tray application, as described in step 8 of Install a Tenable Agent on Windows in the Tenable Agent User Guide. |
NESSUS_CA_PATH
|
Specify a custom CA certificate to use to validate the manager's server certificate. |
| NESSUS_GROUPS |
Specify existing agent group or groups where you want to add the agent. If you do not specify an agent group during the install process, you can add your linked agent to an agent group later in Tenable Nessus Manager or Tenable Vulnerability Management. Note: The agent group name is case-sensitive and must match exactly. You must encase the agent group name in quotation marks (for example, --groups="My Group"). Note: Quotation marks (") are necessary when listing multiple groups, or one group with spaces in its name. For example:
|
NESSUS_NAME
|
Specify the name for your agent. If you do not specify a name for your agent, the name defaults to the name of the computer where you are installing the agent. |
| NESSUS_OFFLINE_INSTALL | You can install the Tenable Agent on a system even if it is offline. Add the command line option NESSUS_OFFLINE_INSTALL="yes" to the command line input. The Tenable Agent will periodically attempt to link itself to either Tenable Vulnerability Management or Tenable Nessus Manager. If the agent cannot connect to the controller then it retries every hour, and if the agent can connect to the controller but the link fails then it retries every 24 hours. |
| NESSUS_PLUGINS_FILEPATH="C:\path\to\plugins_set.tgz" | Install a full plugins set before linking to reduce the bandwidth impact during a mass installation. Add the command line option NESSUS_PLUGINS_FILEPATH="C:\path\to\plugins_set.tgz" where plugins_set.tgz is a recent plugins set tarball less than five days old. A stale plugins set older than five days will force a full plugins download to occur. You can download a recent plugins set from the Tenable downloads page. |
|
NESSUS_PROCESS_PRIORITY |
Determine the priority of the agent relative to the priority of other tasks running on the system. For valid values and more information on how the setting works, see Agent CPU Resource Control in the Tenable Agent Deployment and User Guide. |
NESSUS_PROXY_AGENT
|
Specify the user agent name, if your proxy requires a preset user agent. |
NESSUS_PROXY_PASSWORD
|
Specify the password of the user account that you specified as the username. |
NESSUS_PROXY_SERVER
|
Specify the hostname or IP address of your proxy server. |
NESSUS_PROXY_USERNAME
|
Specify the name of a user account that has permissions to access and use the proxy server. |
NESSUS_SERVER
|
Specify the hostname or IP address of your server.
|
| NESSUS_SERVICE_AUTOSTART=false |
Prevents the Tenable Agent from starting up after installation. This parameter can be useful for streamlined deployment options (for example, deploying using a JSON file). Note: On Windows, the agent service StartType is set to Automatic. Therefore, when you reboot a Windows system, the agent service always starts. |
Once you install and link the agent, Tenable recommends that you verify that the agent is successfully linked to the manager by viewing the agent in the manager user interface.
Install and Link with the Installation Wizard
- Navigate to the folder where you downloaded the Tenable Agent installer.
- Next, double-click the file name to start the installation process. The Welcome to the InstallShield Wizard for Nessus Agent window appears.
- In the Welcome to the InstallShield Wizard for Nessus Agent window, click Next to continue.
- In the License Agreement window, read the terms of the Tenable, Inc. Nessus software license and subscription agreement.
- Click I accept the terms of the license agreement.
- Click Next.
-
In the Destination Folder window, click Next to accept the default installation folder.
-or-
Click Change to browse and select a different folder where you want to install Tenable Agents, then click Next.
-
In the Setup Type window, do one of the following:
-
To install the agent with the System Tray Application, which allows you to view the agent status on your machine, select Custom, click Next, and complete the steps in the following drop-down menu:
 System Tray Application configuration
Field Value Key (Required) Use the linking key you obtained from the manager.
To retrieve the linking key from the manager, see the Tenable Nessus User Guide or the Tenable Vulnerability Management User Guide, depending on which manager you use.
Server (Required) Enter the manager's host server:
-
To link to Tenable Vulnerability Management, enter sensor.cloud.tenable.com:443.
Note:If you are connecting to Tenable Vulnerability Management through Tenable Nessus scanners, Tenable Agents, Tenable Web App Scanning scanners, or Tenable Network Monitors (NNM) located in mainland China, you must connect through sensor.cloud.tenablecloud.cn instead of sensor.cloud.tenable.com.Note: For more information about linking agents to Tenable Vulnerability Management, see Link a Sensor in the Tenable Vulnerability Management User Guide. -
To link to Tenable Nessus Manager, enter the IP/hostname of the manager with the appended port 8834; for example, 192.168.2.1:8834.
Groups Specify the existing agent group or groups where you want to add the agent.
If you do not specify an agent group during the installation process, you can later add your linked agent to an agent group.
-
The Custom Setup page appears. By default, the system tray application is excluded from the installation package.
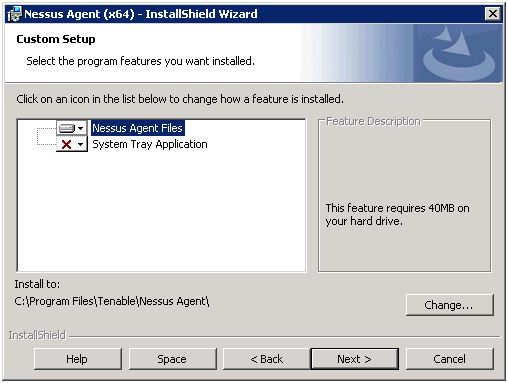
-
Click the System Tray Application drop-down box.
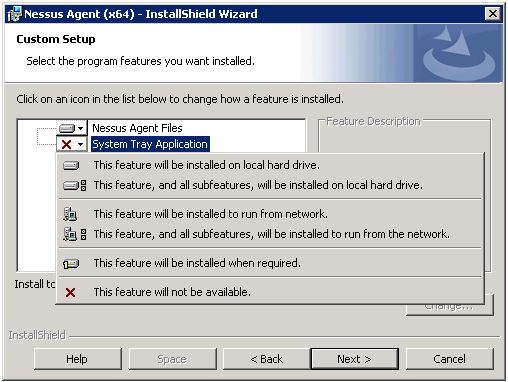
- Click This feature will be installed on local hard drive.
- Click Next.
-
-
To install the agent without the System Tray Application, select Typical and click Next.
-
-
In the Configuration Options window, type the Agent Key values:
Field Value Key (Required) Use the linking key you obtained from the manager.
To retrieve the linking key from the manager, see the Tenable Nessus User Guide or the Tenable Vulnerability Management User Guide, depending on which manager you use.
Server (Required) Enter the manager's host server:
-
To link to Tenable Vulnerability Management, enter sensor.cloud.tenable.com:443.
Note: If you are connecting to Tenable Vulnerability Management through Tenable Nessus scanners, Tenable Agents, Tenable Web App Scanning scanners, or Tenable Network Monitors (NNM) located in mainland China, you must connect through sensor.cloud.tenablecloud.cn instead of sensor.cloud.tenable.com.Note: For more information about linking agents to Tenable Vulnerability Management, see Link a Sensor in the Tenable Vulnerability Management User Guide. -
To link to Tenable Nessus Manager, enter the IP/hostname of the manager with the appended port 8834; for example, 192.168.2.1:8834.
Groups Specify the existing agent group or groups where you want to add the agent.
If you do not specify an agent group during the installation process, you can later add your linked agent to an agent group.
-
- Click Next.
- In the Ready to Install the Program window, click Install.
- If presented with a User Account Control message, click Yes to allow the Tenable Agent to install.
- In the InstallShield Wizard Complete window, click Finish.
Once you install and link the agent, Tenable recommends that you verify that the agent is successfully linked to the manager by viewing the agent in the manager user interface.
HKLM/Software/Tenable/TAG file. To resolve this issue, replace the value in the HKLM/Software/Tenable/TAG file with a valid UUIDv4 value. Verify the Linked Agent
Once you install and link the agent, use the following steps to view the new agent in the manager user interface:
-
To verify a linked agent in Tenable Vulnerability Management:
-
In the upper-left corner, click the
 button.
 The left navigation plane appears.
-
In the left navigation plane, click Settings.
The Settings page appears.
-
Click the Sensors tile.
The Sensors page appears. By default, Nessus Scanners is selected in the left navigation menu and the Cloud Scanners tab is active.
-
In the left navigation menu, click Nessus Agents.
The Nessus Agents page appears and the Linked Agents tab is active.
-
Locate the new agent in the linked agents table.
-
-
To verify a linked agent in Tenable Nessus Manager:
-
In the top navigation bar, click Sensors.
The Linked Agents page appears.
-
Locate the new agent in the linked agents table.
-