Initiatives
Required User Role: Basic, Scan Operator, Standard, Scan Manager, or Administrator
In the Exposure Response section, you create initiatives, which are projects to address vulnerabilities in your environment. In initiatives, you track specific findings using combinations and apply asset tags to choose the assets in scope. You can then assign initiatives to your team, set SLAs (Service Level Agreements), generate tickets, and track progress using remediation scan results. Tenable calls this process mobilization.
What is Mobilization?
Mobilization is the critical action stage of the exposure management lifecycle. It operationalizes prioritized Continuous Threat Exposure Management (CTEM) findings, transforming your program from a passive system of record into an active system where security intelligence translates directly into measurable business impact. This requires unifying security and remediation teams, establishing clear cross-functional workflows, and securing leadership buy-in to decisively reduce business risk across the modern attack surface.
You can use the mobilization workflow within Tenable One Vulnerability Management to create initiatives and link them to tracked action items in your preferred ticketing systems without manual synchronization or complex Security, Orchestration, Automation, and Response (SOAR) solutions. Your vulnerability and exposure status updates automatically between the Tenable platform and your existing workflows, which provides you with a real-time view of your remediation progress.
Example Initiative
To address recently exploited vulnerabilities on your Headquarters network, you might create an initiative as follows:
-
Name — Recently exploited vulnerabilities at HQ
-
Asset Scope — Network: HQ
-
Owner — [email protected]
-
Remediate Within — 7 days
-
Combinations — Category is equal to Recently Actively Exploited AND VPR is greater than 6

To access the Initiatives tab:
-
In the left navigation, click
 Exposure Response.
The Exposure Response page appears. By default, the
 Initiatives tab is active.
The Initiatives tab includes the following sections:
Initiatives List
On the left side of the Initiatives page, you can view a list of all of your initiatives. Tiles represent each individual initiative.
This section has two tabs:
-
My Initiatives — A list of the initiatives you have created.
-
Shared — A list of the initiatives shared with you by an administrator. Only users with the Administrator role can share initiatives or view initiatives that others have shared; this is not currently supported for Custom Roles. For more information, see Sharing Initiatives.
On any tile, click the  or
or  button to expand or collapse the tile, respectively. When expanded, each tile includes information about the initiative, including:
-
The initiative name.
-
The date on which the initiative was last updated.
-
The name of the user that created the initiative.
-
The number of Active Findings, Affected Assets, and Tickets associated with the initiative.
or button on any initiative to automatically expand or collapse all initiative tiles.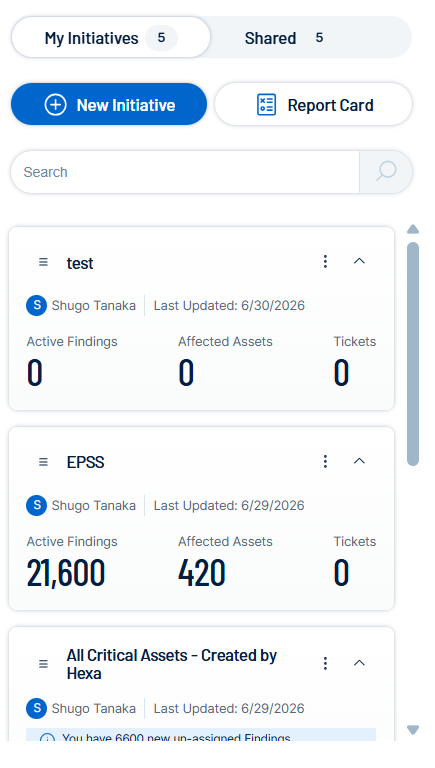
Here, you can create, append, or remove appended initiatives. For more information, see Manage Initiatives.
Initiative Overview
The Initiatives page displays overview details for the initiative selected in the Initiatives list.
To view overview details for an initiative:
-
In the Initiatives list, select the initiative for which you want to view details.
The Initiatives page displays overview details for the selected initiative.
While viewing overview details for an initiative, you can:
-
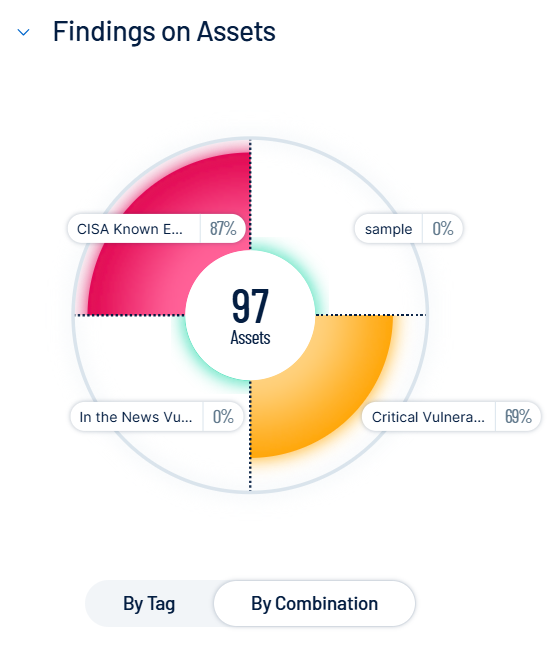
View a graphical representation of the findings on your assets within the selected initiative:
-
To view assets separated by combination, below the circle graph, click By Combination.
The graph splits into sections that represent each combination. For more information, see Manage Combinations.
-
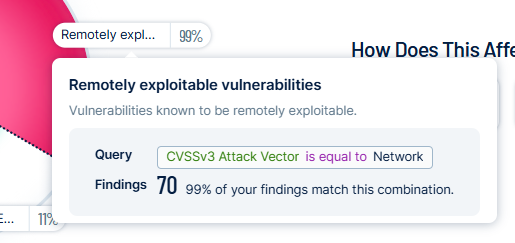
Within the graph, click an individual combination name to view additional combination information.
-
-
To view assets separated by tag, below the circle graph, click By Tag.
The graph splits into sections that represent each combination. For more information, see Tags.

-
Within the graph, click an individual tag name to view additional tag information.

-
-
-
View the Initiative Overview.
-
In the How Does This Affect Me? section, view the total number of your Assets and Findings affected by the initiative.
Tip: Click Assets or Findings to navigate directly to the My Affected Assets or My Findings lists on the Initiatives page, respectively.
How Am I Doing?
In the How Am I Doing? section, view key metrics and an area chart which tracks initiative trends over time.
Key Metrics
At the top of the panel, the following metrics appear:
| Metric | Description |
|---|---|
| Average Age of Vulnerabilities |
View the average age of findings in the initiative. This metric is based on the dates that findings were first seen or when they resurfaced. |
| Average Time to Remediate | View the average time to fix findings since they were discovered on a scan. A finding is marked Fixed after being Active, New, or Resurfaced. |
| Percentage of Findings Remediated | View the percentage of fixed findings in the initiative, including all historic findings. |
New Findings vs. Remediations
In the New Findings vs. Remediations graph, view the initiative’s finding and remediation trends, which change over time as scans run and new assets are found or added.
You can manage the graph in the following ways:
-
To change the date range, select 30 Days, 60 Days, 90 Days, or Custom.
-
To see more details for a date, in the graph, hover on that date.
-
To see details about major events, below the graph, click an event marker to open an event card.
Event Cards
Below the chart, the following events can appear:
| Metric | Description |
|---|---|
| Asset Count | Appears when the number of affected assets changes by more than 20%. |
| Combination Changes | Appears when Tenable modifies or removes combinations in the initiative |
| Finding Count | Appears when the total findings count changes by more than 20%. |
| Resurfaced Findings | Appears when the resurfaced findings count changes by more than 20%. |
What's New?
In the What's New section, you can view how an initiative has recently changed. These updates can include new findings, new affected assets, and new CVEs (Common Vulnerabilities and Exposures) that the combinations bring into scope (for example, a CVE whose VPR increased).
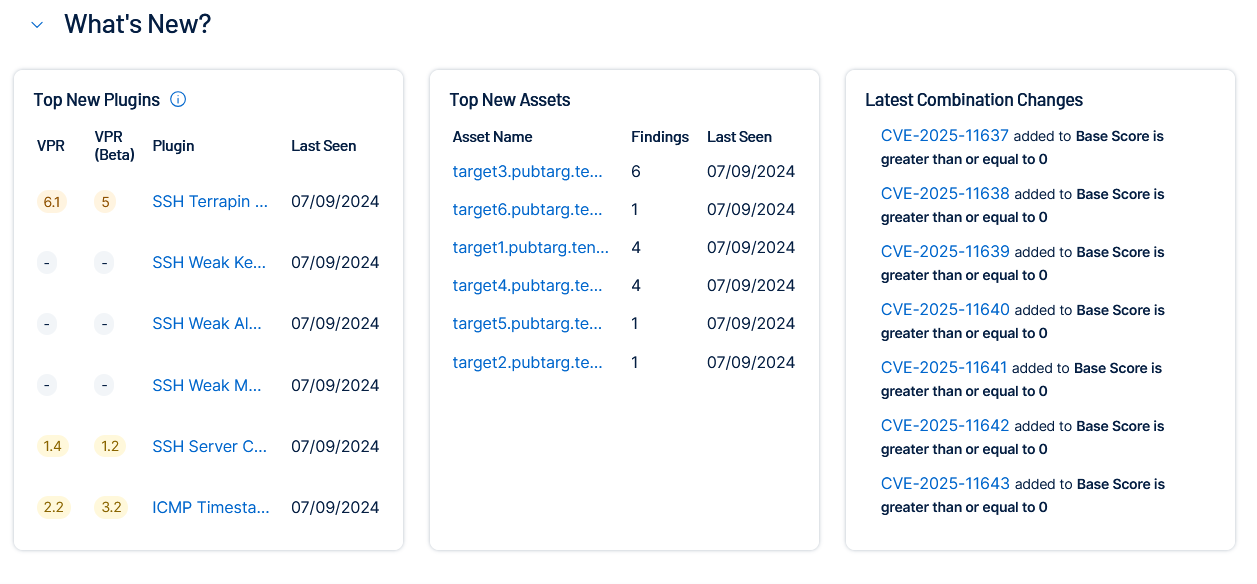
The What's New section includes the following tiles:
Top New Plugins
On the Top New Plugins tile, view the following information about plugins associated with your newly discovered findings.
| Column | Description |
|---|---|
| VPR | Indicates the Vulnerability Priority Rating (VPR) for the finding. |
| Plugin | Indicates the plugin that identified the finding. Click a plugin name to view all findings related to that plugin in My Findings. |
| Last Seen |
The date that the asset was last observed by any successful scan, including vulnerability scans, configuration scans, and discovery scans. This value can also be the date that Tenable One Vulnerability Management imported the asset. |
Top New Assets
On the Top New Assets tile, view the following information about your newly discovered assets.
| Column | Description |
|---|---|
| Asset Name | Indicates the name of the affected asset. Click an asset name to view all results for that Asset ID in My Affected Assets. |
| Findings | Indicates the number of findings on the asset. |
| Last Seen |
The date that the asset was last observed by any successful scan, including vulnerability scans, configuration scans, and discovery scans. This value can also be the date that Tenable One Vulnerability Management imported the asset. |
Latest Combination Changes
On the Latest Combination Changes tile, view information about your newly discovered CVEs.
Activity
The Activity section organizes your remediation data across three tabs: My Findings, My Affected Assets, and Ticket Log. Data on the My Findings and My Affected Assets tabs can be filtered using the Query Builder, saved as Saved Queries, and then exported. The Ticket Log tab shows the status of all tickets generated against the initiative.
Note: Findings whose risk is accepted by an Accept rule are still included in Exposure Response initiatives.
My Findings
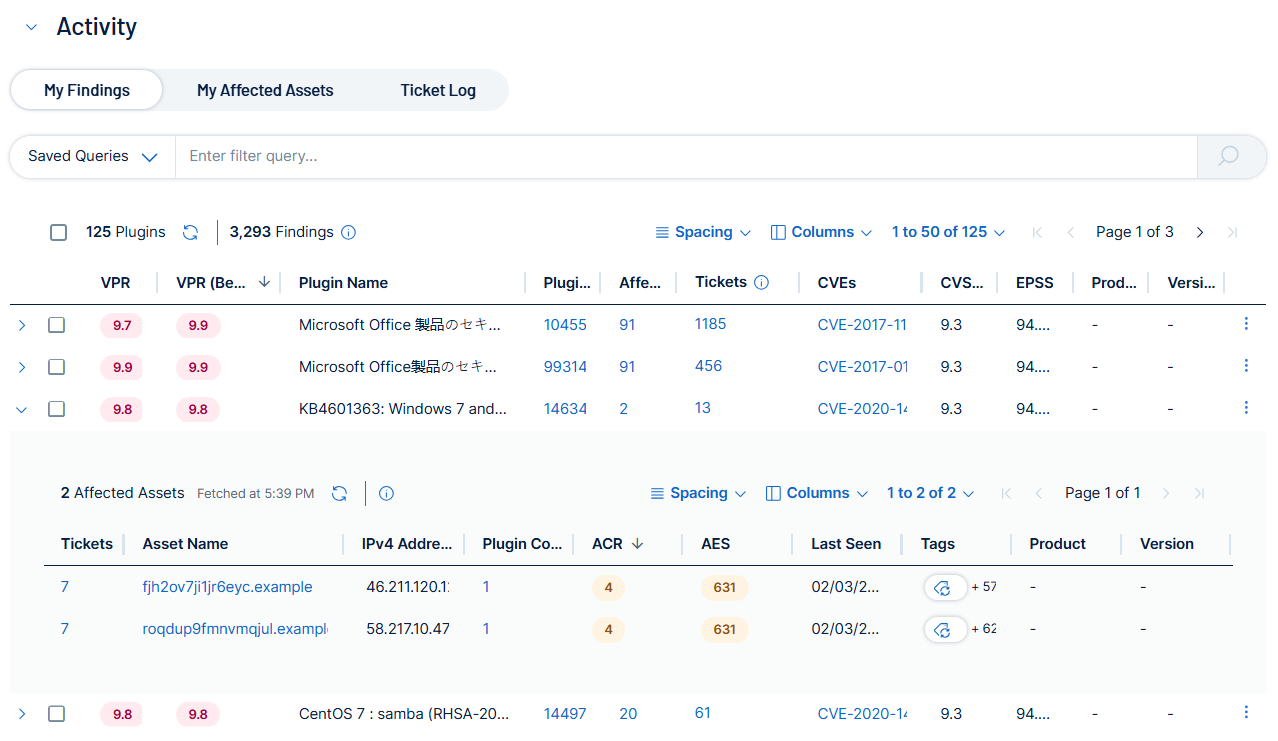
The My Findings tab shows all a list of all active, new, or resurfaced findings for that initiative.
This table includes the following columns, which you can show or hide as described in Column Management.
|
Column |
Description |
|---|---|
|
VPR |
The Tenable-calculated Vulnerability Priority Rating (VPR) score from 0.1 to 10. Note: Tenable bases a finding's VPR on the VPR of the plugin that identified it. When plugins are associated with multiple vulnerabilities, the highest VPR appears.
|
|
Plugin Name |
The name of the Tenable plugin that detected the finding. |
|
Plugin ID |
The ID of the plugin on which Tenable detected the vulnerability, for example 157288. To see a description of the plugin, either click on the ID or see the Tenable Plugins Page. |
|
Affected Assets |
Indicates the number of affected assets. Click the number to open the Asset Details page. |
| Tickets |
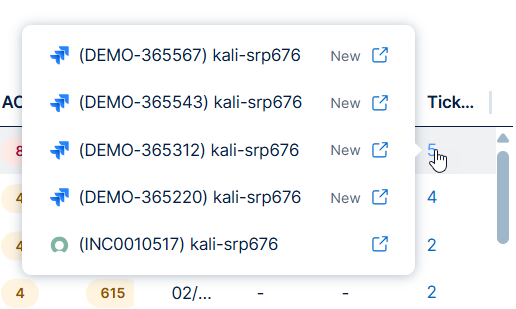
The number of third party ticketing integration tickets associated with the finding. Do any of the following:
Note: The number in this column is not the total number of tickets shown in the Ticket Log and the Initiative card. Note: Due to a caching issue, the ticket status that appears in the popup in this column may be temporarily inconsistent with the Status column in the Ticket Log. Always refer to the Ticket Log tab within the corresponding Initiative's Activity section. The Ticket Log is the definitive source of truth for all tickets created, their current status, and the total count. |
| CVEs | Indicates the CVE identifier for the finding, as assigned by the CISA-sponsored CVE Program. |
| CVSSv2 | Indicates the CVSS (Common Vulnerability Scoring System) v2 score for the finding. |
|
CVSSv3 |
Indicates the CVSS v3 score for the finding. |
| CVSSv4 | Indicates the CVSS v4 score for the finding. |
| EPSS |
The EPSS (Exploit Prediction Scoring System) Score. This percentage indicates the likelihood that a vulnerability will be exploited in the wild. |
| Product | The name of the product on which Tenable One Vulnerability Management detected the vulnerability. |
| Product Type | The type of product, for example, Application. |
| Vendor | The vendor who makes the producton which Tenable One Vulnerability Management detected the vulnerability, for example, Apache. |
| Version | The version of the product on which Tenable One Vulnerability Management detected the vulnerability. |
| Vuln SLA Date | The date that Tenable One Vulnerability Management last activated the finding. This can be the First Seen date for new findings, or the Resurfaced Date for resurfaced findings. |
Affected Assets
In the row for any finding, click the > button to reveal a table of assets on which that finding appears. This table includes the following columns, which you can show or hide as described in Tables.
|
Column |
Description |
|---|---|
| Tickets |
The number of third party ticketing integration tickets associated with the finding. Do any of the following:
Note: The number in this column is not the total number of tickets shown in the Ticket Log and the Initiative card.
Note: Due to a caching issue, the ticket status that appears in the popup in this column may be temporarily inconsistent with the Status column in the Ticket Log. Always refer to the Ticket Log tab within the corresponding Initiative's Activity section. The Ticket Log is the definitive source of truth for all tickets created, their current status, and the total count. |
| Original Severity |
The vulnerability's CVSS-based severity when the scan first detected the finding. For more information, see CVSS vs. VPR. |
|
Asset Name |
A unique identifier that Tenable assigns based on the availability of the following attributes: Agent Name, Local hostname, NetBIOS Name, DNS (FQDN) (Fully Qualified Domain Name), IPv4 Address, and IPv6 Address. |
| Operating Systems |
Indicates the operating system(s) installed on the asset, for example, Linux Kernel 3.13. |
|
IPv4 Address |
Indicates the IPv4 address for the asset. |
|
IPv6 Address |
Indicates the IPv6 address for the asset. |
| Plugin Count | Indicates the number of findings on the asset. Click the number to view details on the Findings workbench. |
| Port | Information about the port the scanner used to connect to the asset where the scan detected the vulnerability. |
| Protocol | The protocol the scanner used to communicate with the asset where the scan detected the vulnerability. |
|
ACR |
(Requires Tenable One / Tenable Lumin license) The Tenable-defined Asset Criticality Rating (ACR) is an integer from 1 to 10. |
|
AES |
(Requires Tenable One / Tenable Lumin license) The Tenable-defined Asset Exposure Score (AES) as an integer from 0 to 1000. |
|
Last Seen |
Indicates the date when the asset last appeared on a scan. |
| Sources | Indicates the scanner or sensor that identified the finding, for example Nessus network-based assessment. |
|
Tags |
Lists any asset tags you applied in Tenable One Vulnerability Management. |
| Product | The name of the product on which the vulnerability was detected. |
| Product Type | The type of product, for example, Application. |
| Vendor | The vendor who makes the product on which Tenable One Vulnerability Management detected the vulnerability, for example, Apache. |
| Vendor Severity | The severity of a vulnerability that a CVE Numbering Authority (CNA) assigns. Unlike an NVD (National Vulnerability Database) score, which reflects the worst-case scenario, this rating accounts for mitigations. |
| Version | The version of the product on which Tenable One Vulnerability Management detected the vulnerability. |
| Vuln SLA Date | The date that Tenable One Vulnerability Management last activated the finding. This can be the First Seen date for new findings, or the Resurfaced Date for resurfaced findings. |
My Affected Assets
The My Affected Assets tab shows all assets in the initiative with a finding that has not yet been fixed. Refine the results with the Query Builder or add tags to provide business context.
Here, you can view the following information about your affected assets:
|
Column |
Description |
|---|---|
|
Name |
Indicates the name of the asset. |
| Operating Systems | Indicates the operating system(s) the asset runs, for example Linux Kernel 3.13. |
|
IPv4 Address |
Indicates the IPv4 address for the asset. |
|
IPv6 Address |
Indicates the IPv6 address for the asset. |
|
Plugin Count |
Indicates the number of Tenable plugins that identified findings on the asset. Click the number to review details on the Findings workbench. |
|
ACR |
(Requires Tenable One / Tenable Lumin license) The Tenable-defined Asset Criticality Rating (ACR) is an integer from 1 to 10. |
|
AES |
(Requires Tenable One / Tenable Lumin license) The Tenable-defined Asset Exposure Score (AES) as an integer from 0 to 1000. |
| CVEs | Indicates the CVE (Common Vulnerability and Exposure) identifier for the finding on the asset, as assigned by the CISA-sponsored CVE Program. |
| Sources | Indicates the scanner or sensor that identified a finding on the asset, for example Nessus network-based assessment. |
|
Tags |
Lists any asset tags for the asset. |
| Product | The name of the product on which the vulnerability was detected. |
| Product Type | The type of product, for example, Application. |
| Vendor | The vendor who makes the product on which Tenable One Vulnerability Management detected the vulnerability, for example, Apache. |
| Version | The version of the product on which Tenable One Vulnerability Management detected the vulnerability. |
| Vuln SLA Date | The date that Tenable One Vulnerability Management last activated the finding. This can be the First Seen date for new findings, or the Resurfaced Date for resurfaced findings. |
Plugins
In the row for any asset, click the > button to reveal a table of plugin results for the findings on that asset. Here, you can view the following information about your plugin results:
|
Column |
Description |
|---|---|
|
VPR |
The Vulnerability Priority Rating that Tenable calculated for the vulnerability. For more information, see CVSS vs. VPR. Note: A finding's VPR is based on the VPR of the plugin that identified it. When plugins are associated with multiple vulnerabilities, the highest VPR appears.
|
|
Plugin Name |
Indicates the name of the Tenable plugin that detected the finding. |
|
Plugin ID |
The ID of the plugin on which Tenable detected the vulnerability, for example 157288. To see a description of the plugin, either click on the ID or see the Tenable Plugins Page. |
|
Findings |
Indicates the number of findings. |
|
Severity |
The vulnerability's CVSS-based severity. For more information, see CVSS vs. VPR. |
| CVSSv2 | Indicates the CVSS (Common Vulnerability Scoring System) v2 score for the finding. |
|
CVSSv3 |
Indicates the CVSS v3 score for the finding. |
| CVSSv4 | Indicates the CVSS v4 score for the finding. |
| EPSS |
The EPSS (Exploit Prediction Scoring System) Score. This percentage indicates the likelihood that a vulnerability will be exploited in the wild. |
| Product | The name of the product on which the vulnerability was detected. |
| Product Type | The type of product, for example, Application. |
| Vendor | The vendor who makes the product on which Tenable One Vulnerability Management detected the vulnerability, for example, Apache. |
| Version | The version of the product on which Tenable One Vulnerability Management detected the vulnerability. |
Here, you can also add or remove tags from assets. For more information, see Manage Affected Asset Tags.
Ticket Log
The Ticket Log tab is Tenable One Vulnerability Management's ledger for all ticketing actions associated with the initiative. The Ticket Log tab shows all tickets generated against the initiative.
The Ticket Log tab includes the following information:
|
Column |
Description |
Customer Context |
|---|---|---|
|
Finding ID |
A unique Tenable-assigned alphanumeric identifier for a single instance of a vulnerability appearing on a specific asset, uniquely determined by its plugin ID, port, and protocol. |
The definitive reference for tracking a security issue throughout its entire lifecycle. It allows for precise synchronization between Tenable and external ticketing systems (like Jira or ServiceNow), ensuring that the technical data pushed to the ticket accurately matches the specific vulnerability instance found during scans. |
|
Date Created |
The date and time Tenable One Vulnerability Management first successfully created the ticket in the external system. |
Establishes the official start date for your ticket-based remediation SLAs. |
|
Integration |
The name of the ticketing application that created the ticket (for example, Jira or ServiceNow). |
Useful for auditing and environments using multiple ticketing systems to quickly see where the ticket was routed. |
| Owner | The specific Tenable One Vulnerability Management user assigned as the initiative owner. | Only administrators and the designated initiative owner can view the project, ensuring that the right person is managing the risk reduction efforts. |
|
Key |
Indicates the name of the Tenable plugin that detected the finding. |
The identifier of the ticket in the external system (for example, INC1234567 for ServiceNow or PROJ-123 for Jira). Click to navigate directly to the ticket. |
|
Content |
A snapshot of the vulnerability and asset data (for example, VPR, CVSS, asset tags, exploit status) that the system pushed to the ticket's Description field at the time of creation or update. |
Allows for quick validation that the right risk data was sent to the remediation team. |
|
Status |
The current state of the ticket in the external system (for example, Open, In Progress, Resolved, Closed). Note: Due to a caching issue, the ticket status that appears in the popup in the Tickets column in the My Findings tab may be temporarily inconsistent with this column. The Ticket Log is the definitive source of truth for all tickets created, their current status, and the total count. |
Confirms the lifecycle status of the ticket as reported by the external system. |
| Create Method | Indicates how the ticket was generated: Automatic (via the Initiative's rules) or Manual (created by a user in Exposure Response). | Essential for auditing and verifying that the Remediation Initiative's automation workflow is functioning as expected. |
| Last Updated | The date and time Tenable One Vulnerability Management last observed an update to the ticket status or content in the external system. | Confirms recent activity or state synchronization. |
Here, you can also edit tickets in your external ticketing system (e.g., Jira or ServiceNow) or directly within the Exposure Response interface. For more information, see Edit Initiative Tickets in the Ticket Log.
What to do Next
See the following documentation to get started with creating and managing initiatives: