Rapid7 Insight VM (On-Prem) Connector
The following is not supported in Tenable FedRAMP Moderate environments. For more information, see the Tenable FedRAMP Product Offering.
The following steps allow you to configure this connector for use with Tenable Exposure Management from start to finish.
Connector Details
| Details | Description |
|---|---|
|
Supported products |
Important! This guide describes the InsightVM Application Programming Interface (API) version 3. The API follows the Representational State Transfer (REST) design pattern and, unless stated otherwise, uses JSON (application/json) as the default request and response format. The API is hypermedia-friendly and implements Hypermedia as the Engine of Application State (HATEOAS) principles. All API requests must be made over HTTPS to the Security Console. |
|
Category |
Endpoint Security |
|
Ingested data |
Assets and Findings |
|
Ingested Asset Classes |
Devices |
|
Integration type |
UNI directional (data is transferred from the Connector to Tenable Exposure Management in one direction) |
|
Supported version and type |
SaaS (latest) |
Prerequisites and User Permissions
Before you begin configuring the connector, make sure to:
-
Identify your Rapid7 Server URL (e.g., https://<your-server-hostname>:<port>).
-
Review the System Requirements for your deployment environment.
Important! The performance of the connector, including synchronization times, depends on the system configuration of the Rapid7 Security Console. Ensure that your environment meets the system requirements to avoid degraded performance or sync failures.
-
Create a Rapid7 user with the User role and global permissions.
Create a Rapid7 User with the User Role and Global Permissions
-
Log in to the Rapid7platform using a Global Admin account.
-
Navigate to Administration.
-
In the Users section, click Create.
-
In the General section, enter the required user details and select the Account enabled checkbox.
For example:

-
In the Roles section, select the User role. Then, for Global Permissions, select the Appear on Ticket and Report Lists checkbox.
-
In the Site Access section, select the Allow this user to access all sites option.
-
In the Asset Group Access section, select the Allow this user to access all asset groups option.
-
Click Save to create the user.
-
Copy the Username and Password to a safe location. You need them to configure the connector.
Create Rapid7 Report Templates
To set up the Rapid7 InsightVM integration, you must create the following three report templates:
To create an asset report template:
-
Log in to the Rapid7 platform.
-
Navigate to Create > Report.
-
Click Manage Report Templates > New.
-
Name the template:
tenable_assets_report_templateImportant: This name must match exactly, or the connector configuration will fail. -
(Optional) Type a description.
-
In the Template Type section, select Export (CSV format).
-
In the Content section, select the following fields:
-
Asset Alternate IPv4 Addresses,
-
Asset Alternate IPv6 Addresses
-
Asset ID
-
Asset IP Address
-
Asset Names
-
Asset OS Family
-
Asset OS Name
-
Asset OS Version
-
Asset Risk Score
-
Custom Tag
-
Asset Location
-
Asset Criticality
-
Asset MAC Addresses
-
Asset Owner
-
Site Name
-
Site Importance
-
-
Click Save.

To create an assets and findings details report template:
-
Log in to the Rapid7 platform.
-
Navigate to Create > Report.
-
Click Manage Report Templates > New.
-
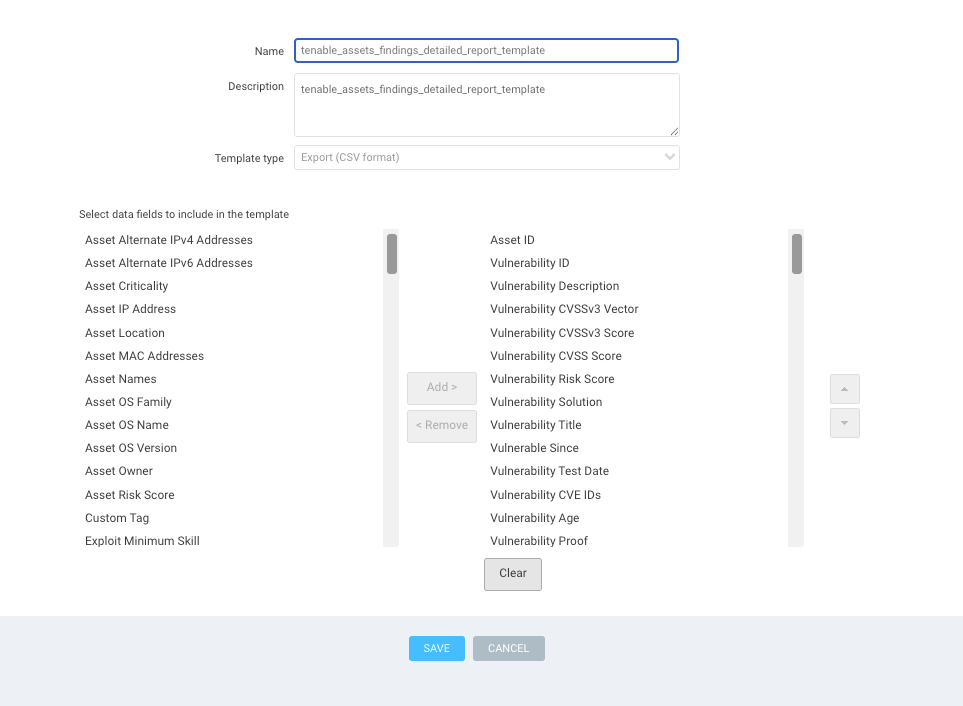
Name the template:
tenable_assets_findings_detailed_report_templateImportant: This name must match exactly, or the connector configuration will fail. -
(Optional) Type a description.
-
In the Template Type section, select Export (CSV format).
-
In the Content section, select the following fields:
-
Asset ID
-
Vulnerability ID
-
Vulnerability Description
-
Vulnerability CVSSv3 Vector
-
Vulnerability CVSSv3 Vector
-
Vulnerability CVSS Score
-
Vulnerability Risk Score
-
Vulnerability Solution
-
Vulnerability Title
-
Vulnerable Since
-
Vulnerability Test Date
-
Vulnerability CVE IDs
-
Vulnerability Age
-
Exploit Count
-
Service Port
-
Service Protocol
-
Vulnerability Proof
-
Vulnerability Published Date
-
-
Click Save.
To create an assets and findings report template:
-
Log in to the Rapid7 platform.
-
Navigate to Create > Report.
-
Click Manage Report Templates > New.
-
Name the template:
tenable_assets_findings_report_templateImportant: This name must match exactly, or the connector configuration will fail. -
(Optional) Type a description.
-
In the Template Type section, select Export (CSV format).
-
In the Content section, select the following fields:
-
Asset ID
-
Vulnerability ID
-
Vulnerable Since
-
Vulnerability Test Date
-
Vulnerability Proof
-
Service Port
-
Service Protocol
-
-
Click Save.

Add a Connector
To add a new connector:
-
In the left navigation menu, click Connectors.
The Connectors page appears.

-
In the upper-right corner, click
 Add new connector.
The Connector Library page appears.

-
In the search box, type the name of the connector.
-
On the tile for the connector, click Connect.
The connector configuration options appear.
Configure the Rapid7 Insight VM Connector
-
(Optional) In the Connector's Name text box, type a descriptive name for the connector.
-
(Optional) To use a preconfigured on-prem connector to connect to this connector, from the Gateway drop-down, select the on-prem connector you want to use for the connector. Otherwise, select Don't use gateway.
Note: For information about configuring a gateway, see Tenable On-Prem Connector. -
In the Server URL text box, type the server URL for your Rapid7 instance.
-
In the Username and Password text boxes, type your Rapid7 client credentials.
-
In the Data pulling configuration section, you can configure dynamic settings specific to the connector.
-
In the Asset Retention text box, type the number of days after which you want assets to be removed from Tenable Exposure Management. If an asset has not been detected or updated within the specified number of days, it is automatically removed from the application, ensuring your asset inventory is current and relevant.
Tip: For more information, see Asset Retention.
-
-
In the Test connectivity section, click the Test Connectivity button to verify that Tenable Exposure Management can connect to your connector instance.
-
A successful connectivity test confirms that the platform can connect to the connector instance. It does not, however, guarantee that the synchronization process will succeed, as additional syncing or processing issues may arise.
-
If the connectivity test fails, an error message with details about the issue appears. Click Show tests for more information about the exact error.

-
-
In the Connector scheduling section, configure the time and day(s) on which you want connector syncs to occur.
Tip: For more information, see Connector Scheduling. -
Click Create. Tenable Exposure Management begins syncing the connector. The sync can take some time to complete.
-
To confirm the sync is complete, do the following:
-
Navigate to the Connectors page and monitor the connector's status. Sync is complete once the connector status is Connected.
-
View the sync logs for the connector to monitor the logs for a successful connection.
-
Rapid7 Insight VM in Tenable Exposure Management
Locate Connector Assets in Tenable Exposure Management
As the connector discovers assets, Tenable Exposure Management ingests those devices for reporting.
To view assets by connector:
-
In Tenable Exposure Management, navigate to the Assets page.
-
In the Filters section, under 3rd Party Connectors, click the connector name for which you want to view assets.

The asset list updates to show only assets from the selected connector.
-
Click on any asset to view Asset Details.
Locate Connector Weaknesses in Tenable Exposure Management
As the connector discovers weaknesses, Tenable Exposure Management ingests those weaknesses for reporting.
To view weaknesses by connector:
-
In Tenable Exposure Management, navigate to the Weaknesses page.
-
In the Filters section, under 3rd Party Connectors, click the connector name for which you want to view weaknesses.
The weaknesses list updates to show only weaknesses from the selected connector.
-
Click on any weakness to view Weakness Details.
Locate Connector Findings in Tenable Exposure Management
As the connector discovers individual findings, Tenable Exposure Management ingests those findings for reporting.
To view findings by connector:
-
In Tenable Exposure Management, navigate to the Findings page.
-
In the Filters section, under 3rd Party Connectors, click the connector name for which you want to view findings.
The findings list updates to show only assets from the selected connector.
-
Click on any asset to view Finding Details.
Data Mapping
Tenable Exposure Management integrates with the connector via API to retrieve relevant weakness and asset data, which is then mapped into the Tenable Exposure Management system. The following tables outline how fields and their values are mapped from the connector to Tenable Exposure Management.
Device Mapping
| Tenable Exposure Management UI Field |
Rapid7 InsightVM (On-Prem) field |
|---|---|
| Unique Identifier | id |
| Asset - Name |
hostName or Asset Names Note: In rare cases where the hostname is not available, the IP address is used as a fallback. |
| Asset - Operating Systems | os or osFingerprint.vendor/Asset OS Name |
| Asset - Host Fully Qualified DNS | host_name |
|
Asset - IPv4 Adresses Asset - IPv6 Adresses |
ip or Asset IP Address |
| Asset - Mac Address | mac or address.mac or Asset MAC AddressesAsset MAC Addresses |
| Asset - First Observation Date | history[0].date |
| Asset - Last Observed At | history[-1].date |
| Asset - Host Fully Qualified DNS | hostName or Asset Names |
|
Asset - External Tags |
Custom Tag Site Name Asset Owner Asset Criticality Site Importance Asset Location |
| Asset Custom Attributes |
osFingerprint.os/os Asset OS Family/osFingerprint.family |
Finding Mapping
| Tenable Exposure Management UI Field |
Rapid7 InsightVM (On-Prem) field |
|---|---|
| Unique Identifier | Vulnerability ID + Service Protocol + Service Port |
| Finding Name | Vulnerability Title |
| CVEs | Vulnerability CVE IDs |
| Severity Driver | Vulnerability CVSSv3 Score |
| Description | Vulnerability Description |
| Finding Custom Attributes |
Vulnerability Proof Service Port Service Protocol Vulnerability CVSSv3 Vector |
| First Seen | Vulnerable Since |
| Last seen (Observed) | Vulnerability Test Date |
Finding Status Mapping
|
Tenable Exposure Management Status |
Rapid7 InsightVM (On-Prem) Status / Condition |
|---|---|
|
Active |
All ingested findings are considered active |
|
Fixed |
Findings no longer appear in the scan findings |
Finding Severity Mapping
|
Tenable Exposure Management Severity |
Rapid7 InsightVM (On-Prem) Score |
|---|---|
|
Critical |
CVSS v3: 9.0 - 10.0 |
|
High |
CVSS v3: 7.0 - 8.9 |
|
Medium |
CVSS v3: 4.0 - 6.9 |
|
Low |
CVSS v3: 1-3.9 |
|
None |
CVSS v3: 0 |
Note:For Rapid7 Insight VM On-Prem, Tenable uses the Vulnerability CVSSv3 Score field to determine severity.
Status Update Mechanisms
Every day, Tenable Exposure Management syncs with the vendor's platform to receive updates on existing findings and assets and to retrieve new ones (if any were added).
The table below describes how the status update mechanism works in the connector for findings and assets ingested into Tenable Exposure Management.
|
Update Type in Tenable Exposure Management |
Mechanism (When?) |
|---|---|
|
Archiving Assets |
- Asset not seen for X days according to Last Seen. See Asset Retention |
|
Change of a Finding status from "Active" to "Fixed" |
- Finding no longer appears in the scan findings |
Uniqueness Criteria
Tenable Exposure Management uses defined uniqueness criteria to determine whether an ingested asset or finding should be recognized as a distinct record. These criteria help define how assets and findings are identified and counted from each connector.
Tip: For more information, see Asset Deduplication in Tenable Exposure Management
The uniqueness criteria for this connector are as follows:
|
Data |
Uniqueness Criteria |
|---|---|
|
Asset |
id |
|
Finding |
Vulnerability ID + Service Protocol + Service Port |
| Detection | Vulnerability ID |
| Solution | Vulnerability Solution |
API Endpoints in Use
API: V3
|
API |
Use in Tenable Exposure Management |
Required Permissions |
|---|---|---|
|
|
- |
Allow listing sites |
|
|
- |
Allow create report |
|
|
- |
Allow generating domains |
|
|
Assets, Findings, Solutions |
Allow read report |
| GET {{ server_url }}/api/3/tags | Asset tags | - |
|
|
Asset tags |
Allow listing |
|
|
Asset tags |
Allow listing |
| GET {{ server_url }}/api/3/vulnerabilities |
Findings (Only on report_with_api variant) |
- |
Support Limitations and Expected Behavior
This section outlines any irregularities, expected behaviors, or limitations related to integration of the connector and Tenable Exposure Management. It also highlights details about ingested and non-ingested data to clarify data handling and functionality within this integration.
The connector generates reports as part of the integration process. To ensure successful synchronization, customers must create report templates as outlined in this guide.
The performance of the connector, including synchronization times, depends on the system specifications of the Rapid7 Security Console. Failing to meet the recommended system specifications can result in increased sync durations, performance degradation, or failures in data collection.
Ensure that your environment meets the following requirements to avoid degraded performance or sync failures:
General Requirements:
-
At this time, Tenable Exposure Management only supports x86_64 architecture.
-
If deploying to a virtual machine:
-
Allocate sufficient reserved memory based on system requirements.
-
The reserved memory value must match the allocated memory. For example, if 32 GB is allocated, reserved memory must also be set to 32 GB.
-
Using shared or overcommitted memory may negatively affect performance and can lead to out-of-memory events.
-
Security Console Hardware Requirements:
| Asset Volume | Processor | Memory | Storage |
|---|---|---|---|
| 5,000 | 4 Cores | 16 GB | 1 TB |
| 20,000 | 12 Cores | 64 GB | 2 TB |
| 150,000 |
12 Cores |
128 GB | 4 TB |
| 400,000 | 12 Cores | 256 GB | 8 TB |
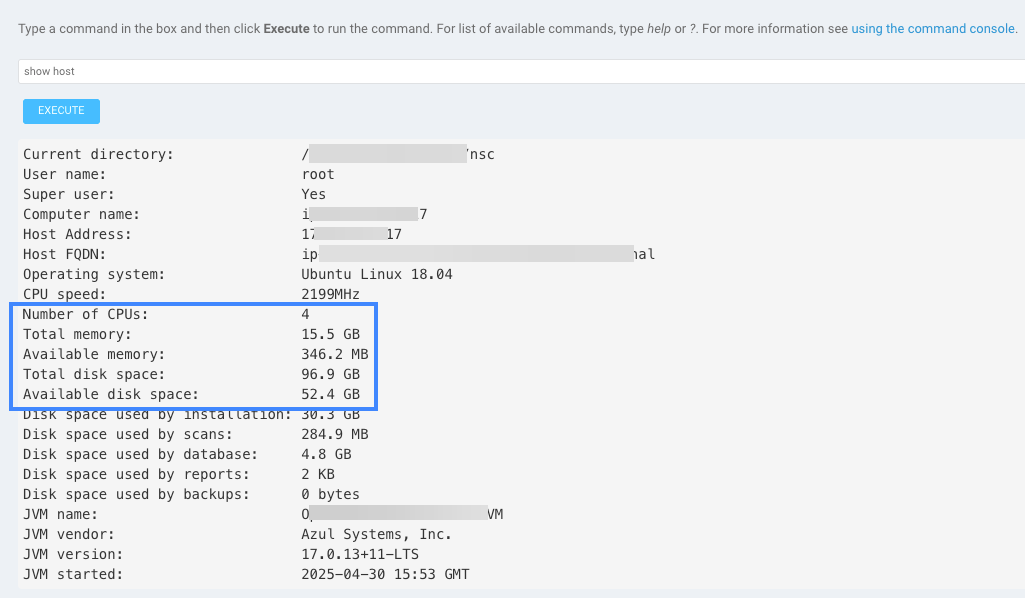
How can I Check Machine Hardware in the Rapid7 Console?
-
Navigate to Administration> Troubleshooting > Run Commands.
-
In the input field, type show host, and then click Execute.
For example:
Note: For more information, see Rapid7 On-Prem System Requirements
Findings are considered unique based on the following combination of fields:
-
Vulnerability ID
-
Service Protocol
The integration does not consider the Proof field as part of the uniqueness criteria. If multiple proofs exist for the same finding, only one will be displayed in Tenable Exposure Management.
Data Validation
This section shows how to validate and compare data between Tenable Exposure Management and the Rapid7 Insight VM On-Prem platform.
Asset Data Validation
Objective: Ensure the number of scanned virtual machines (VMs) in Rapid7 Insight VM On-Prem aligns with the assets (devices) displayed in Tenable Exposure Management.
In Rapid7 Insight VM On-Prem:
-
In the left menu, click Assets
The asset table appears.
-
The asset table displays all scanned virtual machines.
The total number of assets will appear on the bottom of the screen.
In Tenable Exposure Management:
-
Compare the total number of assets between Rapid7 Insight VM On-Prem and Tenable Exposure Management.
Expected outcome: The number of visible assets in Tenable Exposure Management will match the number of VM assets in Rapid7.
If an asset is not visible in Tenable Exposure Management, check the following conditions:
-
Archived based on the last observed date (last seen).
Tip: To learn more on how assets and findings change status, see Status Update Mechanisms.
Finding Data Validation
Objective: Ensure the number of vulnerabilities associated with assets in Rapid7 InsightVM aligns with the findings displayed in Tenable Exposure Management.
In Rapid7 InsightVM:
You can view vulnerabilities (findings) in Rapid7 in one of the following ways:
-
Through the Assets view:
-
Navigate to Assets.
In the Assets table view, each asset row displays a count of associated vulnerabilities.

-
To get the findings total, sum the total number of vulnerabilities across all assets.
-
-
Through the Vulnerabilities view:
-
Navigate to Vulnerabilities.
-
Scroll down to view the vulnerabilities table. This table is aggregated by unique vulnerability name and displays the number of findings for each vulnerability.

-
In Tenable Exposure Management:
-
Compare the total number of findings between Rapid7 Insight VM On-Prem and Tenable Exposure Management.
Expected outcome: The total numbers returned in Rapid7 Inisght VM On-Prem and Tenable Exposure Management should match.
If a finding is missing from Tenable Exposure Management or no longer active, check the following conditions:
-
The finding no longer appears in the scan findings.
-
The finding is marked as Fixed and appears under the Fixed state on the Findings screen.
-
The finding no longer appears because its related asset was archived.
Tip: To learn more on how assets and findings are archived or change status, see Status Update Mechanisms.