RiskRecon Connector
The following is not supported in Tenable FedRAMP Moderate environments. For more information, see the Tenable FedRAMP Product Offering.
The following steps allow you to configure this connector for use with Tenable Exposure Management from start to finish.
Connector Details
| Details | Description |
|---|---|
|
Supported products |
|
|
Category |
DAST |
|
Ingested data |
Assets and Findings |
|
Ingested Asset Classes |
Web Application |
|
Integration type |
UNI directional (data is transferred from the Connector to Tenable Exposure Management in one direction) |
|
Supported version and type |
SaaS (latest) |
Prerequisites and User Permissions
Before you begin configuring the connector, make sure to:
Generate a RiskRecon API Token
-
Log in to the RiskRecon platfom.
-
Navigate to My Account > System Administration.
-
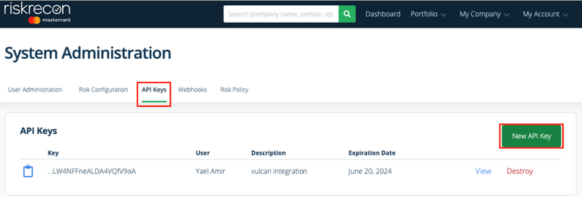
Click API Keys and then New API Key.
-
Type a brief Description and set the Expiration Date to 1 year.
-
Click Create API Key.
-
Copy the API Token to a safe location. You need it to configure the connector.
Add a Connector
To add a new connector:
-
In the left navigation menu, click Connectors.
The Connectors page appears.

-
In the upper-right corner, click
 Add new connector.
The Connector Library page appears.

-
In the search box, type the name of the connector.
-
On the tile for the connector, click Connect.
The connector configuration options appear.
Configure the Connector
To configure the connector:
-
(Optional) In the Connector's Name text box, type a descriptive name for the connector.
-
(Optional) To use a preconfigured on-prem connector to connect to this connector, from the Gateway drop-down, select the on-prem connector you want to use for the connector. Otherwise, select Don't use gateway.
Note: For information about configuring a gateway, see Tenable On-Prem Connector. -
In the API Key text box, paste the API key you generated in RiskRecon.
-
In the Data pulling configuration section, you can configure dynamic settings specific to the connector.
-
To fetch specific companies instead of all companies: By default, the Fetch all companies (auto-update for new additions) check box is selected. To choose specific companies, clear this check box. When the drop-down appears, select the RiskRecon companies you want to include.
-
In the Asset Retention text box, type the number of days after which you want assets to be removed from Tenable Exposure Management. If an asset has not been detected or updated within the specified number of days, it is automatically removed from the application, ensuring your asset inventory is current and relevant.
Tip: For more information, see Asset Retention.
-
-
In the Test connectivity section, click the Test Connectivity button to verify that Tenable Exposure Management can connect to your connector instance.
-
A successful connectivity test confirms that the platform can connect to the connector instance. It does not, however, guarantee that the synchronization process will succeed, as additional syncing or processing issues may arise.
-
If the connectivity test fails, an error message with details about the issue appears. Click Show tests for more information about the exact error.

-
-
In the Connector scheduling section, configure the time and day(s) on which you want connector syncs to occur.
Tip: For more information, see Connector Scheduling. -
Click Create. Tenable Exposure Management begins syncing the connector. The sync can take some time to complete.
-
To confirm the sync is complete, do the following:
-
Navigate to the Connectors page and monitor the connector's status. Sync is complete once the connector status is Connected.
-
View the sync logs for the connector to monitor the logs for a successful connection.
-
RiskRecon in Tenable Exposure Management
Locate Connector Assets in Tenable Exposure Management
As the connector discovers assets, Tenable Exposure Management ingests those devices for reporting.
To view assets by connector:
-
In Tenable Exposure Management, navigate to the Assets page.
-
In the Filters section, under 3rd Party Connectors, click the connector name for which you want to view assets.

The asset list updates to show only assets from the selected connector.
-
Click on any asset to view Asset Details.
Locate Connector Weaknesses in Tenable Exposure Management
As the connector discovers weaknesses, Tenable Exposure Management ingests those weaknesses for reporting.
To view weaknesses by connector:
-
In Tenable Exposure Management, navigate to the Weaknesses page.
-
In the Filters section, under 3rd Party Connectors, click the connector name for which you want to view weaknesses.
The weaknesses list updates to show only weaknesses from the selected connector.
-
Click on any weakness to view Weakness Details.
Locate Connector Findings in Tenable Exposure Management
As the connector discovers individual findings, Tenable Exposure Management ingests those findings for reporting.
To view findings by connector:
-
In Tenable Exposure Management, navigate to the Findings page.
-
In the Filters section, under 3rd Party Connectors, click the connector name for which you want to view findings.
The findings list updates to show only assets from the selected connector.
-
Click on any asset to view Finding Details.
Data Mapping
Exposure Management integrates with the connector via API to retrieve relevant weakness and asset data, which is then mapped into the Exposure Management system. The following tables outline how fields and their values are mapped from the connector to Exposure Management.
Web Application Mapping
| Tenable Exposure Management Value | RiskRecon Filed |
|---|---|
| Unique Identifier |
host_name or ip_address or domain_name |
| Asset - Name |
host_name or ip_address or domain_name |
| Asset - Last Observed At | record_load_timestamp or last_seen |
| Asset - Webapp Homepage Screenshot Url |
host_name or ip_address or domain_name |
|
Asset - External Tags |
company name hosting_provider asset_value domain country_name |
| Asset Custom Attributes |
hosting_provider asset_value auth_detected (has authentication) host_name domain_name ip_address country_name |
Finding Mapping
| Tenable Exposure Management UI Field |
RiksRecon Field |
|---|---|
| Unique Identifier | asset id + finding_id + unique vulnerability id |
| Finding Name | display_name |
| Description |
|
| Severity Driver | attributes.severity |
| First Seen | first_seen |
| Last seen (Observed) | last_seen |
| Finding Custom Attributes |
finding_id finding_detail finding_data_value finding_extra_data_value asset_value priority severity ip_address host_name domain_name severity |
Finding Status Mapping
|
Tenable Exposure Management Status |
RiskRecon Status |
|---|---|
|
Active |
All findings returned from the connector |
|
Fixed |
Otherwise |
Note:For XCONNECTOR, Tenable Exposure Management uses the X field to determine finding status. If X is not available, Tenable Exposure Management uses the Yfield from the connector, if provided.
Finding Severity Mapping
|
Tenable Exposure Management Severity |
RiskRecon Score |
|---|---|
|
Critical |
Severity: Critical |
|
High |
Severity: High |
|
Medium |
Severity: Medium |
|
c |
Severity:Low |
Note:For XCONNECTOR, Tenable Exposure Management uses the attributes.severity field to determine severity.
Status Update Mechanisms
Every day, Tenable Exposure Management syncs with the vendor's platform to receive updates on existing findings and assets and to retrieve new ones (if any were added).
The table below describes how the status update mechanism works in the connector for findings and assets ingested into Tenable Exposure Management.
|
Update Type in Tenable Exposure Management |
Mechanism (When?) |
|---|---|
|
Archiving Assets |
Asset that appears in Tenable Exposure Management and is not returned on the next connector sync |
|
Change a Finding status from "Active" to "Fixed" |
Finding no longer appears in the scan findings |
Uniqueness Criteria
Tenable Exposure Management uses defined uniqueness criteria to determine whether an ingested asset or finding should be recognized as a distinct record. These criteria help define how assets and findings are identified and counted from each connector.
Tip: For more information, see Asset Deduplication in Tenable Exposure Management
The uniqueness criteria for this connector are as follows:
|
Data |
Uniqueness Criteria |
|---|---|
|
Asset |
host_name or ip_address or domain_name |
|
Finding |
asset id + finding_id + unique vulnerability id |
| Detection | security_criteria |
API Endpoints in Use
API version: 0.0-1.0
|
API |
Use in Tenable Exposure Management |
|---|---|
|
/v1/toes |
Get TOE_IDs (vendor ids) and vendor names |
|
/v1/hosts/{toe_id} |
Assets |
|
/v1/findings_paginated/{toe_id} |
Findings |
|
/v1/display_names/security_criteria |
Detections, Solutions |
| /v0/cpe/raw_language?language=english&security_criteria={security_criteria} | Detections |
Support Limitations and Expected Behavior
This section outlines any irregularities, expected behaviors, or limitations related to integration of the connector and Tenable Exposure Management. It also highlights details about ingested and non-ingested data to clarify data handling and functionality within this integration.
The connector allows users to select which companies to ingest into Exposure Management. Only data related to the selected companies will be synchronized.
-
Status filtering: Findings with a status of Pass or Positive are excluded from ingestion.
-
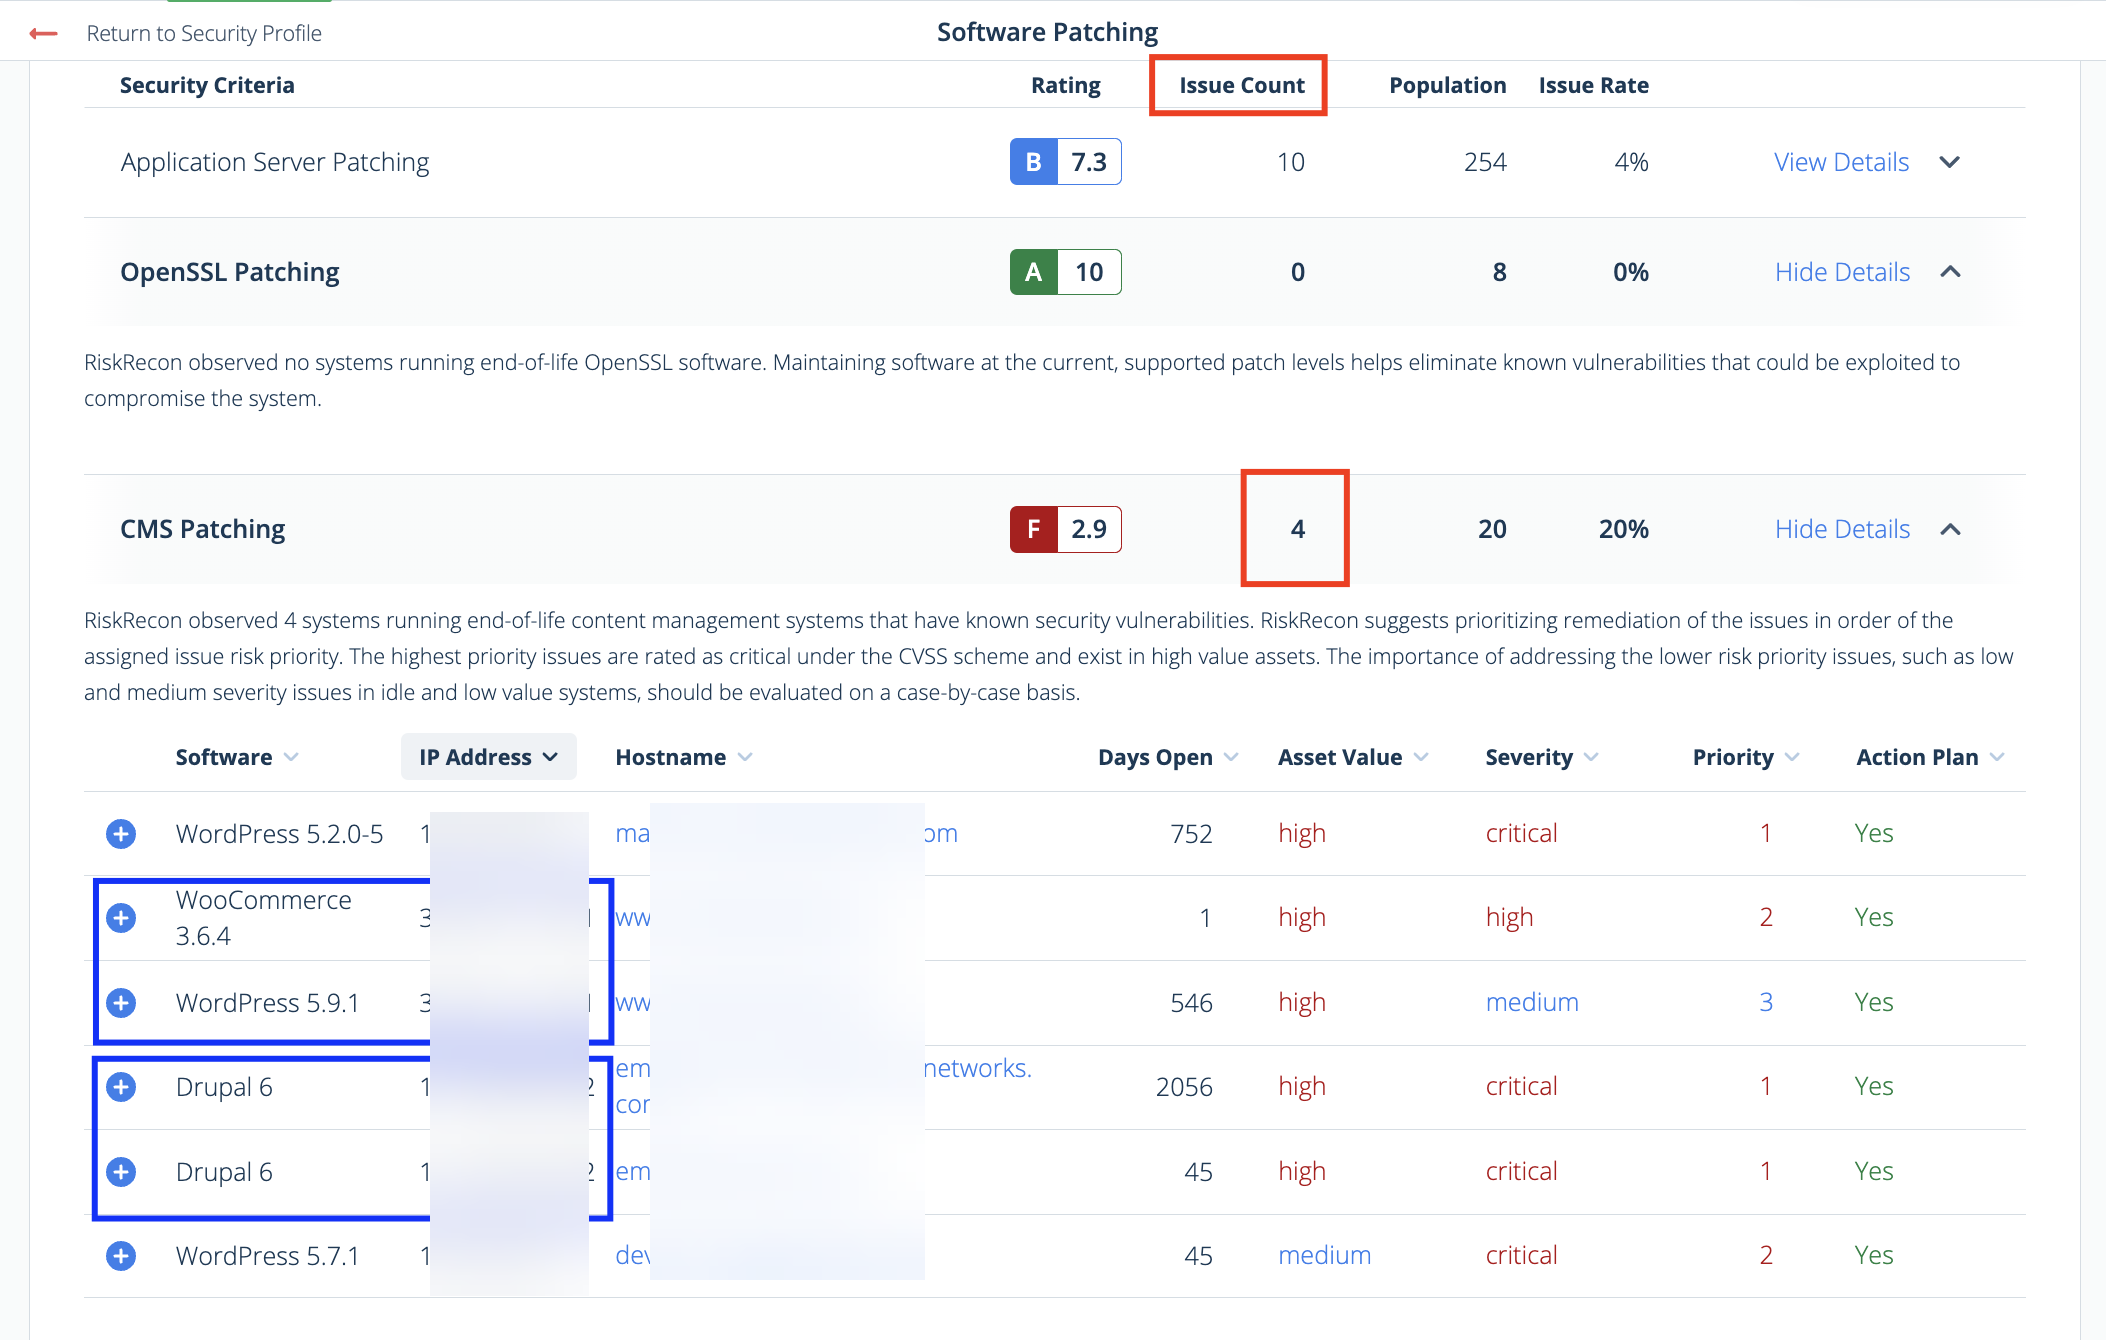
Finding count differences: RiskRecon counts findings based on a combination of issue + IP. For example, if a device has two IP addresses and one issue, RiskRecon will count this as two findings. In contrast, Exposure Management counts findings by issue alone, regardless of IP associations. As a result, RiskRecon may display a higher total number of findings.
-
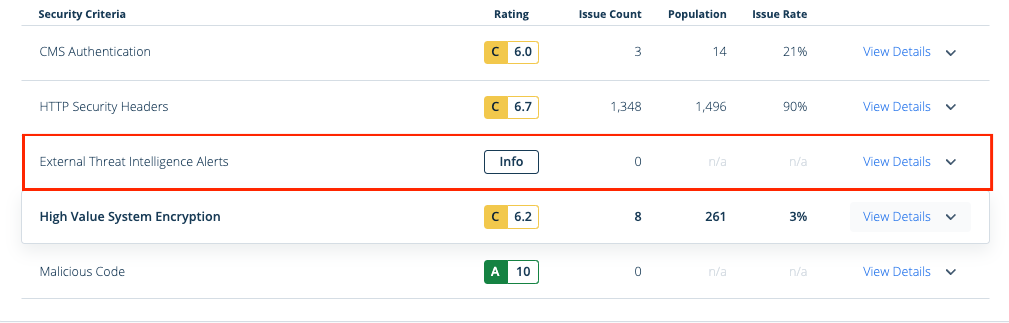
Security criteria without identifiers: RiskRecon Security Criteria that do not disclose IP addresses, hosts, or domains are not ingested into Exposure Management. Therefore, RiskRecon may show a higher number of unique vulnerabilities than Tenable.
-
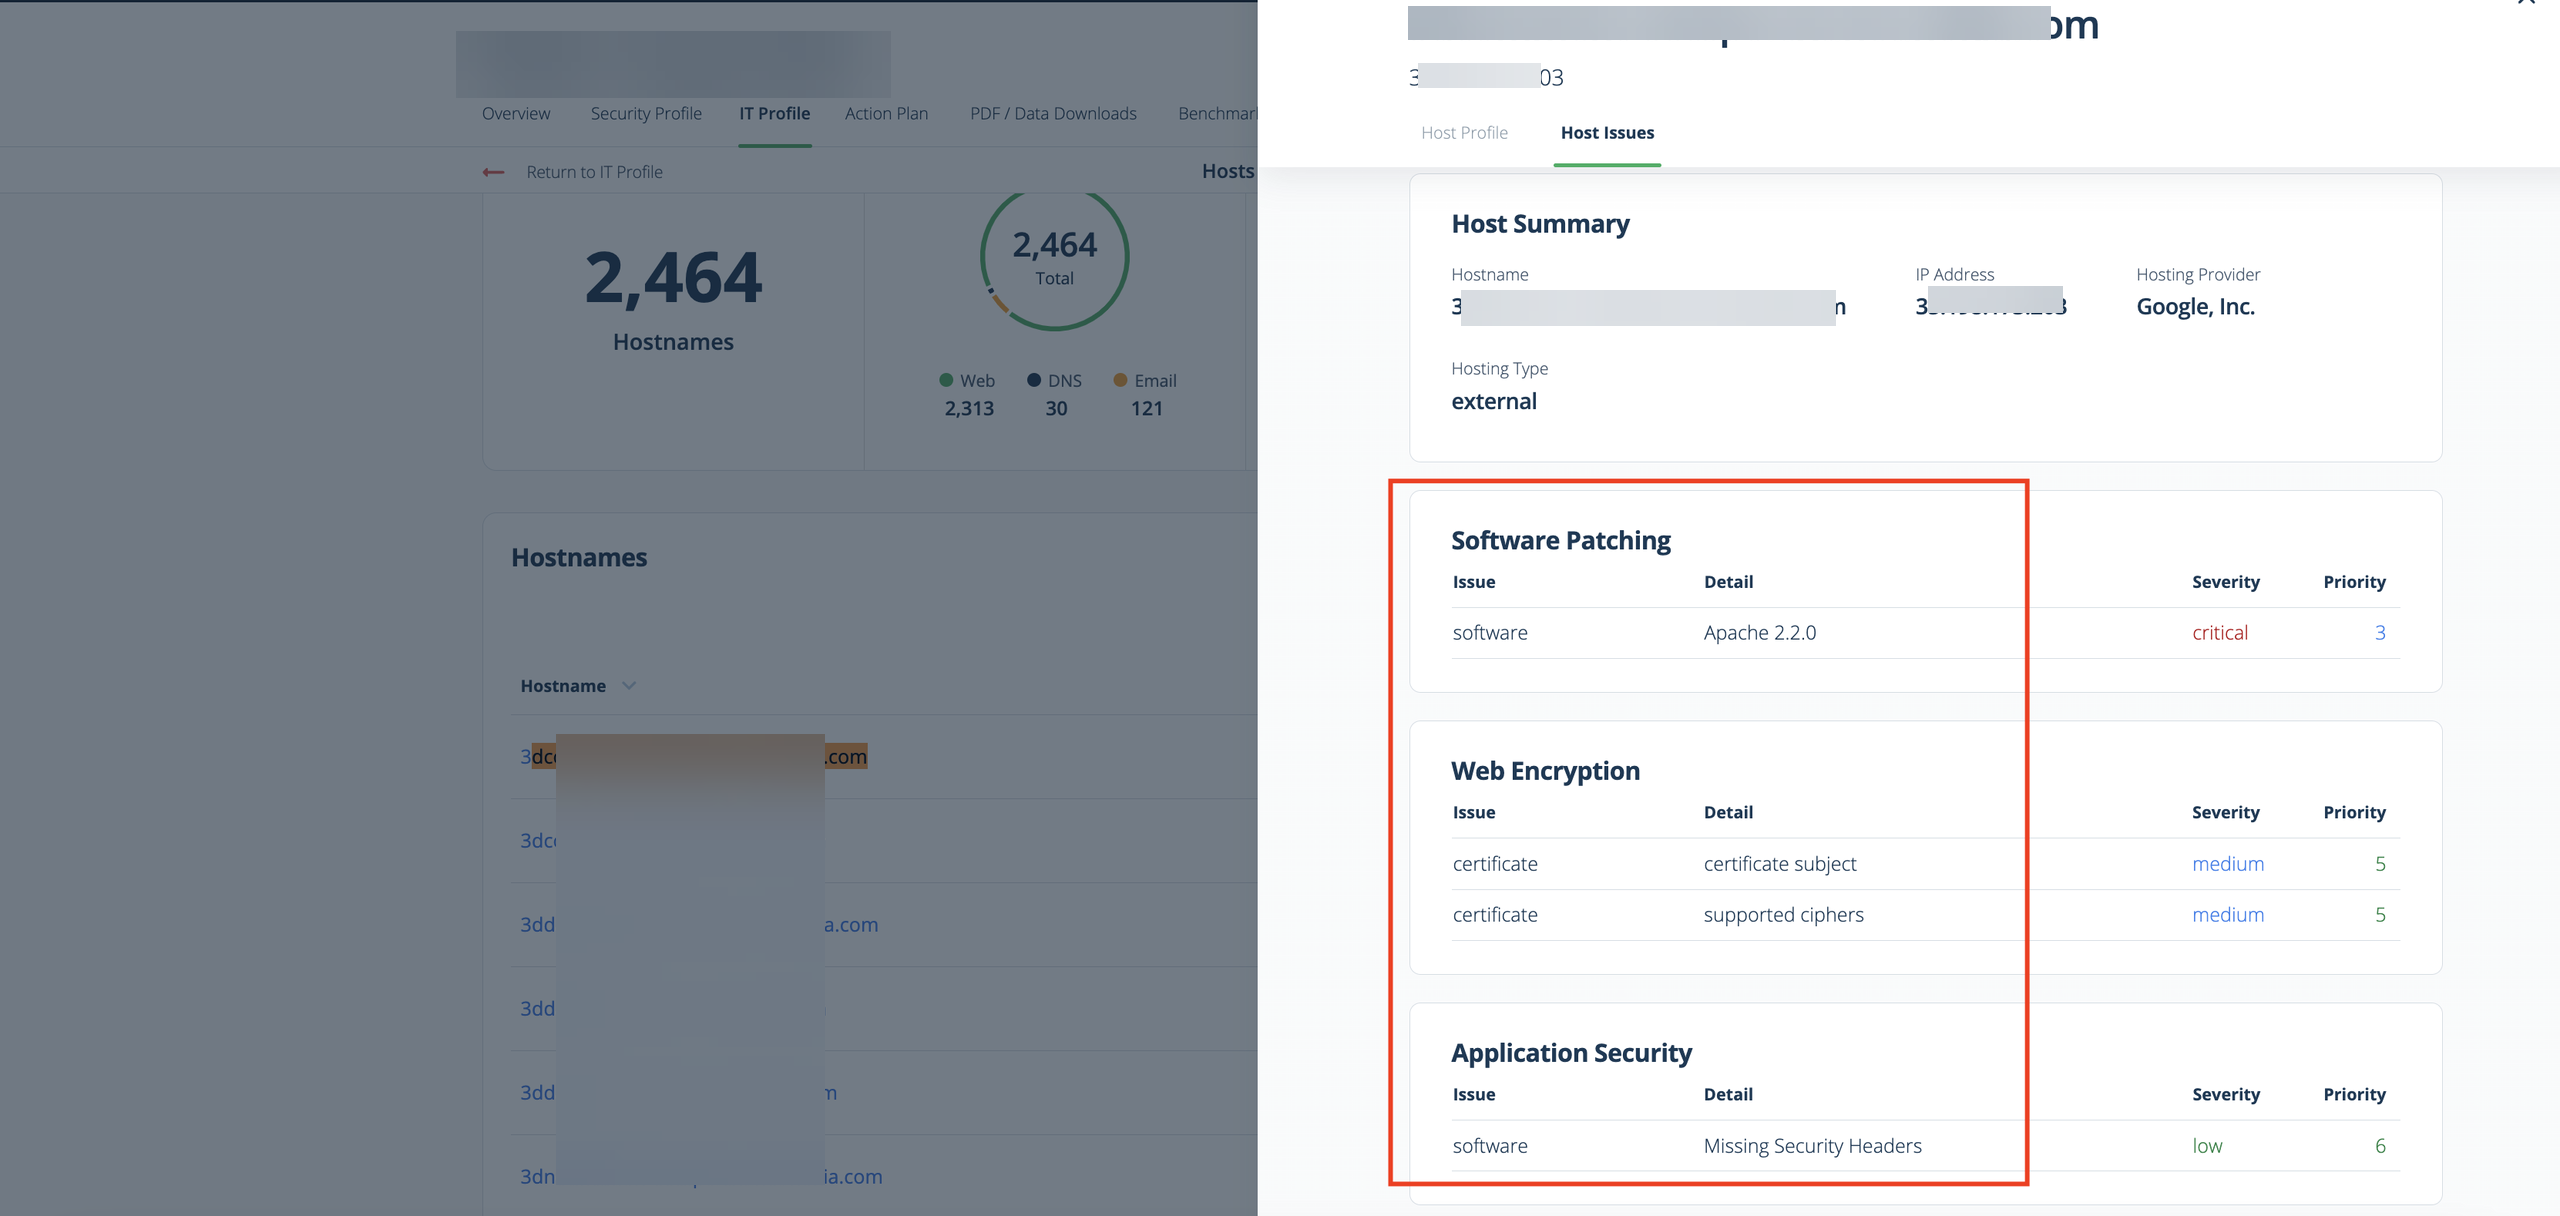
Asset type mapping:RiskRecon displays only hosts in its asset view. However, findings may also be linked to IP addresses or domains. In Exposure Management, each IP or domain is treated as a distinct asset, which may lead to a higher number of assets displayed in Tenable.
-
Domain ownership filtering:: RiskRecon filters out hosts that are not part of the company’s owned domains. Exposure Management does not apply this filter and displays all hosts, regardless of domain ownership. This may result in displaying a higher asset count on Exposure Management.
-
Security criteria without identifiers: RiskRecon Security Criteria that do not disclose IP addresses, hosts, or domains are not ingested into Exposure Management. Therefore, RiskRecon may show a higher number of unique vulnerabilities than Tenable.
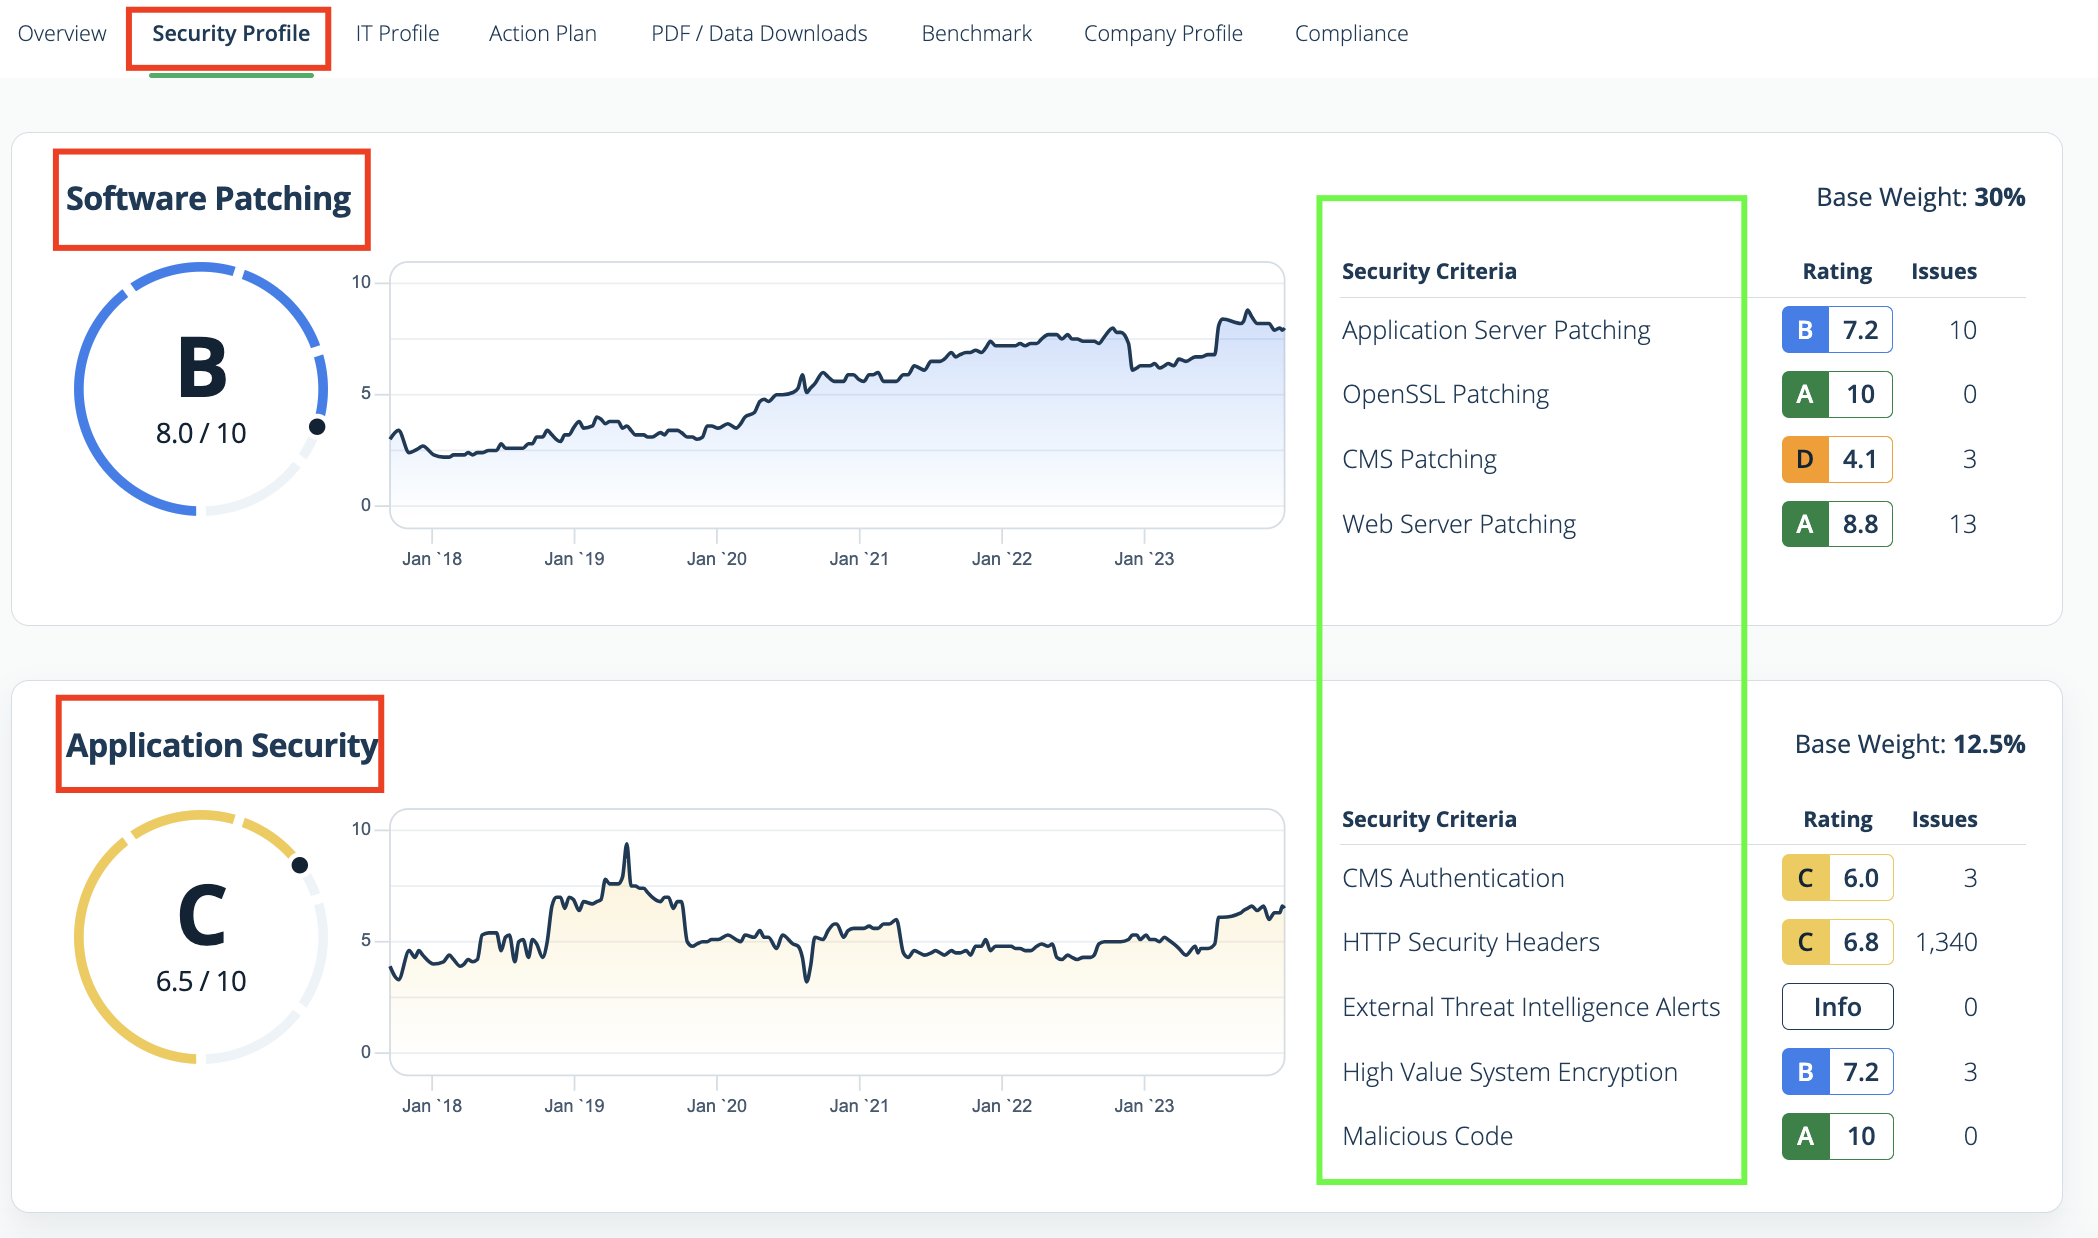
In the RiskRecon host issues tab, the displayed value is the Security Profile, which is the parent hierarchy of the Security Criteria (the equivalent of a unique vulnerability in Exposure Management). As a result, the view may not reflect specific issue-level detail.
Data Validation
This section shows how to validate and compare data between Tenable Exposure Management and the RiskRecon platform.
Asset Data Validation
Objective: Because RiskRecon doesn't provide an option to view all assets for all companies, RiskRecon and Tenable Exposure Management don't show the same number of assets in the UI. In order to compare the data with Tenable Exposure Management, you must compare one company at a time. The numbers calculated this way should be identical within both RiskRecon and Tenable Exposure Management.
In RiskRecon:
-
Navigate to the Portfolio tab and choose the target company.
-
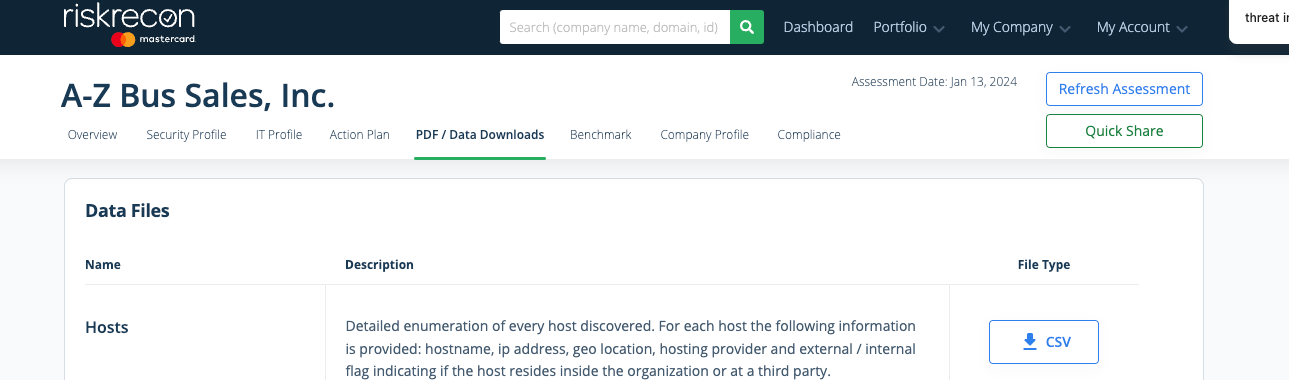
Navigate to the PDF / Data Downloads tab.
-
Scroll down to the Data Files section.
-
Download each available data file, except for the Owned Netblocks file, which is not required.
-
For each downloaded file, extract the column that represents the asset.
-
Combine all extracted asset values into a single column in a new spreadsheet.
-
Remove any duplicate entries from the combined column.
The result is a deduplicated list of all assets identified for that company in RiskRecon.
In Tenable Exposure Management:
-
Compare the total number of assets between RiksRecon and Tenable Exposure Management.
Expected outcome: The total numbers returned in RiskRecon and Tenable Exposure Management should align after taking into consideration that issues described in the Support Limitations and Expected Behavior section.
If an asset is not visible in Tenable Exposure Management, check the following conditions:
-
The asset was archived because it did not return in the connector's next sync.
Tip: To learn more on how assets and findings change status, see RiskRecon Connector.
Finding Data Validation
Objective: Understand how RiskRecon issues are represented in Tenable Exposure Management, and why finding counts may not match between platforms.
As described in the Support Limitations and Expected Behavior section, RiskRecon and Tenable Exposure Management don’t show the same number of findings in the UI. Tenable Exposure Management doesn’t ingest RiskRecon issues (findings) whose status is pass or positive.
Furthermore, RiskRecon issues are counted by issue + IP. That means that a host with with two IPs and an issue would be counted as two issues. Tenable Exposure Management counts only the issues, without taking into account the IPs. Potentially, RiskRecon may show a higher number.
Due to these factors, there is no feasible way to validate the number of findings by using the UI.