Manage User Accounts
Required User Role: Administrator
In Tenable Vulnerability Management, you can manage your User accounts in the following ways:
Create a User Account
On the Users page, you can create an account for a new user.
To create a user account:
-
Access the Users page.
-
Click the
 Create User button.
The Create User page appears.
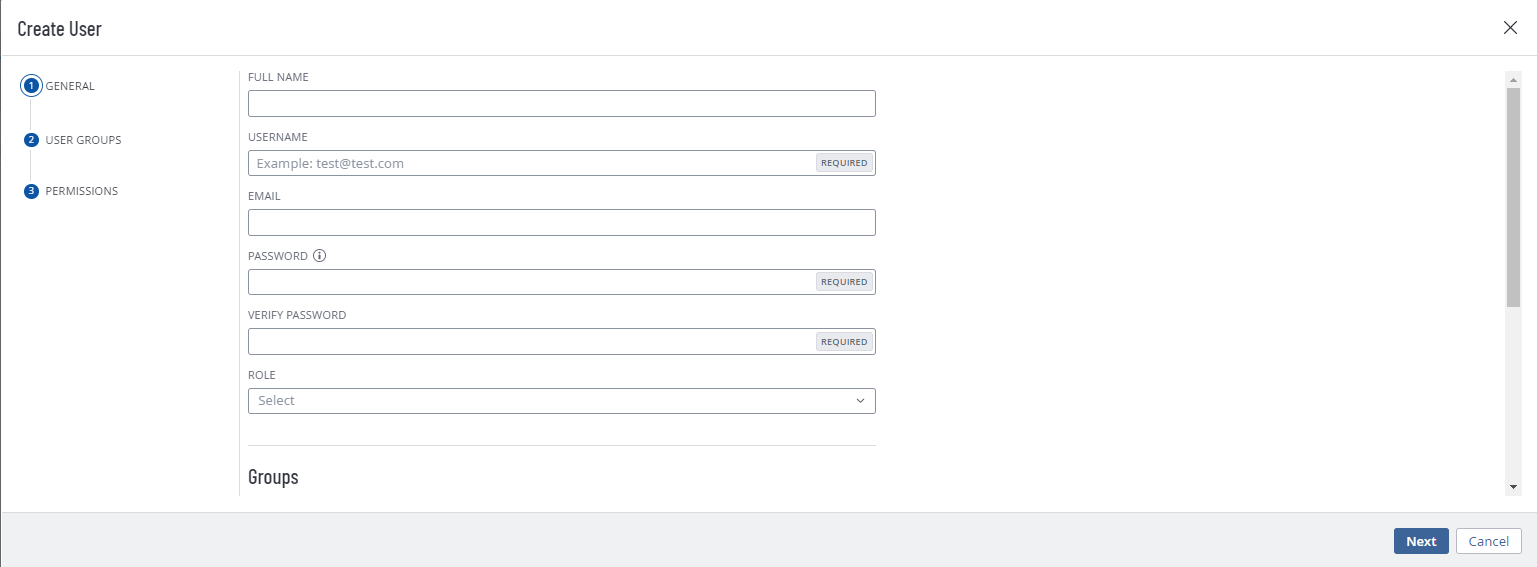
- Configure the following options:
Note: To view and configure options in each section, you must select the section in the left menu.
Option Action General Section Full Name Type the first and family name of the user. Username Type a valid username.
A valid username must be in the format: name@domain where domain corresponds to a domain approved for your Tenable Vulnerability Management instance.
Note: During initial setup, Tenable configures approved domains for your Tenable Vulnerability Management instance. To add domains to your instance, contact your Tenable representative.
Caution: The Username must be unique not only within a single instance, but also across all customer instances, including those in an MSSP environment.
Note:Tenable Vulnerability Management usernames cannot include the following characters:
', !, #, $, %, ^, &, *, (, ), /, \, |, {, }, [, ], ", :, ;, ~, `, <, > and the comma "," itself.Email Type a valid email address in the format:
name@domain where domain corresponds to a domain approved for your Tenable Vulnerability Management instance.
This email address overrides the email address set in the Username box. If you leave this option empty, Tenable Vulnerability Management uses the Username value as the user's email address.
Note: As an Administrator, you can create user accounts with email addresses from unapproved domains. Once a user account is created, you can only change the email address to another approved domain.
Password Type a valid password. See Password Requirements for more information.
In Tenable Web App Scanning, passwords must be at least 12 characters long and contain the following:
- An uppercase letter
- A lowercase letter
- A number
- A special character
Verify Password Type the password again. Role In the drop-down box, select the role that you want to assign to the user.
Authentication Select or deselect the available security setting options. When selected, these settings:
Note: If you enable the Password Access or SAML options for a user with a custom role, the user automatically has basic access to your dashboards and widgets.
API Key — Allow the user to generate API keys.
Tip: You can select only this setting to create an API-only user account.
SAML — Allow the user to log in to their account using a SAML single sign-on (SSO). For more information, see SAML.
Username/Password — Allow the user to log in to their account using a password.
Note: If you deselect this option, you cannot select the MFA option.
Two-Factor Required — Require the user to provide two-factor authentication to log in to their account.
Tip: You can configure two-factor authentication for your own account on the My Account page.
Important! If you or any user has Two-Factor Required enabled, you must log in using two-factor authentication. If you attempt to log in to Tenable Vulnerability Management without using two-factor authentication, you cannot access any of your Tenable products.
Session Timeout Determine the time frame, in Hours and Minutes, after which a user's session times out. Upon timeout, the user is automatically logged out of Tenable Vulnerability Management and must log back in.
Note: The session timeout can be set between a minimum of 5 minutes and a maximum of 12 hours.Important: While bulk updates affect the Session Timeout configuration for all other users, it does not affect your own account. To change this setting for your own account, you must impersonate another administrator with the User Assist feature. Then, you can navigate to the Edit User page and update the session timeout for your account.User Groups Section User Groups Select the user group or groups to which you want to assign the user.
By default, a new user belongs to the system-generated All Users user group, which assigns the user the Basic role.
Add a user group:
Click anywhere in the User Groups box.
A search box and drop-down list of roles appear.
(Optional) In the Search box, type a user group name.
As you type, a list of user groups matching your search appears.
Click the user group you want to add.
In the User Groups box, Tenable Vulnerability Management adds a label representing the user group.
- Repeat these steps to add the user to another user group.
Permission Section Permissions In the Permissions table, select the permission configurations you want to assign to the user.
-
Click Save.
Note: If you assign permissions to the user, the button appears as Add & Save.
Tenable Vulnerability Management lists the new user account on the users table.
Edit a User Account
-
Access the Users page.
-
In the users table, click the name of the user that you want to edit.
The Edit User page appears.
-
Make any desired changes to the user configuration options.
- (Optional) Generate API keys for the user.
-
Click Save.
Tenable Vulnerability Management saves the changes to the account.
Assist a User with their Account
The following is not supported in Tenable FedRAMP Moderate environments. For more information, see the Tenable FedRAMP Product Offering.
As an administrator, you can use the user assist functionality to simulate being logged in as another account. While assisting a user account, you can perform operations in Tenable Vulnerability Management as that user without needing to obtain their password or having to log out of your administrator account.
Username/Password
SAML
To assist a user with their account:
-
Access the Users page.
-
In the users table, click the check box for the user account you want to assist.
The action bar appears at the top of the table.
Note: You can select only one user to assist at a time.
-
In the action bar, click the
 button.
Tenable Vulnerability Management refreshes and displays the default dashboard for the user you are assisting. While you are assisting the user,Tenable Vulnerability Management displays an overlay at the top of each page with the role of the user you are assisting.
To stop assisting a user with their account:
- At the top of any page, in the overlay that displays the role of the user you are assisting, click the
 button.
Change a User Password
To change the password for another user's account, you must be an administrator. To change your own password, see Change Your Password.
To change another user's password:
-
Access the Users page.
-
In the users table, click the name of the user that you want to edit.
The Edit User page appears.
-
In the New Password box, type a new password. See Password Requirements for more information.
-
Click Save.
Tenable Vulnerability Management saves the new password for the user account.
Generate a User's API Key
The API keys associated with your user account enable you to access the API for all Tenable Vulnerability Management products for which your organization is licensed. These keys must be used to authenticate with the Tenable Vulnerability Management REST API.
Administrators can generate API keys for any user account. Other roles can generate API keys for their own accounts. For more information, see Generate API Keys.
Note: The API keys associated with your user account enable you to access the API for all Tenable Vulnerability Management products for which your organization is licensed. You cannot set separate keys for individual products. For example, if you generate API keys in Tenable Vulnerability Management, this action also changes the API keys for Tenable Web App Scanning and Tenable Container Security.
To generate API keys for another user:
-
Access the Users page.
-
In the users table, click the name of the user that you want to edit.
The Edit User page appears.
-
In the API Keys section, click Generate API Keys.
Caution: Any existing API keys are replaced when you generate new API keys. You must update the applications where the previous API keys were used.A warning message appears.
-
Review the warning and click Replace & Generate.
The Generate API Keys text box appears.
The new access and secret keys for the account appear in the text box.
-
(Optional) Click Re-generate API Keys.
-
Copy the new access and secret keys to a safe location.
Caution: Be sure to copy the access and secret keys before you navigate away from the Edit User page. After you close this page, you cannot retrieve the keys from Tenable Vulnerability Management.
Unlock a User Account
Tenable Vulnerability Management locks you out if you attempt to log in and fail 5 consecutive times.
You can unlock a user account in one of the following ways:
- If a user has access to the email address specified in the user account, they can unlock their own account.
- If a user no longer has access to that email address, another user with administrator privileges can reset the user's password.
- If a user has two-factor authentication enforced and can no longer access their authenticator, another user with administrator privileges can reset two-factor authentication for the user.
Manage User Access Authorizations
Users can access Tenable Vulnerability Management using the following methods:
- Username and password login.
- Single sign-on (SSO). For more information, see SAML.
- Tenable Vulnerability Management REST API with API keys. For more information, see Generate a User's API Key.
When you create a new user, all access methods are authorized by default. Depending on your organization's security policies, you may need to disable certain access methods, for example, disable username and password login to enforce SSO.
Use the Tenable Vulnerability Management Platform API to view, grant, and revoke access authorizations for a user. For more information, see Get User Authorizations and Update User Authorizations in the Tenable Developer Portal.
Manage Two-Factor Authentication
Two-factor authentication (2FA) is a security method that requires two different forms of identification to verify a user's identity. This adds a crucial extra layer of protection beyond just a username and password. Once two-factor authentication is set up for a user, they must use a third-party authentication method of their choice alongside their login credentials to access Tenable Vulnerability Management.
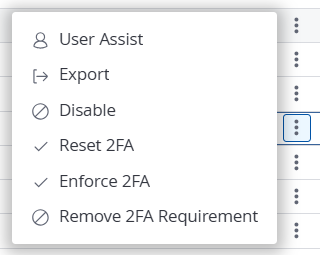
When creating a user, administrators can choose to enable the Two-Factor Required option. Otherwise, administrators can manage two-factor authentication for their Tenable Vulnerability Management users in the following ways:
Reset 2FA
To reset two-factor authentication for a user:
-
Access the Users page.
-
On the right side of the row for the user for which you want to reset two-factor authentication, click the
 button.
A menu appears.
-
Click Reset 2FA.
A confirmation message appears, and Tenable Vulnerability Management resets two-factor authentication for the selected user.
Enforce 2FA
To enforce two-factor authentication for a user:
-
Access the Users page.
-
On the right side of the row for the user for which you want to enforce two-factor authentication, click the
button.A menu appears.
-
Click Enforce 2FA.
A confirmation message appears, and Tenable Vulnerability Management begins enforcing two-factor authentication for the selected user. The user can then login using the a Two-Factor Setup option, for example, a Time-based One-time Password.
Tip: Once enforced, users can manage two-factor authentication for their own account on the My Account page.
Remove 2FA Requirement
To remove the two-factor authentication requirement for a user:
-
Access the Users page.
-
On the right side of the row for the user for which you want to reset two-factor authentication, click the
button.A menu appears.
-
Click Remove 2FA Requirement.
A confirmation message appears, and Tenable Vulnerability Management removes the two-factor authentication requirement for the selected user.
Disable an Active User Account
- does not disable scheduled reports for that user, nor does it prevent others from generating a report shared by the disabled user. For more information, see Reports.
- prevents the user from logging in.
- prevents the user's scans from running and aborts any ongoing scans owned by the user.
You can enable a disabled user account as described in Enable a Disabled User Account.
To disable a user account:
-
Access the Users page.
-
Select the user or users you want to disable:
-
 Select a single user:
-
In the users table, in the row for the user account you want to disable, click the
button.The action buttons appear
-
In the row, click the
 button.
A confirmation window appears.
-
-
Select multiple users:
- In the users table, click the check box for each user you want to disable.
The action bar appears at the
- In the action bar, click the button.
A confirmation window appears.
- In the users table, click the check box for each user you want to disable.
-
-
In the confirmation window, click Disable.
A success message appears.
Tenable Vulnerability Management disables the selected user or users. In the users table, a disabled user appears in light gray.
Note: If the user you disable has a session in progress, they may continue to have limited access. However, once they log out, they cannot log back in.
Enable a Disabled User Account
When you disable a user account, you can re-enable that account to restore a user's access.
To enable a user account:
-
Access the Users page.
-
Select the user or users you want to enable:
Select a single user:
-
In the users table, in the row for the user account you want to enable, click the
button.The action buttons appear
Note: Users appear grayed out while they are disabled.
-
In the row, click the
 button.
A confirmation window appears.
Select multiple users:
- In the users table, click the check box for each user you want to enable.
The action bar appears at the
- In the action bar, click the button.
A confirmation window appears.
-
-
In the confirmation window, click Enable.
A success message appears.
Tenable Vulnerability Management enables the selected user or users. In the users table, an enabled user appears in black.
Delete a User Account
Before you delete a user account, you must first disable the user account.
- Tenable Web App Scanning does not support object migration. When you delete a Tenable Web App Scanning user, the application does not reassign objects belonging to the deleted users. Note that you cannot reassign a Tenable Web App Scanning scan to a new owner if its owner is deleted.
- Before you delete a user account, reassign any associated Remediation projects. These will not be reassigned automatically.
The following table describes what objects are migrated, retained, or permanently deleted upon user deletion:
| Object Type | Deleted | Notes |
|---|---|---|
| Audit Files in Scans | Yes | Permanently deleted |
| Scan Schedules | No |
Migrated to the new object owner Note: Migrated scan schedules may be disabled if they rely on other permanently deleted objects, such as Audit files, Target Groups, or Unmanaged Credentials. |
|
Historical Scan Results |
No | Migrated to the new object owner |
| Scan Templates | No | Migrated to the new object owner |
| Unmanaged Credentials in Scans | Yes | Permanently deleted |
| Custom Dashboards/Widgets | Yes |
Migrated to the new object owner |
| Managed Credentials | No | Retained (Created By value displays as null) |
| Tags | No | Retained (Created By value displays as null) |
| Recast/Accept Rules | No | Retained (Owner value displays as Unknown User) |
| Exclusions | No | Retained |
| System Target Groups | No | Retained |
| User Target Groups | No | Migrated to the new object owner |
| Saved Searches | Yes | Permanently deleted |
| Connectors | No | Retained |
| Sensors | No | Retained |
| Scheduled Exports | No | Migrated to the new object owner |
To delete a user account:
-
Access the Users page.
-
In the users table, in the row for the user account you want to delete, click the
button.A menu appears.
-
In the menu, click the
 button.
Note: If a user is not disabled, then the
button does not appear. Disable the user before deleting them.Note: You cannot delete the Default Administrator account. If you want to delete the Default Administrator account, you must contact Tenable Support.
The user plane appears.
- In the Select New Object Owner drop-down box, select the user to which you want to transfer any of the user's objects (e.g., scan results, user-defined scan templates).
- Click Delete.
A confirmation message appears.
- Click Delete.
Tenable Vulnerability Management deletes the user and transfers any user objects to the user you designated.