Manage Managed Credentials
Use the following procedures to manage your managed credentials. For general information about managed credentials, see Managed Credentials.
Create a Managed Credential
Required User Role: Basic, Scan Operator, Standard, Scan Manager, or Administrator
Required User Role: Basic User, Scan Operator, Standard User, Scan Manager, or Administrator
This section creating a managed credential in the Tenable Web App Scanning credential manager.
You can also create a managed credential during scan configuration, as well as convert a scan-specific credential to a managed credential. For more information, see Add a Credential to a Scan (Tenable One Vulnerability Management) or Configure Credentials Settings in Tenable One Web App Scanning.
To create a managed credential:
-
In the left navigation, click
 Settings.
The Settings page appears.
-
Click the Credentials tile.
The Credentials page appears. The credentials table lists the managed credentials you have permission to view.
-
In the upper-right corner of the page, click the
 Create Credential button.
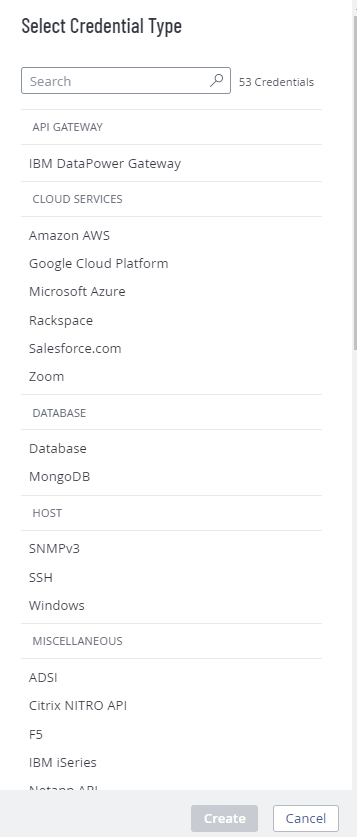
The Select Credential Type plane appears.
-
Do one of the following:
- Select one of the available credential types.
- Click on a credential type in the category sections.
The credential settings appear.
- In the Title box, type a name for the credential.
- (Optional) In the Description box, type a description for the credential.
-
Configure the settings for the credential type you selected.
For more information about credential settings, see Credentials (Tenable One Vulnerability Management) or Credentials (Tenable One Web App Scanning).
- Add user permissions.
-
Click Save.
Tenable Web App Scanning adds the credential to the credentials table in the Credentials page.
Edit a Managed Credential
Required User Role: Basic User, Scan Operator, Standard User, Scan Manager, or Administrator
This section describes editing a credential in the Tenable One Vulnerability Management credential manager.
You can also edit managed credentials during scan configuration. For more information, see Add a Credential to a Scan (Tenable One Vulnerability Management) or Configure Credentials Settings in Tenable One Web App Scanning
You can edit any credentials where you have Can Edit permission.
To edit managed credentials:
-
In the left navigation, click
Settings.The Settings page appears.
-
Click the Credentials tile.
The Credentials page appears. The credentials table lists the managed credentials you have permission to view.
- Filter or search the credentials table for the credential you want to edit.
-
In the credentials table, click the name of the credential you want to edit.
The credential settings plane appears.
- Do one of the following:
Edit the credential name or description.
Roll over the name or description box.
Click the
 button that appears next to the box.
Make your changes.
Click the
 button at the lower right corner of the box to save your changes.
- Edit the settings for the credential type. For more information about these settings, see Credentials (Tenable One Vulnerability Management) or Credentials (Tenable One Web App Scanning).
Configure user permissions for the credential.
-
Click Save.
Configure User Permissions for a Managed Credential
Required User Role: Basic User, Scan Operator, Standard User, Scan Manager, or Administrator
You configure user permissions for a managed credential separately from the permissions you configure for the scans where you use the credential.
You can configure credential permissions for individual users or a user group. If you configure credential permissions for a group, you assign all users in that group the same permissions. You may want to create the equivalent of a credential manager role by creating a group for the users you want to manage credentials. For more information, see User Groups.
If you create a managed credential, Tenable Web App Scanning automatically assigns you Can Edit permissions.
To configure user permissions for a managed credential:
-
Create or edit a managed credential:
Location Action In the credential manager Create or edit In a scan configuration Create or edit - Do one of the following:
Add permissions for a user or user group.
In the credential settings plane, click the
button next to the User Permissions title. The Add User Permission settings appear.
In the search box, type the name of a user or group.
As you type, a filtered list of users and groups appears.
- Select a user or group from the search results.
Click the
 button next to the permission drop-down for the user or group.
Select a permission level:
Can Use — The user can view the credential in the managed credentials table and use the credential in scans.
Can Edit — The user can view and edit credential settings, delete the credential, and use the credential in scans.
- Click Add.
- Click Save.
Edit permissions for a user or user group.
- In the User Permissions section of the credential settings plane, click the button next to the permission drop-down for the user or group.
Select a permission level:
Can Use — The user can view the credential in the managed credentials table and use the credential in scans.
Can Edit — The user can view and edit credential settings, delete the credential, and use the credential in scans.
- Click Save.
- In the User Permissions section of the credential settings plane, click the
Delete permissions for a user or user group.
In the User Permissions section of the credential settings plane, roll over the user or group you want to delete.
Click the
 button next to the user or user group.
The user or group is removed from the User Permissions list.
Click Save.
Export Credentials
Required User Role: Administrator
On the Credentials page, you can export the data for one or more managed credentials.
Note: When you export credential data, authentication details such as usernames, passwords, or keys are not included in the export.
To export credential data:
-
In the left navigation, click
Settings.The Settings page appears.
-
Click the Credentials tile.
The Credentials page appears. The credentials table lists the managed credentials you have permission to view.
-
(Optional) Refine the table data. See Filterable Workbench Tables.
-
Select the credentials that you want to export:
Export Scope Action Selected credentials To export selected credentials:
-
In the credentials table, select the check box for each credential you want to export.
The action bar appears at the top of the table.
-
In the action bar, click
 Export.
Note: The
Export link is available for up to 200 selections. If you want to export more than 200 credentials, select all the credentials in the list and then click Export.
A single credential To export a single credential:
-
In the credentials table, right-click the row for the credential you want to export.
The action options appear next to your cursor.
-or-
In the credentials table, in the Actions column, click the
 button in the row for the credential you want to export.
The action buttons appear in the row.
- Click Export.
The Export plane appears. This plane contains:
- A text box to configure the export file name.
- A list of available export formats.
- A table of configuration options for fields to include in the exported file.
- A text box to set the number of days before the export expires.
- A toggle to configure the export schedule.
- A toggle to configure the email notification.
Note: By default, all fields are selected.
-
- In the Name box, type a name for the export file.
-
Click the export format you want to use:
Format Description CSV A CSV text file that contains a list of credentials.
Note: If your .csv export file includes a cell that begins with any of the following characters (=, +, -, @), Tenable Web App Scanning automatically inputs a single quote (') at the beginning of the cell. For more information, see the related knowledge base article.JSON A JSON file that contains a nested list of credentials.
Empty fields are not included in the JSON file.
-
(Optional) Deselect any fields you do not want to appear in the export file.
-
In the Expiration box, type the number of days before the export file expires.
Note: Tenable Web App Scanning allows you to set a maximum of 30 calendar days for export expiration.
-
(Optional) To set a schedule for your export to repeat:
- Click the Schedule toggle.
- In the Start Date and Time section, select the date and time on which you want the export schedule to start.
- In the Time Zone drop-down box, select the time zone to which you want the schedule to adhere.
- In the Repeat drop-down box, select how often you want the export to repeat.
- In the Repeat Ends drop-down, select the date on which you want the schedule to end.
Note: If you select never, the schedule repeats until you modify or delete the export schedule.
The Schedule section appears.
-
(Optional) To send email notifications on completion of the export:
Note: You can enable email notifications with or without scheduling exports.-
Click the Email Notification toggle.
The Email Notification section appears.
-
In the Add Recipients box, type the email addresses to which you want to send the export notification.
-
(Required) In the Password box, type a password for the export file. You must share this password with the recipients to allow them to download the file.
Note: Tenable Web App Scanning sends an email to the recipients and from the link in the email, the recipients can download the file by providing the correct password.
-
-
Click Export.
Tenable Web App Scanning begins processing the export. Depending on the size of the exported data, Tenable Web App Scanning may take several minutes to process the export.
When processing completes, Tenable Web App Scanning downloads the export file to your computer. Depending on your browser settings, your browser may notify you that the download is complete.
-
Access the export file via your browser's downloads directory. If you close the export plane before the download finishes, then you can access your export file from the Exports page.
Delete a Managed Credential
Required User Role: Basic User, Scan Operator, Standard User, Scan Manager, or Administrator
You can delete any credentials where you have Can Edit permission.
To delete a managed credential:
-
In the left navigation, click
Settings.The Settings page appears.
-
Click the Credentials tile.
The Credentials page appears. The credentials table lists the managed credentials you have permission to view.
- Filter or search the credentials table for the credential you want to delete. See Filterable Workbench Tables.
- In the table, roll over the credential you want to delete.
The action buttons appear in the row.
-
Click the
 button.
The Confirm Deletion window appears.
-
Do one of the following:
- If no scans use the credential, click Delete.
-
If any scans use the credential:
-
Click View Scans.
The Scans plane appears.
- Filter or search for scans that use the credential.
-
Do one of the following:
- Click Cancel to cancel the deletion.
- Click Delete to confirm the deletion.
-