Send Tenable Identity Exposure Alerts to QRadar
In order to send Tenable Identity Exposure alerts to QRadar, you first need to configure Tenable Identity Exposure for your QRadar system. Then, for each relevant policy, you can specify QRadar as a target for receiving alerts.
To configure the Syslog server to Tenable Identity Exposure:
-
In Tenable Identity Exposure, click System > Configuration > Syslog.
-
Click the Add a Syslog alert button on the right.
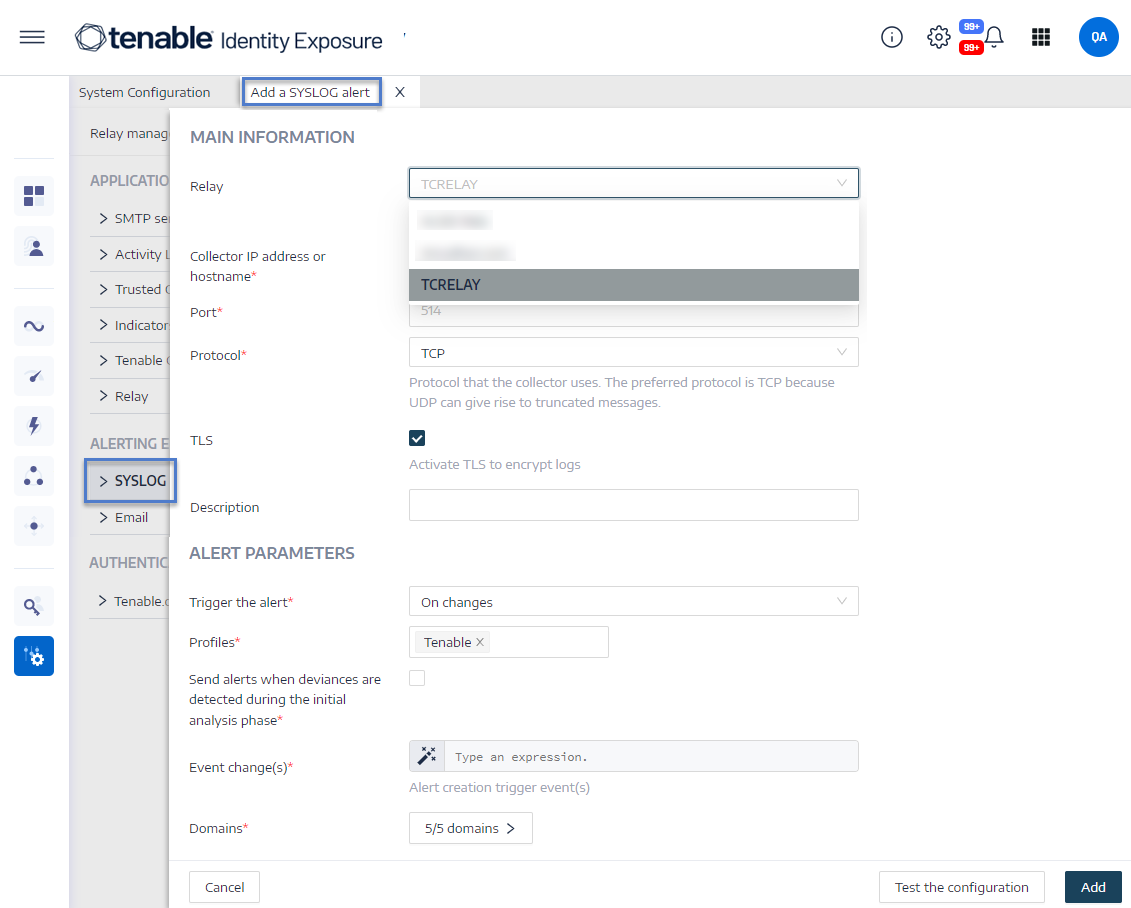
The Add a Syslog alert pane appears.
-
Under the Main Information section, provide the following:
-
If your network uses Secure Relay: In the Relay box, click the arrow to select a Relay to communicate with your SIEM from the drop-down list.
-
In the Collector IP address or hostname box, type the server IP or hostname that receives notifications.
-
In the Port box, type the port number for the collector.
-
In the Protocol box, click the arrow to select either UDP or TCP.
-
If you choose TCP, select the TLS option checkbox if you want to enable the TLS security protocol to encrypt the logs.
-
-
-
In the Trigger the alert drop-down list, select one:
-
On changes: Tenable Identity Exposure sends out a notification whenever an event that you specified occurs.
-
On each deviance: Tenable Identity Exposure sends out a notification on each deviant IoE detection.
-
On each attack: Tenable Identity Exposure sends out a notification on each deviant IoA detection.
-
On each health check status changes: Tenable Identity Exposure sends out a notification whenever a health check status changes.
-
-
In the Description box, type a brief description for the collector.
-
In the Profiles box, click to select the profile to use for this Syslog alert (if applicable).
-
Send alerts when deviances are detected during the initial analysis phase: do one of the following (if applicable):
-
Select the checkbox: Tenable Identity Exposure sends out a large volume of email notifications when a system reboot triggers alerts.
-
Unselect the checkbox: Tenable Identity Exposure does not send out email notifications when a system reboot triggers alerts.
-
-
Severity threshold: click the arrow of the drop-down box to select the threshold at which Tenable Identity Exposure sends alerts (if applicable).
-
Depending on the alert trigger you selected previously:
-
Event changes: If you set alerts to trigger on changes, type an expression to trigger the event notification.
You can either click on the
 icon to use the search wizard or type a query expression in the search box and click Validate. For more information, refer to Customize Trail Flow Queries in the Tenable Identity Exposure User Guide.
 -
Indicators of Exposure: If you set alerts to trigger on each deviance, click the arrow next to each severity level to expand the list of Indicators of Exposure and select the ones for which to send alerts.
-
Indicators of Attack: If you set alerts to trigger on each attack, click the arrow next to each severity level to expand the list of Indicators of Attack and select the ones for which to send alerts.
-
Health check status changes: Click Health Checks to select the health check type to trigger an alert, and click Filter on selection.
-
-
Click the Domains box to select the domains for which Tenable Identity Exposure sends out alerts.
The Forests and Domains pane appears.
-
Select the forest or domain.
-
Click Filter on selection.
-
-
Click Test the configuration.
A message confirms that Tenable Identity Exposure sent a Syslog alert to the server.
-
Click Add.
A message confirms that Tenable Identity Exposure created the Syslog alert.
-
In Tenable Identity Exposure, click System > Configuration > Syslog.
-
In the list of Syslog alerts, hover over the one you want to modify and click the
 icon at the end of the line.
The Edit a Syslog alert pane appears.
-
Make the necessary modifications as described in Syslog Alert in the Tenable Identity Exposure User Guide.
-
Click Edit.
A message confirms that Tenable Identity Exposure updated the alert.
-
In Tenable Identity Exposure, click System > Configuration > Syslog.
-
In the list of Syslog alerts, hover over the one you want to delete and click the
 icon at the end of the line.
A message asks you to confirm the deletion.
-
Click Delete.
A message confirms that Tenable Identity Exposure deleted the alert.
For more information, refer to the Tenable Identity Exposure documentation.
