Kubernetes Clusters
This is a how-to guide for viewing and managing Kubernetes clusters.
- For a conceptual overview of Kubernetes capabilities, see Kubernetes.
- For how-to guides about connecting clusters to Tenable, see the relevant guide: Via Helm, Amazon EKS, Azure AKS, Google GKE, Oracle OKE.
- To configure VM settings, see Virtual Machine Settings.
- For frequently asked questions, see FAQ: Kubernetes.
A dedicated Clusters page displays all clusters that have been connected to Tenable One Cloud Exposure. See Kubernetes Clusters to learn more about how clusters are connected.
View Your Clusters
To view your clusters:
- In the Cloud Exposure Console, navigate to Explore > Compute > Kubernetes Clusters.
-
Within the table, you can perform the following, optional tasks:
- Select an account scope in the Organization dropdown to view clusters for that scope. By default, the entire Organization (all accounts) is selected.
- Filter the table to modify the scope of the visible data. See Cluster Column Data for more information.
- Export the table to CSV.
- You can use this page to connect clusters and install new features on already connected clusters. See Connect a Cluster via Helm Chart for more information.
- (On-premises clusters) To delete any synced resources and findings related to the cluster, click the three dots icon next to the cluster and then click Delete. Resources/findings are deleted the next time data is synchronized in your environment.
Note: When deleting resources/findings, it is highly recommended to also uninstall the connected cluster using the Helm uninstall command.
Manage Your Clusters
Use the following actions to maintain and update your clusters:
- Upgrade Helm or Install New Features
- Disconnect a Cluster from Tenable
- Move a Cluster to a Different Account
Upgrade Helm or Install New Features
To install features such as Runtime Detection, Admission Controller, or Vulnerability Management on a cluster where the Helm chart is already installed, or to update your Helm version:
- In the Cloud Exposure Console, navigate to Explore > Compute > Kubernetes Clusters, and locate the relevant cluster.
- Click the three dots menu (⋮) and select Upgrade Helm.
- Follow the instructions in the wizard to select the desired features or version.
- In your CLI, update your local repository:
helm repo update tenable - Run the generated Helm command provided by the wizard to update the configuration for the added cluster.
Disconnect a Cluster from Tenable
To disconnect a cluster, uninstall the Helm chart from your environment. Tenable removes the cluster from the Console during the next data synchronization.
- Run the following command:
helm uninstall -n tenable-cloud-security-kubernetes-cluster - (On-premises clusters) To delete synced resources and findings immediately, click the three-dot menu (⋮) next to the cluster and click Delete.
Move a Cluster to a Different Account
In some cases, you may need to move a cluster to a different account location. For example, if you connect a cloud-based cluster via Helm before you connect the cloud account to Tenable, the Console automatically maps the cluster to the On-Premises default account.
To move a cluster to a different account:
-
Uninstall the cluster by running the following command:
- helm uninstall -n tenable-cloud-security-kubernetes-cluster
- Re-add the cluster to the correct location using the standard installation process.
Upgrade a Cluster with Additional Features
Customers need to upgrade their clusters to include new features. In order to install new features on your clusters, follow these steps:
- Log in to Cloud Exposure Console.
- In the left navigation pane, click on Explore > Compute > Kubernetes Clusters.
- On the right side of the relevant cluster, click the three-dot menu (⋮) > Upgrade Helm.
- Follow the instructions in the wizard.
- Make sure you update the repo to the latest chart by running: helm repo update tenable
- Ensure your images are updated at least every two weeks for optimal performance.
Cluster Column Data
The following columns appear in the table on the Clusters page, and most of them can also be used to filter data in the table.
| Column | Description | Displayed by Default |
|---|---|---|
| Name | The name of the cluster. | Yes |
| Account | The account where the cluster is located. | Yes |
| Platform | Possible values: Kubernetes, OpenShift | Yes |
| Cluster Sync Time | The last time the cluster itself reported to Tenable, either through a sync with the cloud provider or a report from the agent. Use this column to identify stale clusters and track how close they are to removal under your retention policy. | Yes |
| Resource Sync | The last time Tenable synced with the cluster’s resources and can trigger findings on detected misconfigurations. If connected, Tenable can connect to the Kubernetes API. If the network is disconnected, or there are missing permissions, follow the relevant integration instructions for your cluster type. See Resource Sync Status for possible statuses. | Yes |
| Resource Sync Time | The last time Tenable synced the cluster’s resources, such as workloads. If there are no resources, or the sensor does not have all features enabled this time can be older than the Cluster Sync Time or empty. An old or empty value here does not mean the cluster is inactive. | No |
| Creation Time | The date when the cluster was created. | No |
| Runtime Detection | Indicates whether the eBPF sensor is installed and monitoring events in cluster workloads to detect suspicious activity. | Yes |
| Admission Controller | Indicates whether Tenable admission controller is installed and running on the Kubernetes cluster. This feature is only available with the Enterprise license. See Licensing for more information. |
Yes |
| Workload Protection | Indicates whether Tenable can scan the on-premises cluster’s nodes and container images for vulnerabilities. If running, the Tenable sensor is installed and running on the cluster. See Workload Protection Status for possible statuses. Note: This feature is only available with the Enterprise license. See Licensing for more information. |
Yes |
| Helm Version | The name of the associated Kubernetes Cluster Helm version used to connect to the cluster, if relevant, and whether network and/or identity access have been configured. | No |
Resource Sync Status
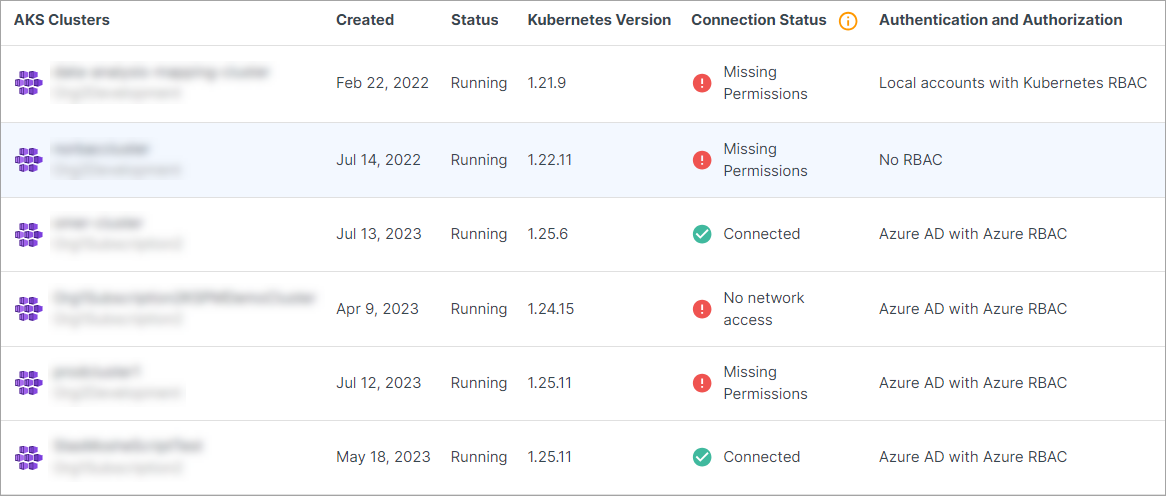
You can see a Resource Sync Status for each Kubernetes cluster, indicating whether Cloud Exposure can connect to the Kubernetes API.
- When connected, Cloud Exposure has visibility into the cluster’s resources and can trigger findings on detected misconfigurations.
- If the network is disconnected, or if there are missing permissions, follow the integration instructions for the relevant cluster type.
Status:
- Connected: Tenable successfully connected to the Kubernetes API.
- Connected with issues (Azure): The cluster is connected, but there is no IAM visibility for it, since the custom Tenable role hasn't been added.
- Connection failed: Tenable cannot connect to the cluster due to an unknown error. Contact Technical Support for assistance.
- Connection lost — Connection was lost within the last 48 hours and may reconnect on its own.
- Inactive cluster: Tenable cannot connect to the cluster because it is inactive.
- Missing permissions:
- The Tenable IAM role / App (Azure) hasn't been granted permissions to the cluster. See Kubernetes Clusters to learn how to grant these permissions for public, cloud-managed clusters.
- Tenable cannot access the cluster because it is missing identity-based permissions to access the cluster. This can occur if the Azure cluster is configured with local account authentication. Either change your cluster to work with Azure AD authentication or connect via the Helm Chart.
- No network access:
- Tenable cannot access the cluster because it is missing a networking tunnel, or the tunnel is unreachable. This can occur if the cluster is private, and a communication tunnel wasn't configured via the Helm Chart.
- Tenable cannot access the cluster because you haven't allowed Cloud Exposure's IP addresses.
- Pending — The cluster status will be updated at the next system sync.
Vulnerability Management Status for On-Premises Clusters
You can view the workload protection status for each on-premises Kubernetes cluster to determine if Tenable can scan nodes and container images for vulnerabilities. A Running status indicates that the sensor is successfully installed and active on the cluster.
For more details, see Cluster Status.
Cluster Status
| Status | Description |
|---|---|
| Connected (duplicate) | This status indicates that the on-prem cluster is currently connected, but a duplicate cloud-managed version of the same cluster has been detected. |
| Not Installed | The Tenable sensor is not installed. Click Install Features next to the cluster, and follow the steps to install features with On-Premises Workload Protection enabled. |
| Not Running | The sensor was installed, but the feature is currently inactive. This status indicates that Tenable has not received a “heartbeat” signal from your pod within the expected timeframe, suggesting the pod may be down or unable to communicate with the system. Troubleshooting may be required to resume normal operation. |
| Running | The Tenable sensor is installed and can scan the cluster’s nodes and container images for vulnerabilities. |