Appendix — SAML Integration for Microsoft Azure
OT Security supports integration with Azure via SAML protocol. This enables Azure users assigned to OT Security to log in to OT Security via Single Sign-on (SSO). You can use group mapping to assign roles in OT Security according to the groups to which users are assigned in Azure.
This section explains the complete flow for setting up a SSO integration for OT Security with Azure. The configuration involves setting up the integration by creating a OT Security application in Azure. You can then provide information about this newly created OT Security application and upload your identity provider’s Certificate to the OT Security SAML page. The configuration is complete when you map groups from your identity provider to User Groups in OT Security.
To set up the configuration, you need to be logged in as an administrator user in both Microsoft Azure and OT Security.
Step 1 - Create the Tenable Application in Azure
To create the Tenable application in Azure:
-
In Azure, go to Microsoft Entra ID > Enterprise Applications and click + New application.
The Browse Microsoft Entra ID Gallery page appears.
-
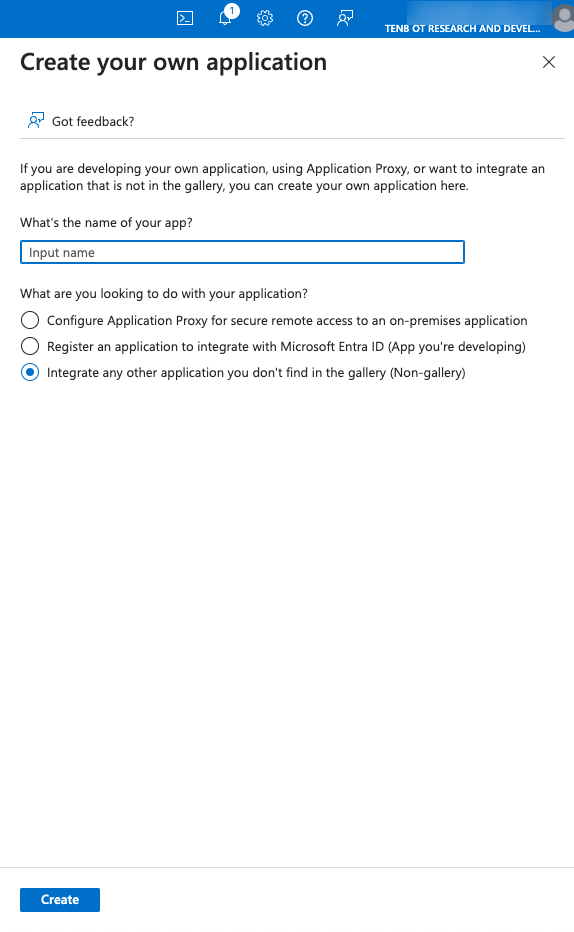
Click + Create your own application.
The Create your own application side panel appears.
-
In the What’s the name of your app? box, type a name for the application (for example, Tenable_OT) and select Integrate any other application you don’t find in the gallery (Non-gallery) (default), then click Create to add the application.
Step 2- Initial Configuration
This step is the initial configuration of the OT Security application in Azure, consisting of creating temporary values for basic SAML configuration values — Identifier and Reply URL to download the required certificate.
To perform the initial configuration:
-
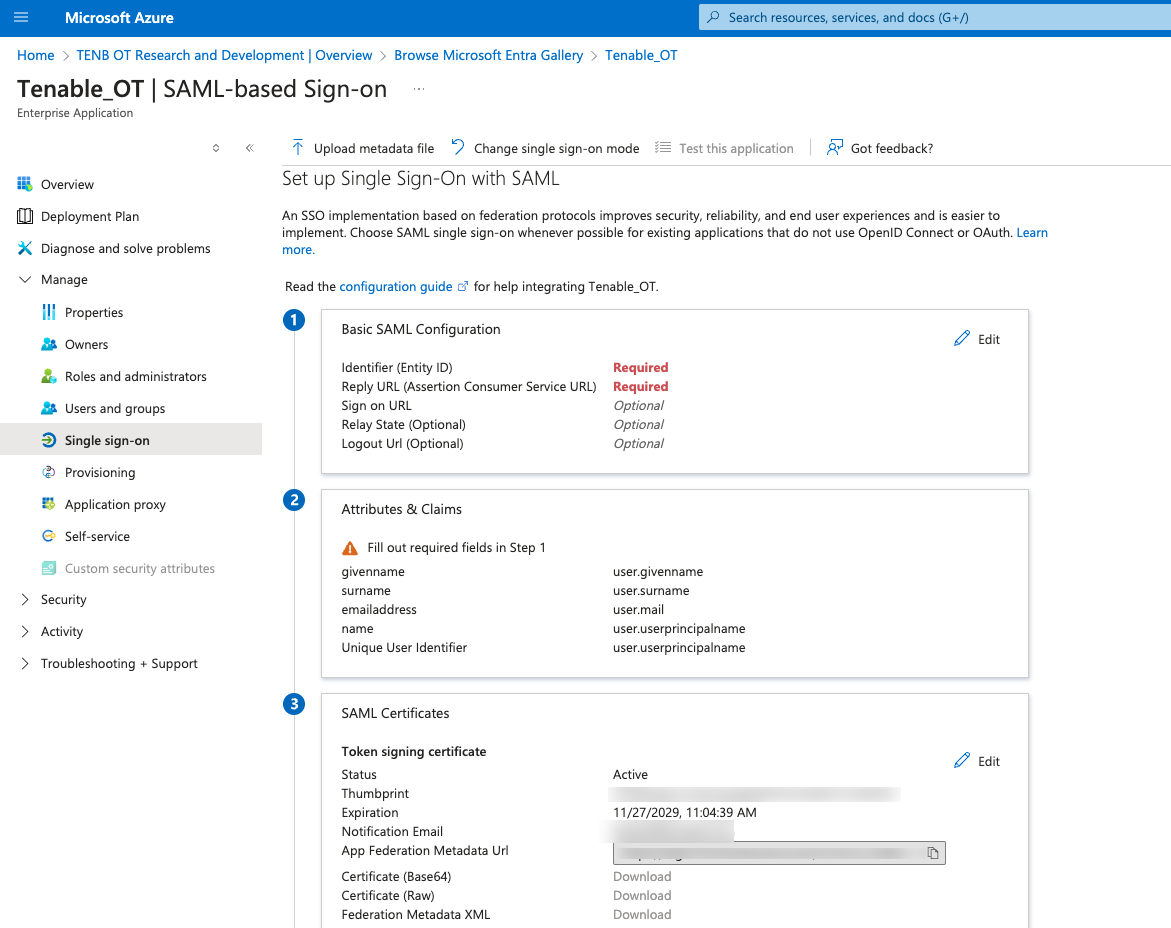
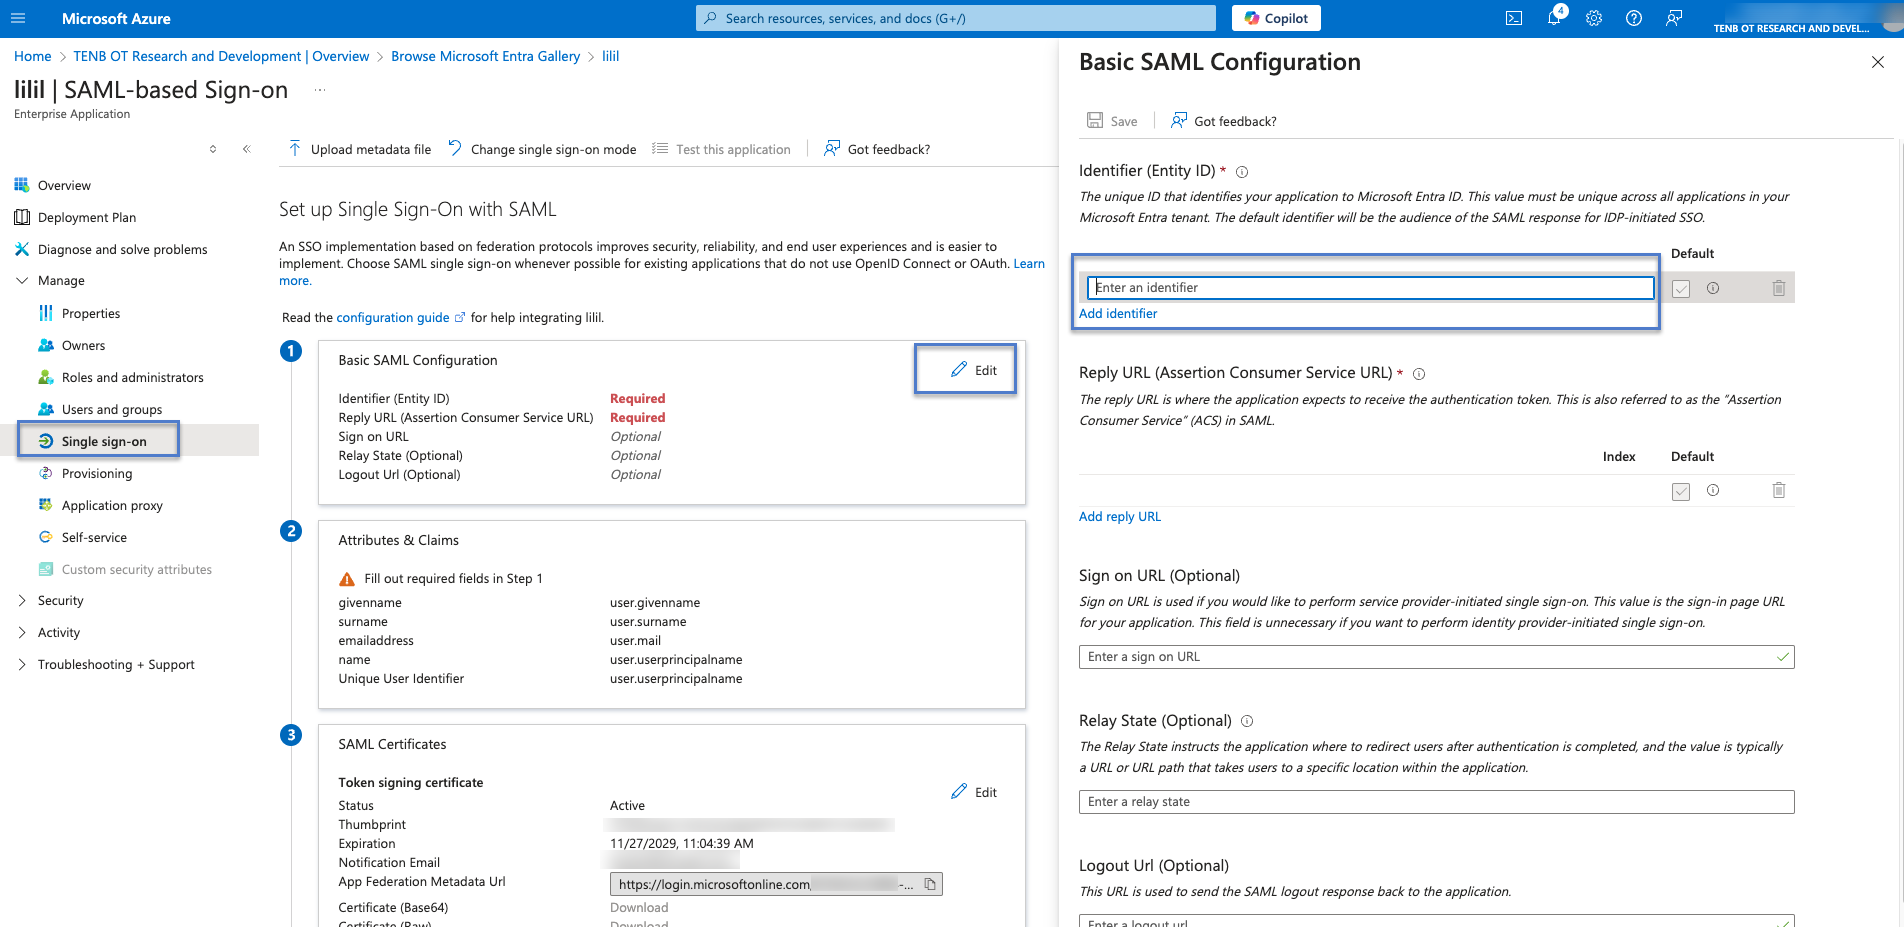
In the Azure navigation menu, click Single sign-on, then select SAML as the single sign-on method.
The SAML-based Sign-on page appears.
-
In section 1 – Basic SAML Configuration, click
 Edit .
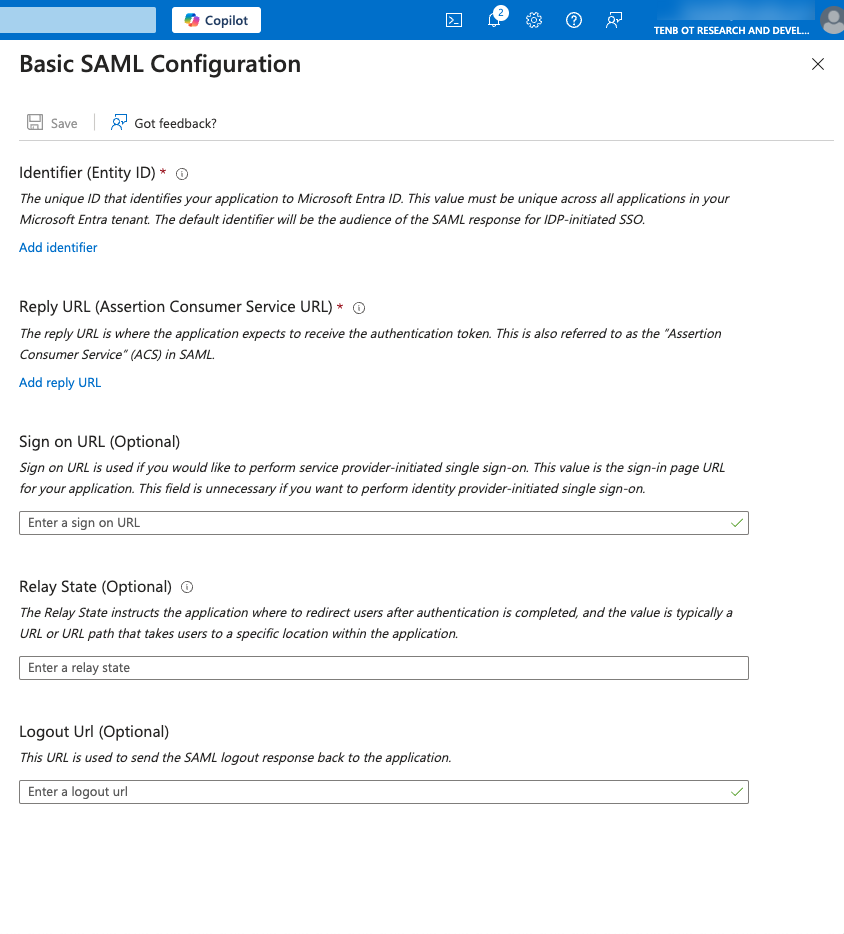
The Basic SAML Configuration side panel appears.
-
In the Identifier (Entity ID) box, type a temporary ID for the Tenable application, for example: tenable_ot.
-
In the Reply URL (Assertion Consumer Service URL) box, type a valid URL, for example: https://OT Security.
Note: The Identifier and Reply URL values are temporary values, which you can change later in the configuration process. -
Click
 Save to save the temporary values and close the Basic SAML Configuration side panel.
 -
In section 4 - Set up, click the
 button to copy the Microsoft Entra ID Identifier.
 -
Switch to the OT Security console, and go to User Management > SAML.
-
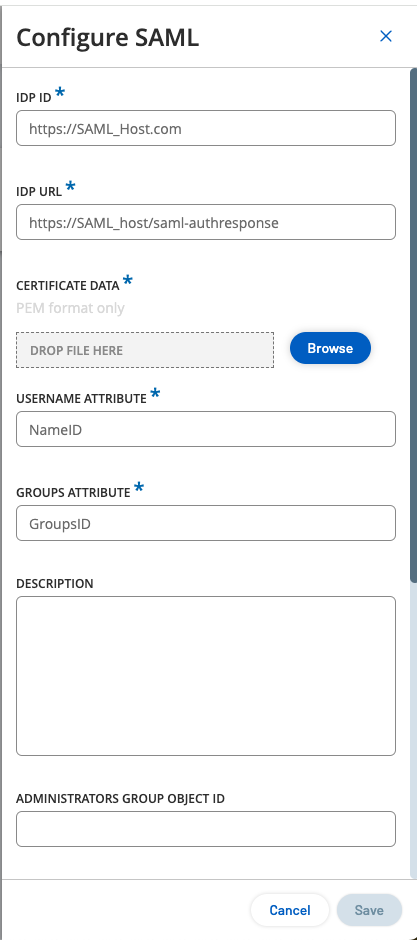
Click Configure to display the Configure SAML side panel, and paste the copied value into the IDP ID box.
-
In the Microsoft Azure console, click the
 button to copy the Login URL.
 -
Return to the OT Security console and paste the copied value into the IDP URL box.
-
In the Azure console, in section 3 - SAML Certificates, for Certificate (Base64), click Download.
-
Return to the OT Security console and in the Certificate Data section, Browse to the security certificate file and select it.
-
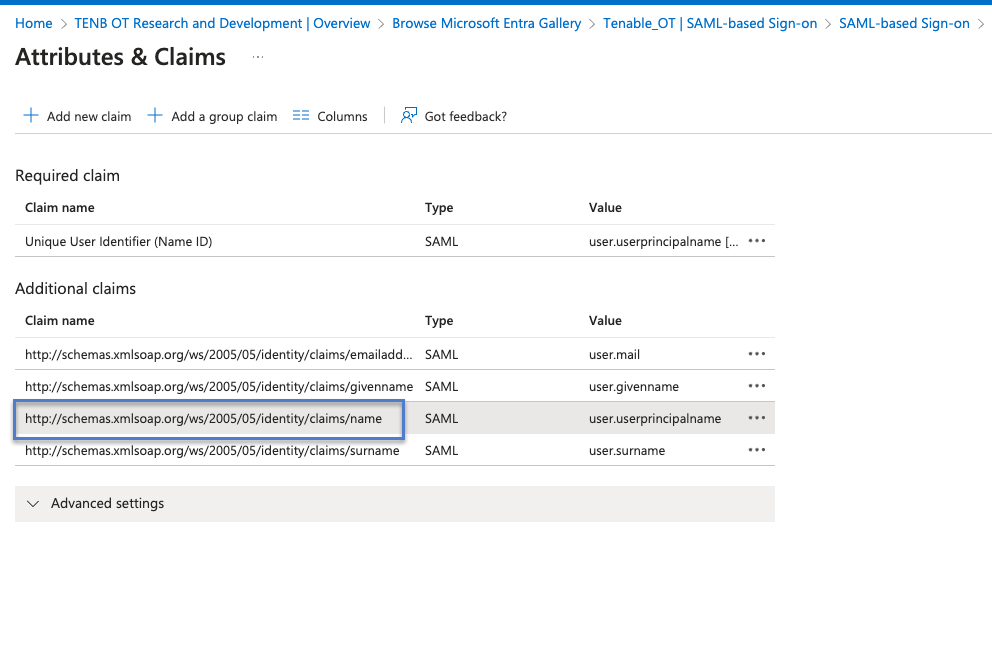
In the Azure console, in section 2 – Attributes & Claims, click
 Edit.
Edit. -
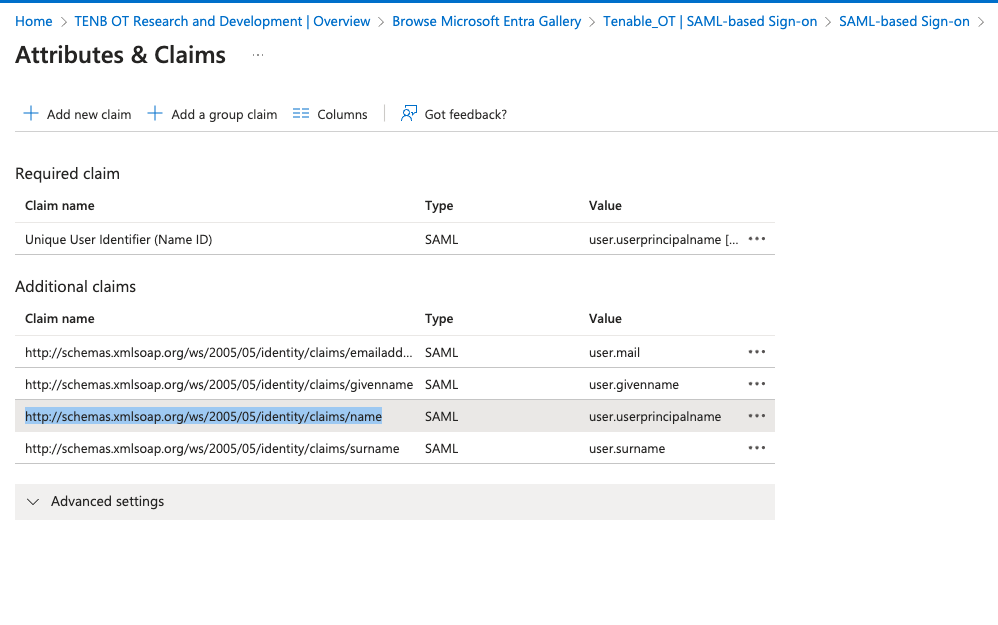
In the Additional claims section, select and copy the Claim name URL corresponding to the Value - user.userprincipalname.
-
Return to the OT Security console and paste this URL in the Username Attribute box.
-
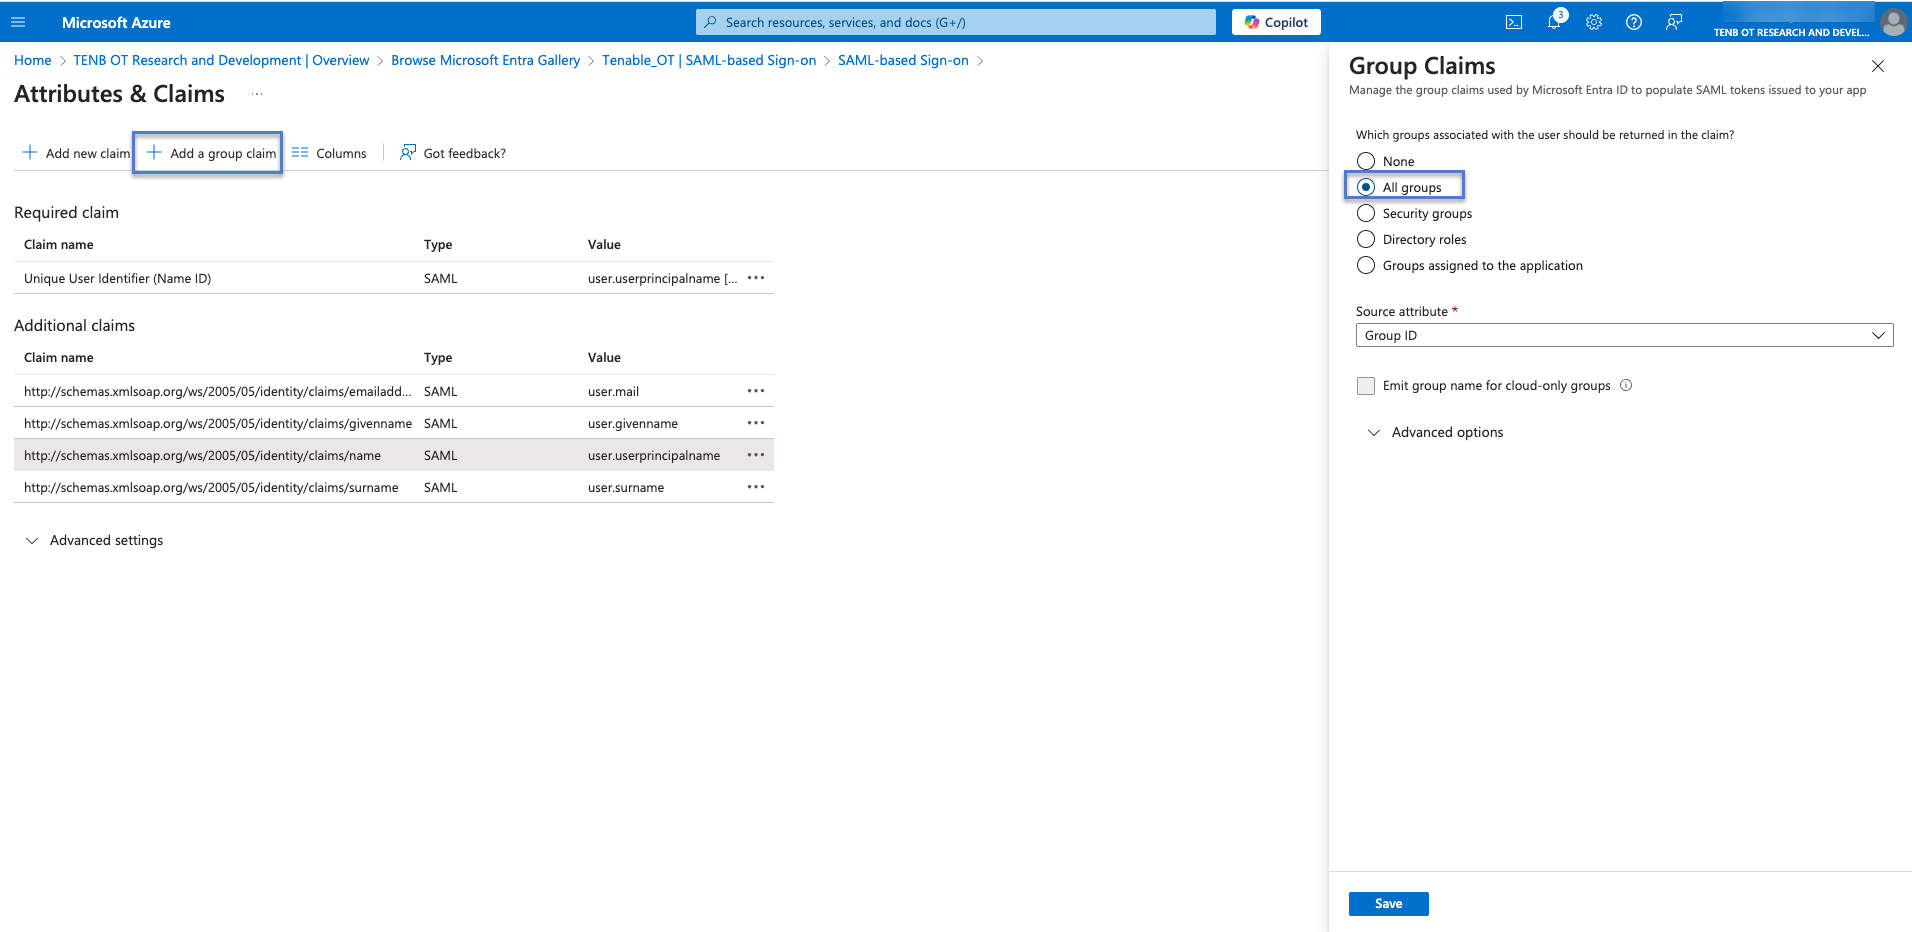
In the Azure console, click + Add a group claim.
The Group Claims side panel appears.
-
In the Which groups associated with the user should be returned in the claim? section, select All groups and click Save.
Note: If you enable the groups setting in Azure, you can select Groups assigned to the application instead of All Groups, and Azure provides only the user groups assigned to the application. -
In the Additional claims section, highlight and copy the Claim name URL associated with the Value— user.groups [All].
-
Return to the OT Security console and paste the copied URL in the Groups Attribute box.
-
(Optional) Add a description of the SAML configuration in the Description box.
Step 3 - Map Azure Users to Tenable Groups
In this step, you assign Azure users to the OT Security application. The permissions granted to each user are designated by mapping between the Azure groups to which they are assigned and a pre-defined OT Security User Group, which has an associated role and set of permissions. The OT Security pre-defined User Groups are: Administrators, Read-Only User, Security Analysts, Security Managers, Site Operators, and Supervisors. For more information, see User Management. Each Azure user must be assigned to at least one group mapped to a OT Security User Group.
To map Azure users to OT Security:
-
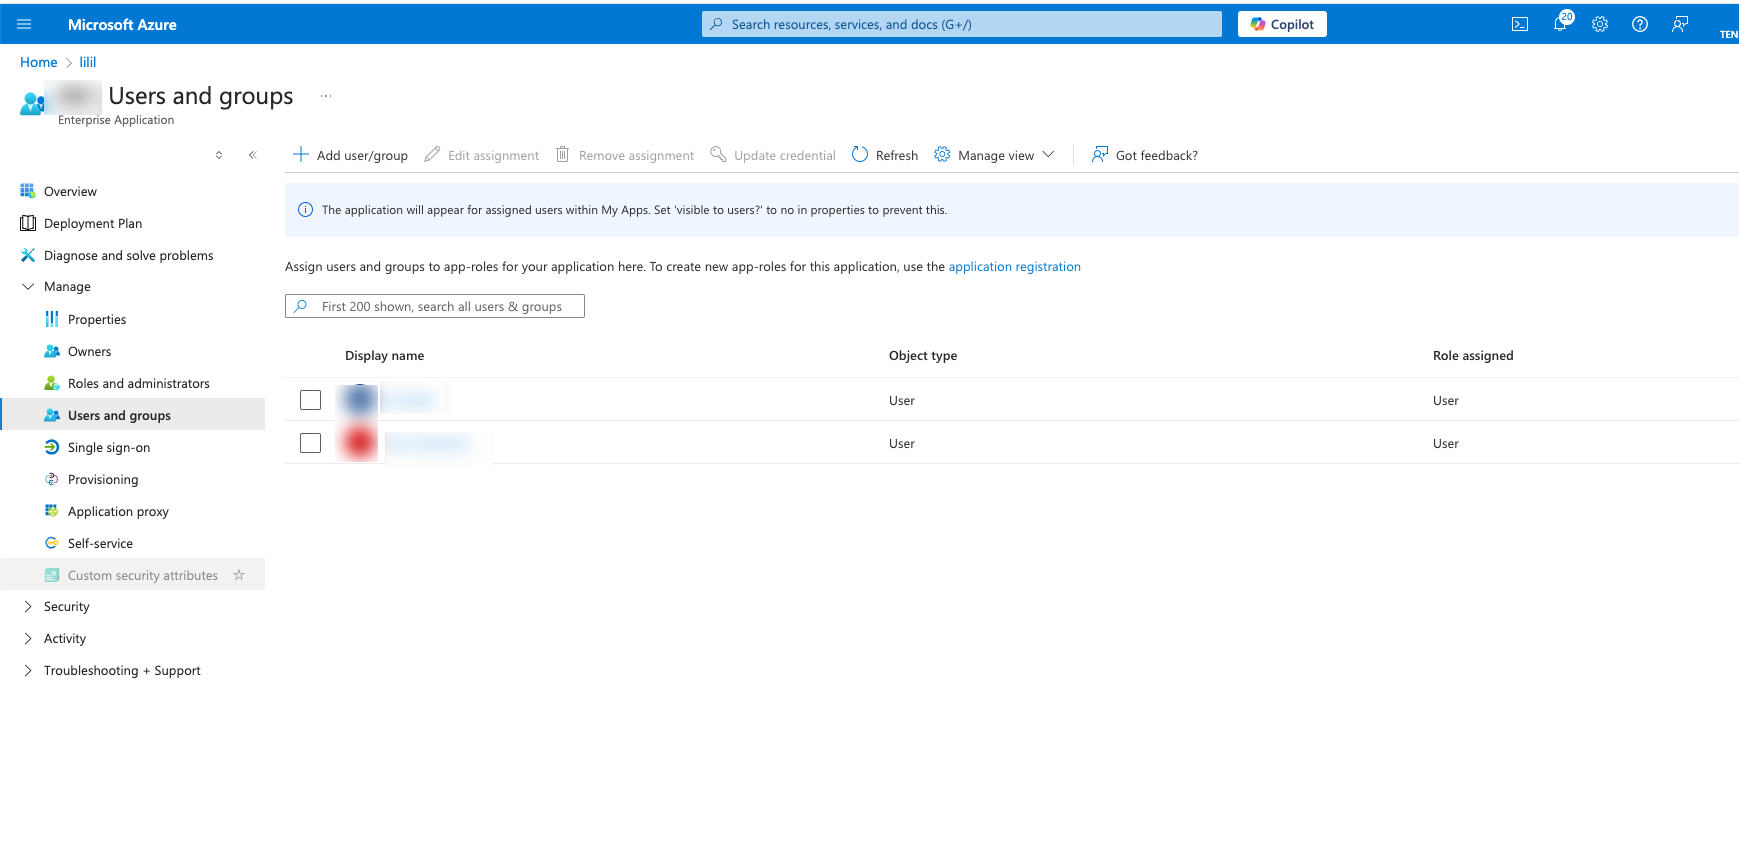
In Azure, navigate to the Users and groups page and click + Add user/group.
-
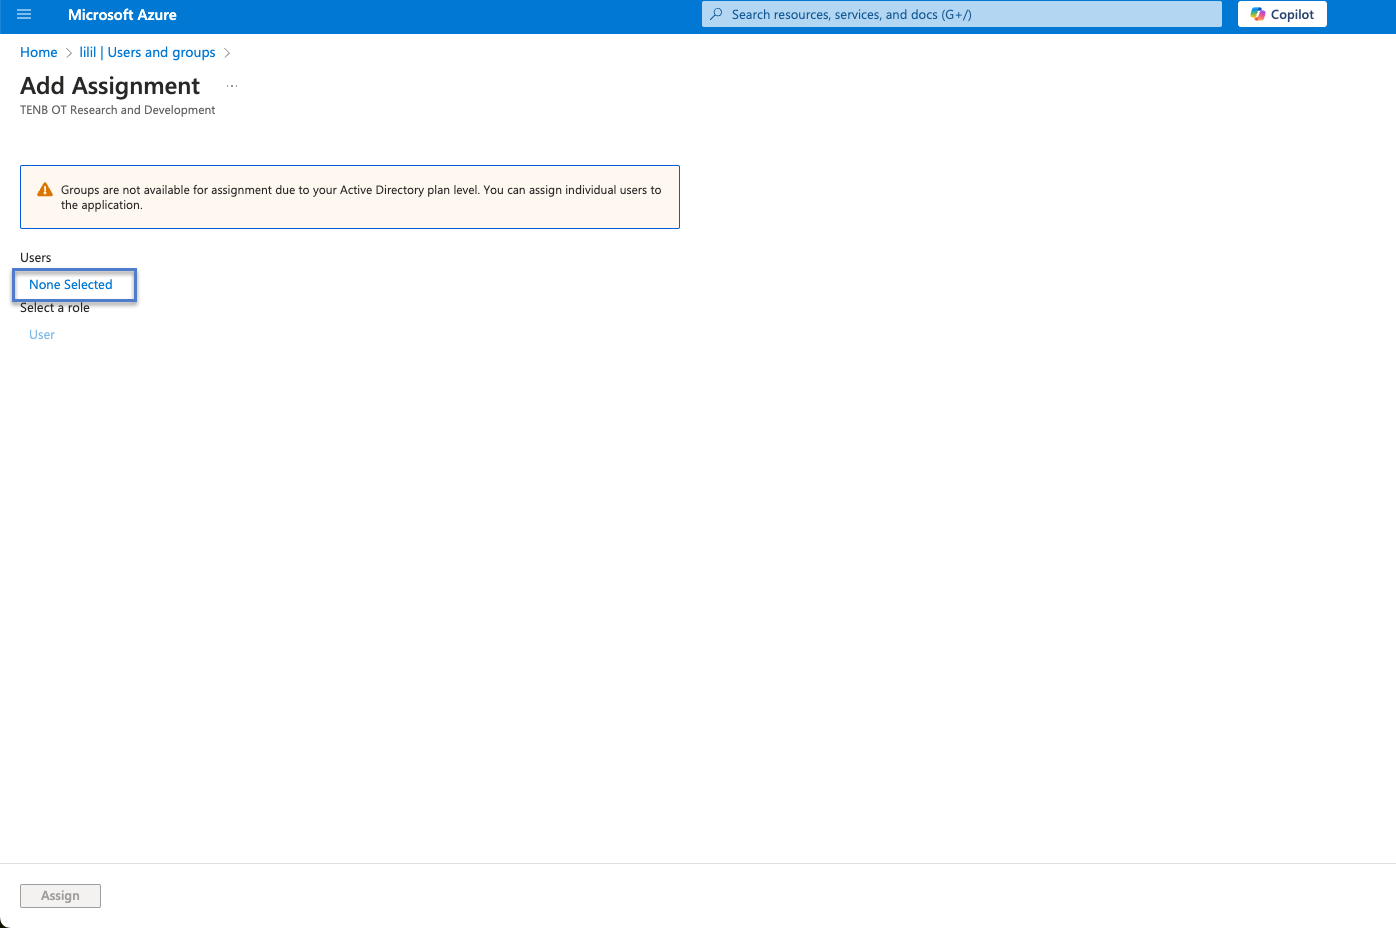
In the Add Assignment page, under Users, click None Selected.
The Users page appears.
Note: If you enable the groups setting in Azure and select Groups assigned to the application instead of All Groups, you can assign groups instead of individual users. -
Search and select all required users, then click Select.
-
Click Assign to assign them to the application.
The Users and groups page appears.
-
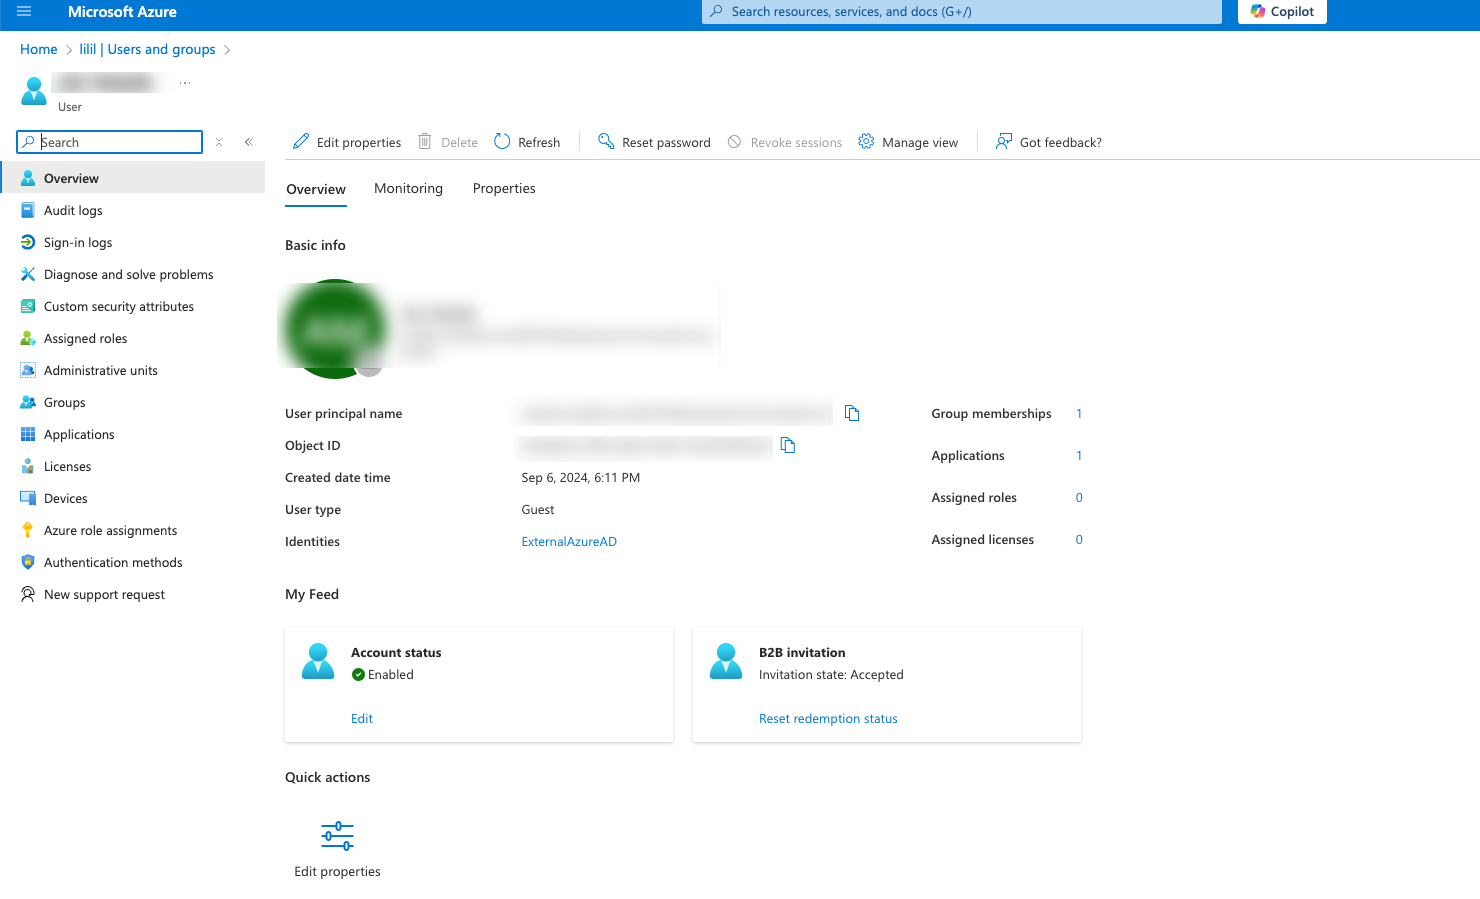
Click the Display Name of a user (or group) to display that user’s (or group’s) Profile.
The Profile page appears.
-
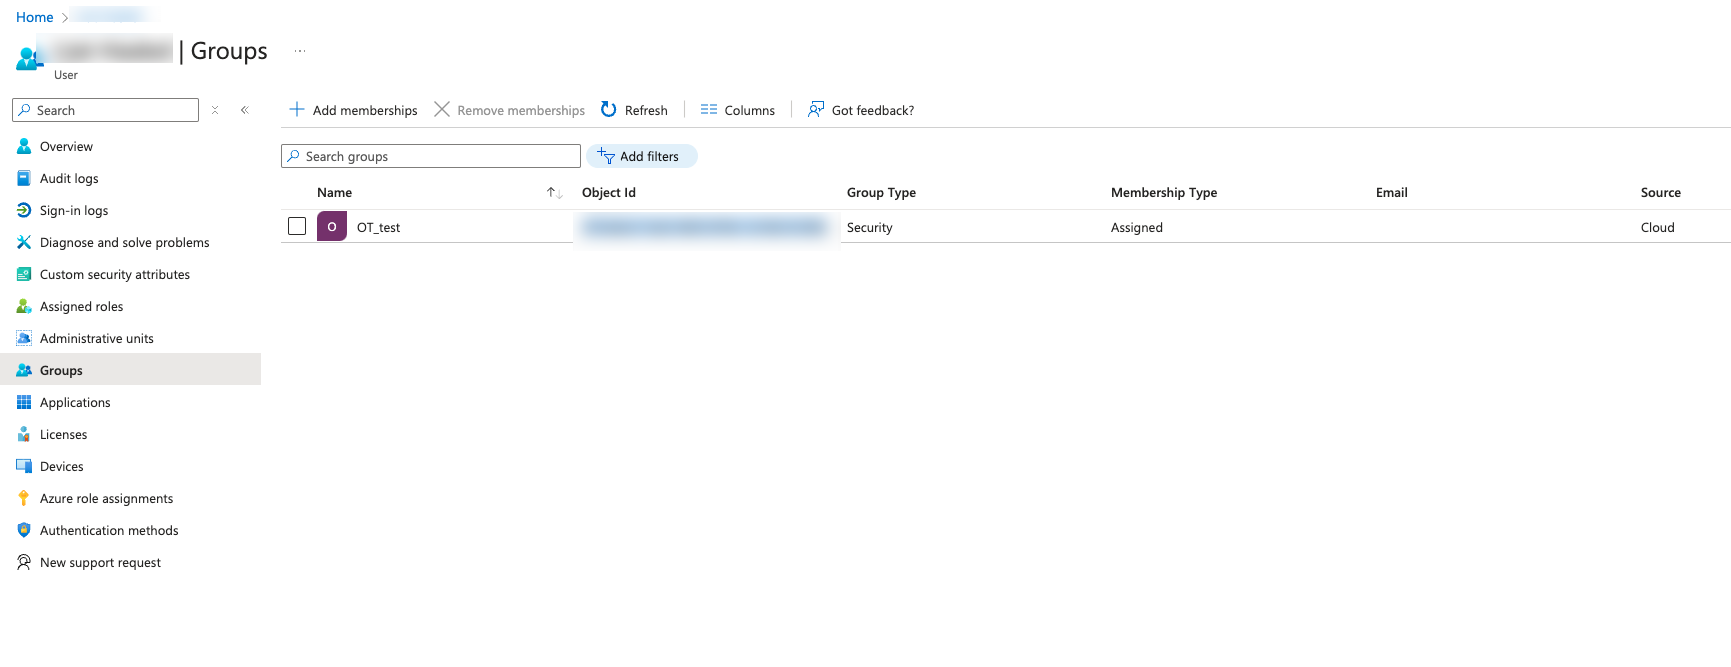
In the left navigation bar, select Groups.
The Groups page appears.
-
In the Object Id column, select and copy the value for the group that will be mapped to Tenable.
-
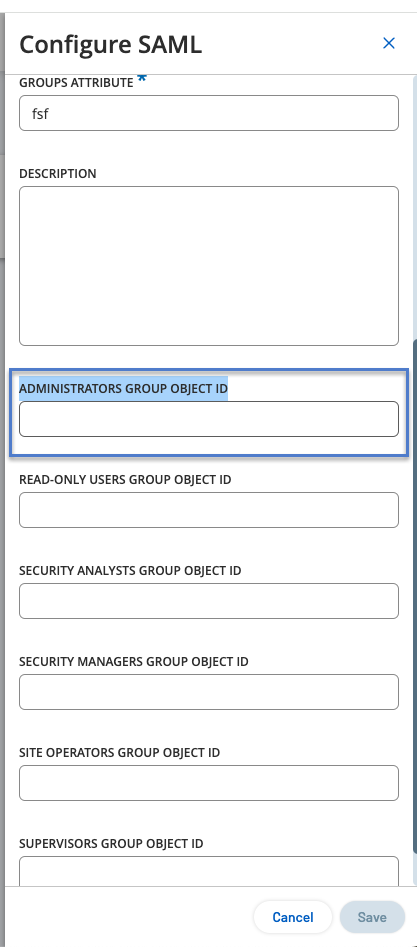
Return to the OT Security console and paste the copied value in the required Group Object ID box. For example, the Administrators Group Object ID.
-
Repeat steps 1-7 for each group you want to map to a distinct user group in OT Security.
-
Click Save to save and close the side panel.
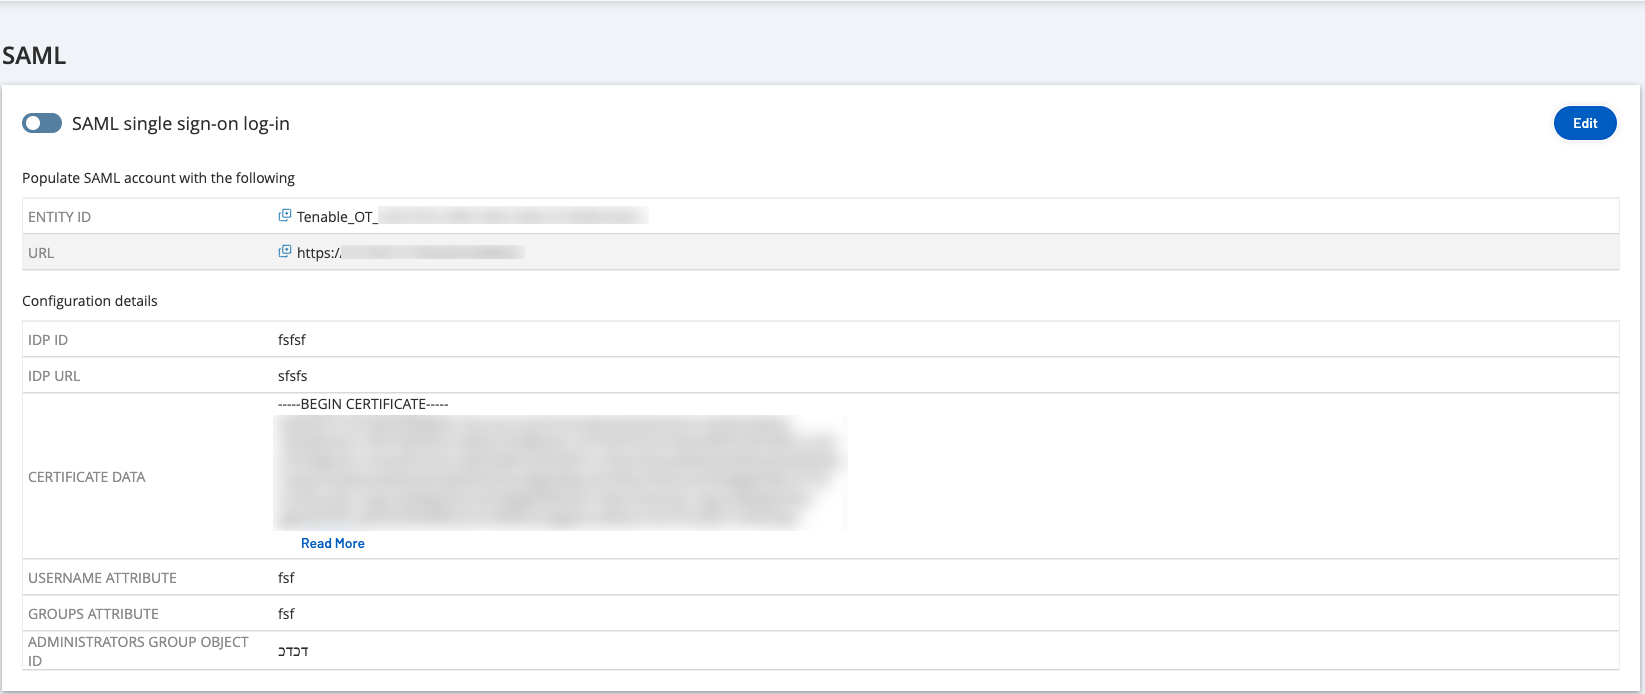
The SAML page appears in the OT Security console with the configured information.
Step 4 - Finalizing the Configuration in Azure
To finalize the configuration in Azure:
-
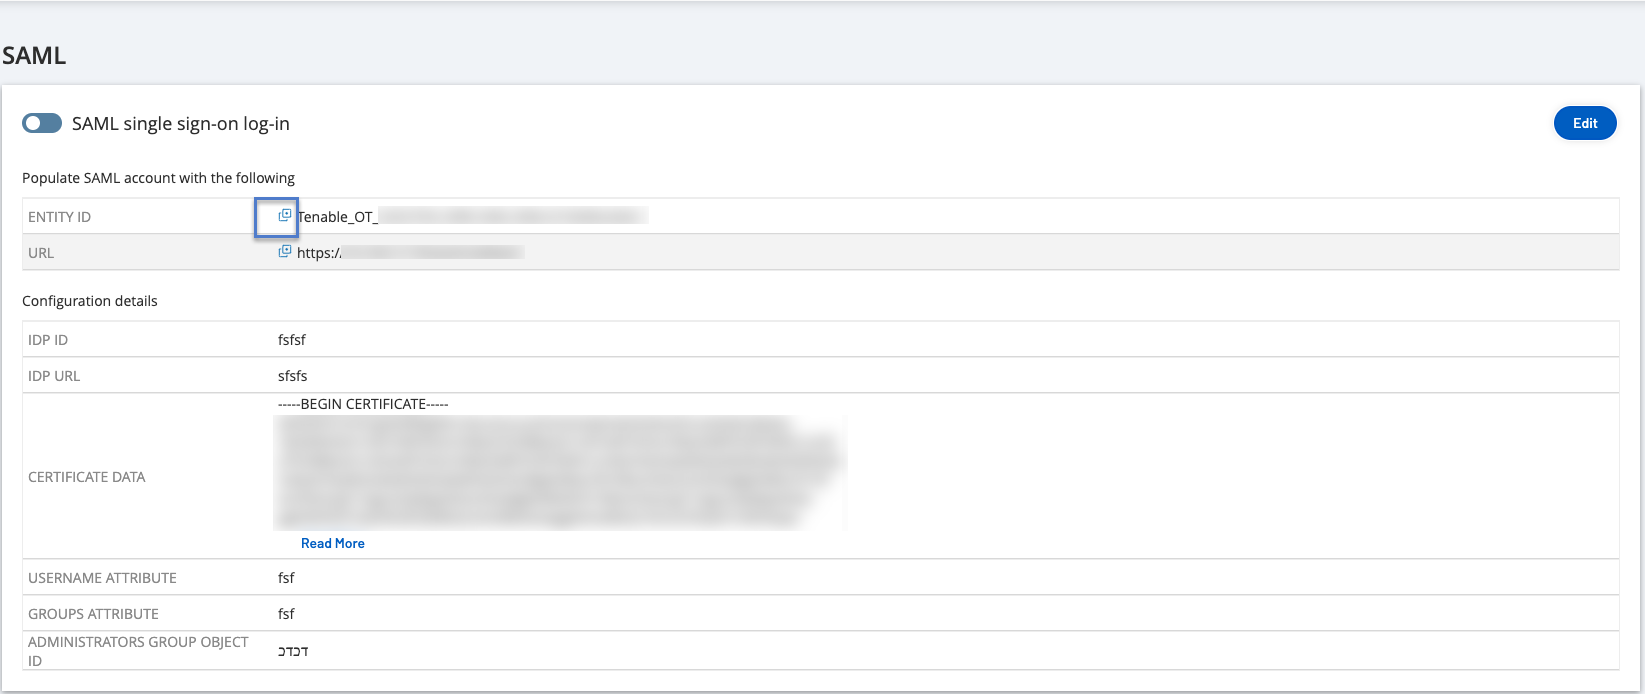
In the OT Security SAML page, click the the
 button to copy the Entity ID.
 -
In the Azure console, click Single sign-on in the left navigation menu.
The SAML-based Sign-on page appears.
-
In section 1 - Basic SAML Configuration, click
 Edit and paste the copied value in the Identifier (Entity ID) box, replacing the temporary value you entered earlier.
 -
Switch to the OT Security and in the SAML page, click the
 button to copy the URL.
 -
Switch to the Azure console and in the Basic SAML Configuration section, paste the copied URL in the Reply URL (Assertion Consumer Service URL) replacing the temporary URL you entered earlier.
-
Click
 Save to save the configuration, and close the side panel.
 The configuration is complete and the connection appears on the Azure Enterprise applications page.
Step 5 – Activate the Integration
To activate the SAML integration, you must restart OT Security. You may restart the system immediately or choose to restart it later.
To activate the integration:
-
In the OT Security console, on the SAML page, click the SAML single sign on login toggle to enable SAML.
The System Restart notification window appears.
-
Click Restart Now to restart the system and apply the SAML configuration immediately, or click Restart Later to delay the application of the SAML configuration the next time the system is restarted. If you choose to restart later, the following banner appears until the restart is done:

Sign in Using SSO
After the restart, the OT Security login window has a new Sign in via SSO link underneath the Log in button. Azure users assigned to OT Security can log in to OT Security using their Azure account.
To sign in using SSO:
-
On the OT Security login window, click the Sign in via SSO link.
If you are already logged in to Azure, you are taken directly to the OT Security console, otherwise you are redirected to the Azure sign-in page.
If you have more than one account, OT Security redirects you to the Microsoft Pick an account page, where you can select the required account for login.
