Get Started with Tenable One OT Exposure
Use the following getting started sequence to install and start using Tenable One OT Exposure.
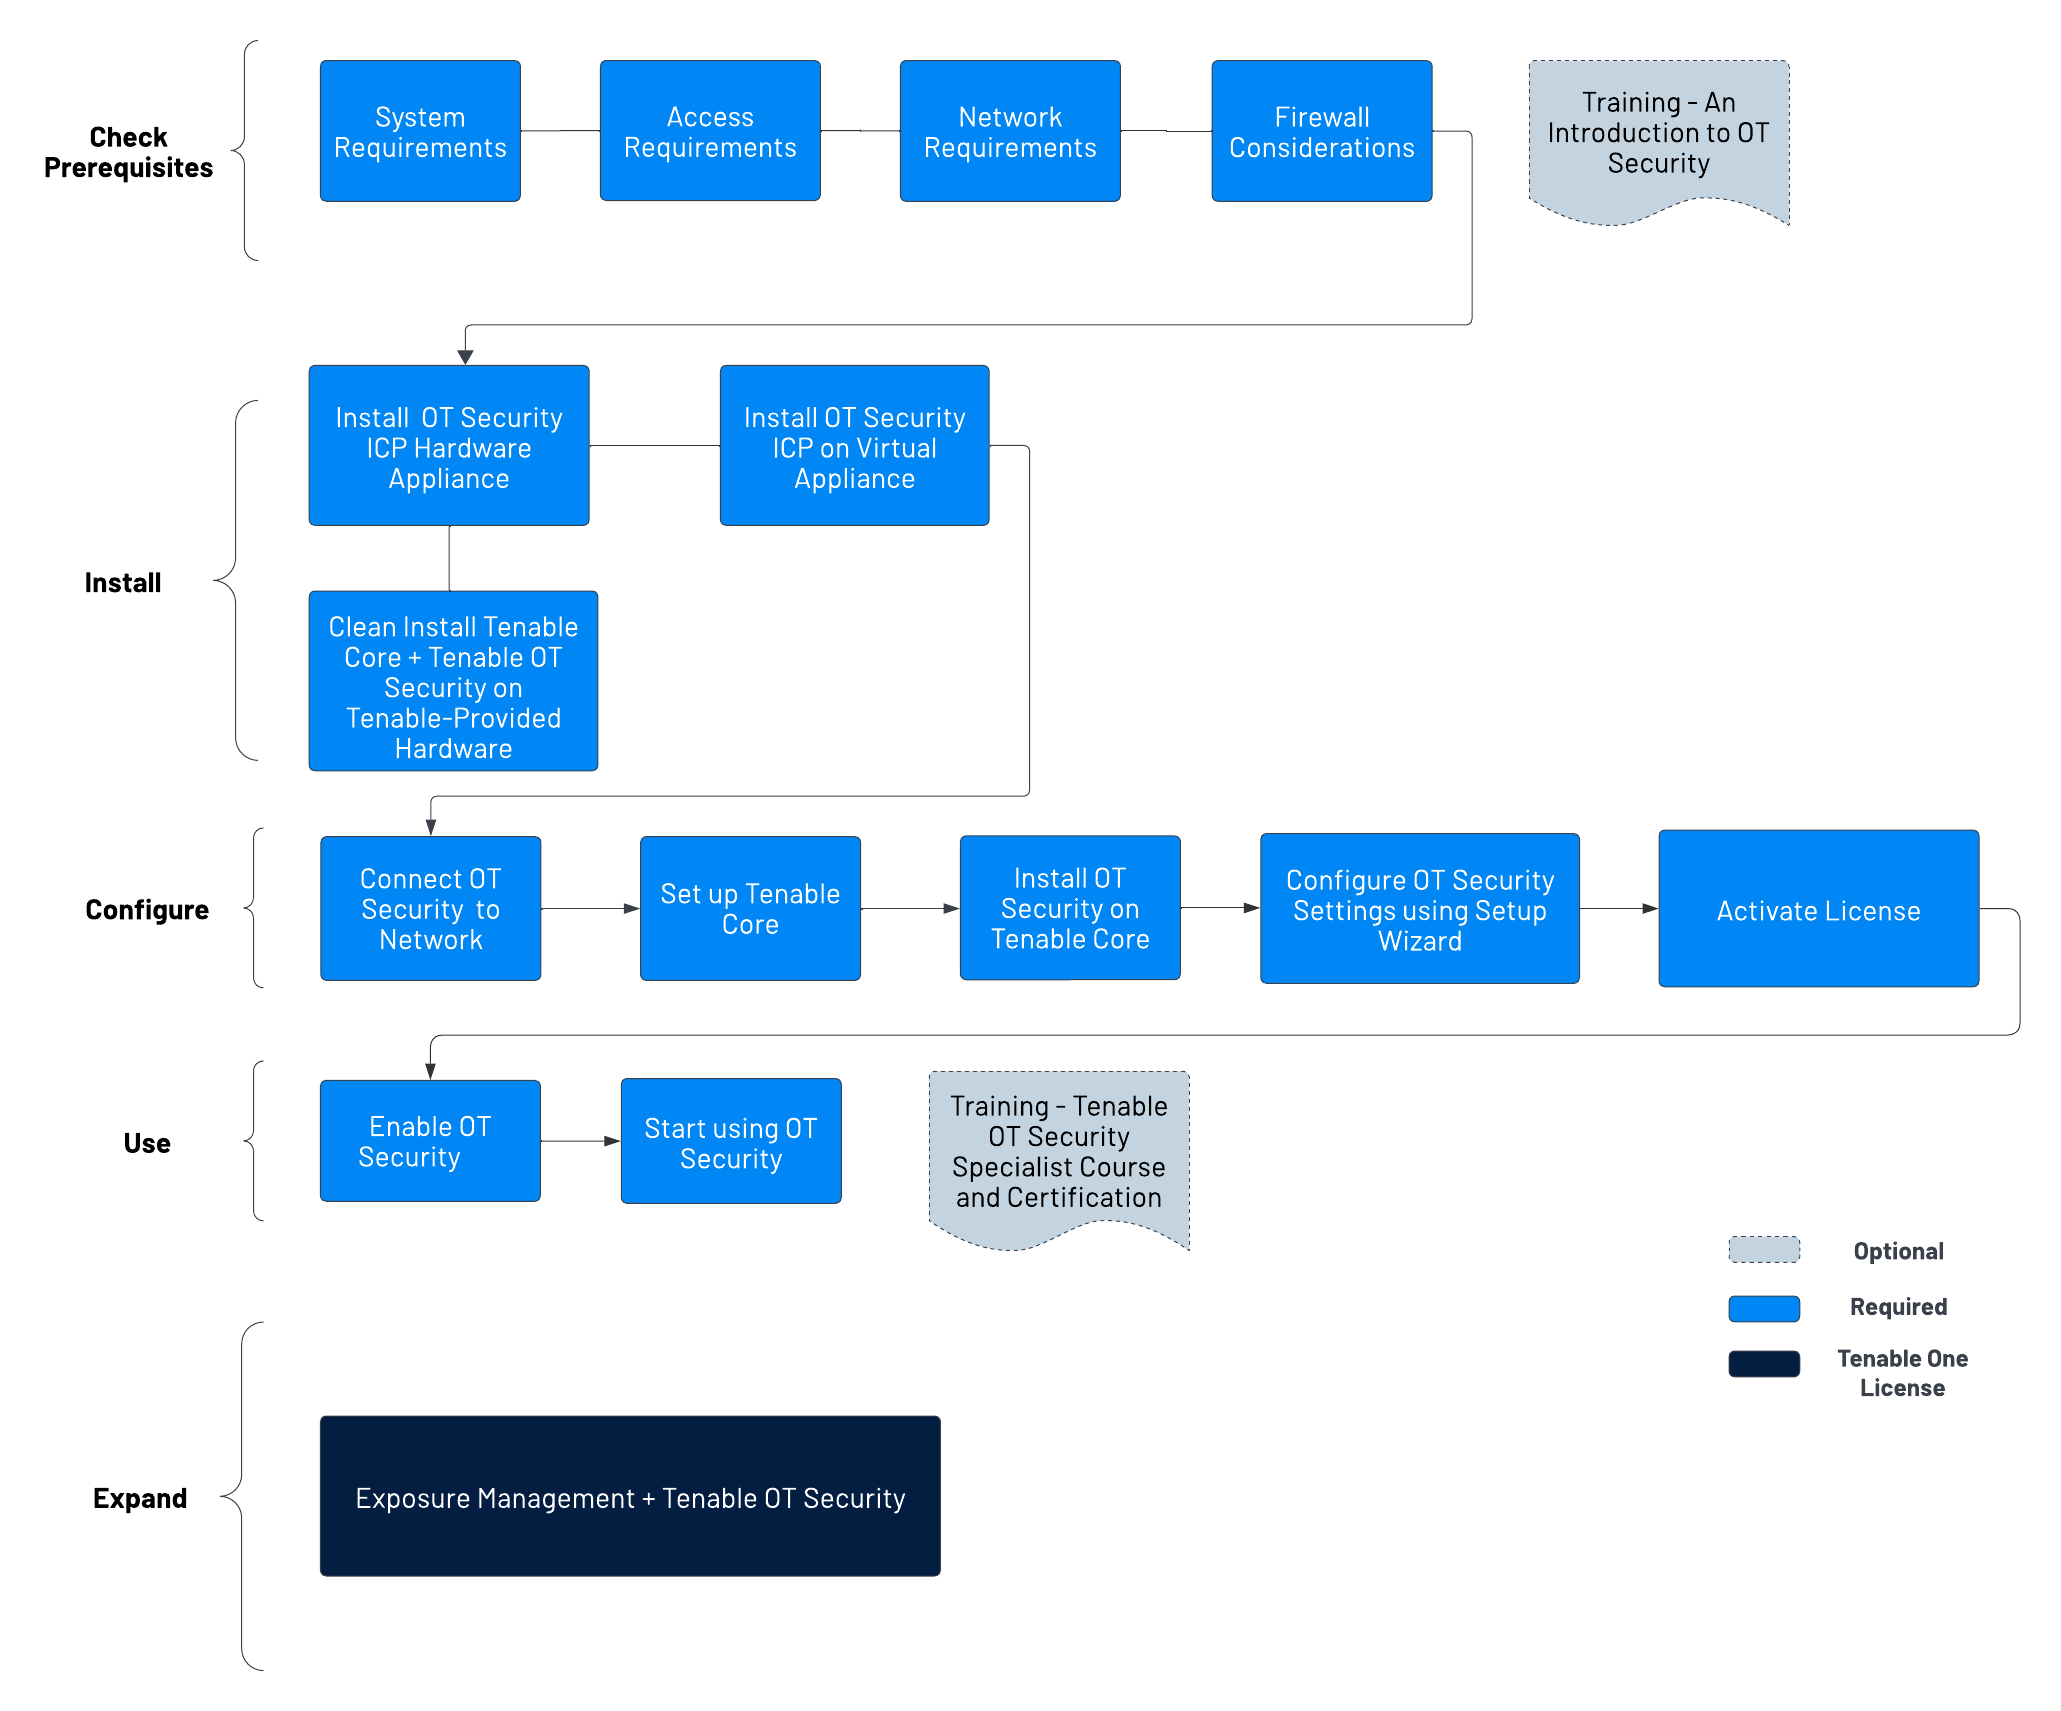
Check Prerequisites
Prerequisites — Review the system, hardware, virtual, and license requirements for Tenable One OT Exposure.
System Requirements — Review the requirements to install and run Tenable Core + Tenable One OT Exposure.
Access Requirements — Review the internet and port requirements to run Tenable Core + Tenable One OT Exposure.
Network Considerations — Review the network interfaces to connect Tenable One OT Exposure.
Firewall Considerations — Review the ports that must be open for Tenable One OT Exposure to function correctly.
Introduction to Tenable One OT Exposure — Go through the training material for an understanding of Tenable One OT Exposure.
Install Tenable One OT Exposure ICP
Tenable One OT Exposure is an application running on top of the Tenable Core operating system, and it is subject to the base requirements of Tenable Core. Use the following guidelines to install and configure Tenable Core + Tenable One OT Exposure.
To install Tenable One OT Exposure:
Install Tenable One OT Exposure ICP
- Install Tenable One OT Exposure ICP Hardware Appliance - Set up Tenable One OT Exposure as a hardware appliance.Note: Tenable-provided Tenable Core hardware comes with Tenable Core+ Tenable One OT Exposure pre-installed. If you are installing an older or dated appliance, you might opt for a clean install. For more information, see Clean Install Tenable Core + Tenable One OT Exposure on Tenable-Provided Hardware.
Install Tenable One OT Exposure ICP Virtual Appliance— Deploy Tenable Core + Tenable One OT Exposure as a virtual machine using the pre-configured .ova file containing the standard virtual machine configuration, or customize your appliance using the installation .iso file.
- Install Tenable One OT Exposure ICP Hardware Appliance - Set up Tenable One OT Exposure as a hardware appliance.
Connect Tenable One OT Exposure to the Network— Connect Tenable One OT Exposure hardware and virtual appliance to the network.
Configure Tenable One OT Exposure ICP
- Set up Tenable Core — Configure Tenable Core via CLI or the user interface.
Install Tenable One OT Exposure on Tenable Core - Manually complete the installation of Tenable One OT Exposure in Tenable Core.
Configure Tenable One OT Exposure Settings using Setup Wizard — Use the setup wizard to configure basic settings in Tenable One OT Exposure.
Log in to the Tenable One OT Exposure console and configure the User Info, Device, System Time, and Port Separation settings.
Activate Tenable One OT Exposure License — Activate your license after you complete the Tenable One OT Exposure installation.
Use Tenable One OT Exposure
Launch Tenable One OT Exposure
Enable Tenable One OT Exposure — Enable Tenable One OT Exposure after you activate your license.
Start using Tenable One OT Exposure — Configure your monitored networks, port separation, users, groups, and authentication servers to start using Tenable One OT Exposure.
Tip: To gain hands-on experience and to obtain Tenable One OT Exposure Specialist Certification, take the Tenable One OT Exposure Specialist Course.
Expand Tenable One OT Exposure into Tenable One
Integrate Tenable One OT Exposure with Tenable One and leverage the following features:
Access the Exposure View page, where you can reveal converged risk levels and uncover hidden weaknesses across the IT-OT boundary. You can continuously monitor and track potential vulnerabilities with enhanced OT data:
View CES and CES trend data for the Global and Operational Technologies exposure cards.
View Remediation Service Level Agreement (SLA) data.
View Tag Performance data.
Access the Exposure Signals page, where you can generate exposure signals that use queries to search for asset violations. Simply put, if an asset is impacted by a weakness related to the query, then the asset is considered a violation. Using this, you can gain visibility into your most critical risk scenarios.
Find top active threats in your environment with up-to-date feeds from Tenable Research.
View, generate, and interact with the data from queries and their impacted asset violations.
Create custom exposure signals to view business-specific risks and weaknesses
Access the Inventory page, enrich asset discovery with OT-specific insights, such as firmware versions, vendors, models & operational states. Access OT intelligence that standard IT security tools cannot provide:
View and interact with the data on the Assets tab:
Review your AD assets to understand the strategic nature of the interface. This should help set your expectations on what features to use within Tenable Exposure Management, and when.
Familiarize yourself with the Global Asset Search and its objects and properties. Bookmark custom queries for later use.
Find devices, user accounts, software, cloud assets, SaaS applications, networks, and their weaknesses.
- Drill down into the Asset Details page to view asset properties and all associated context views.
View and interact with the data on the Weaknesses tab:
View key context on vulnerability and misconfiguration weaknesses to make the most impactful remediation decisions.
View and interact with the data on the Software tab:
Gain full visibility of the software deployed across your business and better understand the associated risks.
Identify what software may be out of date, and which pieces of software may soon be End of Life (EoL).
View and interact with the data on the Findings tab:
View instances of weaknesses (vulnerabilities or misconfigurations) appearing on an asset, identified uniquely by plugin ID, port, and protocol.
Review insights into those findings, including descriptions, assets affected, criticality, and more to identify potential security risks, visibility on under-utilized resources, and support compliance efforts.
Access the Attack Path page, where you can optimize risk prioritization by exposing risky attack paths that traverse the attack surface, including web apps, IT, OT, IoT, identities, ASM, and prevent material impact. Streamline mitigation by identifying choke points to disrupt attack paths with mitigation guidance, and gain deep expertise with AI insights (Not supported in FedRAMP environments).
View the Dashboard tab for a high-level view of your vulnerable assets such as the number of attack paths leading to these critical assets, the number of open attack techniques and their severity, a matrix to view paths with different source node exposure score and ACR target value combinations, and a list of trending attack paths.
Review the Top Attack Path Matrix and click the Top Attack Paths tile to view more information about paths leading to your “Crown Jewels”, or assets with an ACR of 7 or above.
You can adjust these if needed to ensure you’re viewing the most critical attack path data.
On the Top Attack Techniques tab, view all attack techniques that exist in one or more attack paths that lead to one or more critical assets by pairing your data with advanced graph analytics and the MITRE ATT&CK® Framework to create attack techniques, which allow you to understand and act on the unknowns that enable and amplify threat impact on your assets and information.
On the Top Attack Paths tab, generate attack path queries to view your assets as part of potential attack paths:
Then, you can view and interact with the Attack Path Query and Asset Query data via the query result list and the interactive graph.
Interact with the MITRE ATT&CK Heatmap tab, select the ICS heatmap option to focus on ICS (Industrial Control Systems) tactics and techniques
View and interact with the data in the Tags page:
Create a new dynamic tag for your OT assets, where:
Operator = Host System Type
Value = PLC
Create and manage tags to highlight or combine different asset classes.
View the Tag Details page to gain further insight into the tags associated with your assets.