Quick Start Guide
This section outlines some of the basic, first steps that you can take right away to begin protecting your cloud environment with Tenable One Cloud Exposure. These steps will help you focus on setting up your cloud environment to work with Cloud Exposure and addressing some of the most critical issues, laying the groundwork for future monitoring and remediation efforts. Collectively, these steps may take several weeks or more to complete, depending on the size and complexity of your environment.
- Step 1: Set Up Your Environment
- Step 2: Identify Owners for Relevant Security Areas
- Start addressing findings:
- Step 5: Review findings
- Step 6: Remediate Findings
Step 1: Set Up Your Environment
Follow the steps below to set up your Cloud Exposure environment:
-
Log in to Cloud Exposure using the URL that was provided to you, based on your region.
See Product Security and Privacy for details.
Region: The region reflected in the URL determines which API endpoint is used when accessing Tenable API. - Connect your cloud accounts to Cloud Exposure.
- Integrate your identity provider/s (IdP) with Cloud Exposure.
- Enable Tenable Console login via SSO.
- Create an account hierarchy in Cloud Exposure.
- Set up additional Users and Groups, if needed.
- Set up optional inbound and outbound Integrations.
- Mark resources as sensitive. Some of your resources are sensitive, or may contain sensitive data. It's important that you mark these resources as sensitive within Cloud Exposure in order to:
- Allow Cloud Exposure to accurately evaluate the risk of findings associated with such resources
- Elevate the priority of such findings, or identities that have access to the resource.
After you set up your environment, and after the data is synchronized and updated, you will see the Console start to populate with actual data from your environment. You’re almost ready to start working towards securing your cloud environment using the Cloud Exposure Console.
If you want to familiarize yourself a bit more with the Console, you can learn how to Navigate the Console, how to use dashboards, and how to Filter Data throughout Cloud Exposure.
Step 2: Identify Owners for Relevant Security Areas
Think about the people/roles that make up your security team (e.g., IAM professionals, DevSecOps). How do you want to assign ownership across your team to the various security findings that Cloud Exposure discovers? For example, you can assign:
- Owners of specific cloud accounts, or groups of accounts
- Owners of specific finding types/categories (e.g., an owner for all IAM-related findings).
- Owners of all resources that belong to a specific project. You can define custom labels to automatically label resources based on tag keys/values/patterns for this purpose.
Once you decide how to divide up responsibilities, think about how you want to inform each owner about relevant issues. For example, you can notify owners by:
- Assigning findings via automation rules
- Creating scheduled reports
- Asking them to actively search the Cloud Exposure Console for specific issues. To limit Console user access to the folders/accounts that they are responsible for, you can add Console users/groups with specific, relevant scopes.
Assign Findings to Owners via Automation Rules
You can use automation rules to assign all findings that relate to a specific ownership category to the appropriate individual or group, who can then further investigate and, if needed, remediate the finding.
To assign findings:
- Integrate your third-party ticketing, notification, or SIEM tools with Cloud Exposure.
- Create an automation rule that sends a push notification to the third party tool when specific findings are created in Cloud Exposure.
- In addition to automation rules, you can also manually send findings via email or webhook, or create a Jira issue/ServiceNow incident.
Create Scheduled Reports to Send to Owners
Create scheduled reports to communicate with relevant stakeholders about security issues. For example, schedule a Management report to send to executive leadership, which includes a comprehensive overview of your entire cloud environment, giving you a snapshot of your accounts and overall security posture.
To learn about about creating reports in Cloud Exposure, see Reports.
To create a scheduled report:
- In the Cloud Exposure Console, click on Reports.
- Select a Scope. The report will be accessible to users who have permissions in the selected scope.
- Click New Report.
- Select a report Type from the dropdown.
- Give the report a Name.
- Select Schedule for the Delivery time, and then define a cadence to generate a report at a specific time on either a daily, weekly or monthly basis.
- Select any additional delivery methods to send a copy of the report to specific recipients via email or Slack channel.
- Click Generate.
Step 3: Address Critical Findings
After your environment is set up, and you've identified roles/responsibilities for your security team, you can begin to tackle the most important security issues by addressing critical findings discovered by Cloud Exposure. Critical findings can cover a wide-range of different security violations. Tenable recommends that you begin your journey by reviewing the following issues:
- Third-Party Access
- Root Accounts without MFA
- Publicly Exposed Resources
- Secrets Exposed in Production
- Next steps: High and Critical Findings in Production
Third-Party Access
Organizations rely on many 3rd party solutions for services, and grant them access to infrastructure resources via dedicated cloud identities. Gain visibility into which 3rd parties can access your environment, what permissions they have, and what the risks are.
There are multiple ways to identify and review violations related to third-party access in Cloud Exposure. Here are a couple common examples:
- Find Third-Party Identities with Access to Sensitive Data
- Find Overprivileged Third-Party Identities
Find Third-Party Identities with Access to Sensitive Data
- Navigate to the Overview dashboard (Dashboards > Overview).
- Scroll down to the Toxic Combinations widget.
- Click on the 3rd party identities with access to sensitive data entry, if present.
- Review findings.
- Remediate findings.
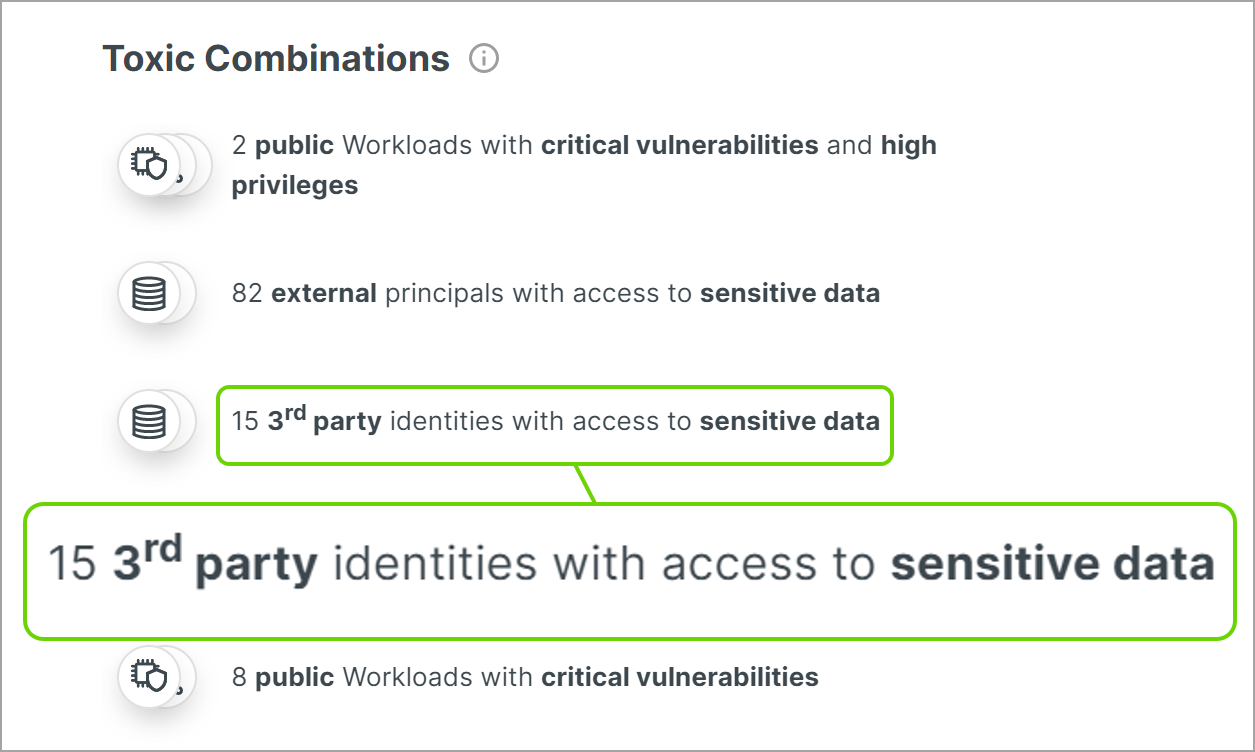
To learn more, see Manage Dashboards and Toxic Combinations. To prioritize VMs that combine high-severity vulnerabilities with high privileges, see Secure Vulnerable Privileged VMs.
Find Overprivileged Third-Party Identities
- Navigate to Findings.
- From the Severity filter, select Critical to show findings where the risk posed requires immediate action.
- From the Policy filter, search for the word overprivileged and then click Select matches.
- From the Label filter, select 3rd Party to show all findings that are related to third-party applications.
- Click on a finding to learn more about it.
- Review findings.
- Remediate findings.
To learn more about how to work with findings, see View Finding Details.
Root Accounts without MFA
Since the root account is the highest privileged user in a cloud account, and MFA makes it harder for attackers to access sensitive resources, it's critical that MFA be enabled for such users.
Although there are multiple ways to locate AWS root accounts without MFA in Cloud Exposure, here is one common example:
Use the Findings Page to Identify Root Accounts without MFA
- Navigate to Findings.
- From the Policy filter, search for and select the Root user MFA is not enabled policy.
- Click on a finding to learn more about it.
- Review findings.
- Remediate findings.
To learn more about how to work with findings, see View Finding Details.
Publicly Exposed Resources
Publicly exposed resources are immediate targets for attacks. Use Cloud Exposure to identify resources exposed via either network or IAM configuration.
Although there are multiple ways to locate publicly exposed compute instances in Cloud Exposure, here is one common example:
Use the Public Resources Widget in the Dashboard to Quickly See Public Resources
- Navigate to the Dashboard.
- Use the scope filter at the top of the Console to filter by your production account/s.
- Scroll down to the Public Resources widget.
-
Do one of the following:
- Click Show More on the top right of the widget to see all findings associated with public resources.
- Choose the tile of a relevant resource type to see a list of findings associated with those resources.
- From the Severity filter, select Critical to show findings where the risk posed requires immediate action.
-
Click on a finding to learn more about it. For example:
- See the resource ACL/Policy that exposes the resource publicly.
- See relevant contextual information, such as the specific permissions exposed by an S3 bucket (e.g., the DeleteBucket permission).
- Review findings.
- Remediate findings.
To learn more about the Dashboard and its widgets, see Manage Dashboards.
Secrets Exposed in Production
Resources in your production environment should store sensitive data like passwords and access tokens in tools like AWS Secrets Manager, or Azure Key Vault.
- Navigate to the Dashboard.
- Use the scope filter at the top of the Console to filter by your production account/s.
- Scroll down to the Resources Exposing Secrets widget.
-
Do one of the following:
- Click Show More on the top right of the widget to see all findings related to resources that expose secrets.
- Click a specific entry within the widget to see findings related to a specific resource type that exposes secrets.
- Review findings.
- Remediate findings.
High and Critical Findings in Production
An increasing number of high/critical security issues make their way into the production environments of organizations. After you address the other critical findings/issues listed above, Tenable recommends performing a general search for high/critical severity findings in your production environment/s. While critical severity findings generally indicate that an issue requires immediate action, high severity findings generally represent issues that, while not critical, should be handled as soon as possible.
- Navigate to Findings.
- From the Accounts filter, select your production account/s for each relevant cloud.
- From the Severity filter, select High and Critical.
- Review findings.
- Remediate findings.
Step 4: Address "Low-Hanging Fruits"
After you've addressed the most critical findings in your environment, Tenable recommends that you address "low-hanging fruits". In this context, low-hanging fruits refers to issues which are easy to remediate, keep your environment clean of unneeded resources, and, when solved, represent quick and valuable wins for your organization. Tenable recommends that you begin by reviewing the following issues:
Inactive Identities
Monitor and remediate users, Microsoft Entra ID applications, and service accounts that have been inactive for a long period of time.
-
Navigate to Findings.
Note: For each of the following queries, the number of finding results that you see will heavily depend on the specifics of your environment. Depending on the number of results, and the resources that your team has, you may need to limit your queries further by using the Severity filter (e.g., High or Critical findings). -
Identify findings related to inactive IAM users that have no MFA configured:
- From the Policy filter, search for and select the Inactive IAM User policy.
- From the Label filter, select the No MFA filter.
-
Identify findings related to inactive IAM users that have active access keys:
- From the Policy filter, search for and select the Inactive IAM User policy.
- From the Label filter, select the Access Keys filter.
-
Identify findings related to inactive Azure AD applications with Admin privileges:
- From the Policy filter, search for and select the Inactive Microsoft Entra ID Application policy.
- From the Label filter, select the Admin filter.
-
Identify findings related to inactive service accounts that have active access keys:
- From the Policy filter, search for and select the Inactive Service Account policy.
- From the Label filter, select the Access Keys filter.
- For each finding that you discovered in the previous steps, perform the following:
Unused Credentials
It is recommended to remove or deactivate all credentials that have been unused in 45 days or more. Disabling or removing unnecessary credentials reduces the window of opportunity for attackers or insider threat actors to gain access to sensitive resources.
- Navigate to Findings.
- From the Policy filter, search for and select the IAM user unused password and/or the IAM user unused Access Keys policy.
- Filter the table by High/Critical Severity if needed.
- Review findings.
- Remediate findings.
Unused Security Groups
Unused security groups should be deleted to prevent resources from being attached to them by mistake, which can lead to unintentional network exposure.
- Navigate to Findings.
- From the Policy filter, search for and select the Unused Security Group policy.
- Filter the table by High/Critical Severity if needed.
- Review findings.
- Remediate findings.
Step 5: Review Findings
Before you go ahead and remediate a finding, it's important to review the finding well and understand the full context of the finding within your specific cloud environment. Although in most cases, remediation steps suggested by Cloud Exposure can and should be implemented exactly as they are, without any adjustments on your end, some findings may require minor adjustments. And in some cases, your specific business context may dictate that a given resource, although flagged by Cloud Exposure as a potential risk, does not need remediation at all. See Cloud Findings for examples of situations where you may not want to remediate.
To review findings:
- Click on the relevant finding to drill-down and view a full analysis of the finding.
-
Review finding details and other relevant information to get a better understanding of:
- What the root cause of the finding is.
- The scope of the finding.
- The potential risk it imposes on your environment.
- An explanation of the severity of the finding.
- Navigate to the Remediation steps area and carefully review the steps listed.
-
If there is a legitimate reason not to remediate the finding right now, you can:
- Temporarily ignore the finding to push it off to a later date and get a reminder when the date arrives.
- Ignore the recommendations and decide whether to create a pattern-based exclusion so that similar findings aren't created.
Step 6: Remediate Findings
Remediate security risks in your organization by taking proactive mitigation steps. Cloud Exposure's remediation recommendations are based on a continuous analysis of your entire multi-cloud environment, taking into consideration risk factors such as effective exposure, misconfigurations, excessive and risky privileges, leaked secrets and vulnerabilities.
To learn more about remediation via Cloud Exposure, including relevant requirements, see Remediate Findings.
Manually Remediate a Finding
For some findings, you may decide that it makes the most sense to remediate any relevant issues outside of Cloud Exposure, instead of letting Tenable automatically remediate findings. This is especially useful in infrastructure as code (IaC) workflows, where a remediation automatically performed by Tenable may be overwritten by developer code. Attaching revised policy suggestions allows you to directly implement Tenable's recommendations in a way that works for your coding environment.
- Click on the relevant finding to drill-down into it.
- In the detailed view of the finding, navigate to the Remediation steps area and follow the steps one at a time.
-
When a remediation step includes suggested policy changes, you will see some or all of the following buttons next to the step, allowing you to view and download the revised policy in various formats, or a side-by-side diff view of the old and new policy:

- JSON
- Diff
- Terraform
- CloudFormation
You can send a copy of these suggestions to your developers so that they can manually apply them to your code.
- Mark the finding as resolved after you remediate it to remove it from the Findings page.
Automatically Remediate a Finding
Cloud Exposure lets you automatically remediate findings with one-click remediation to streamline the process of risk mitigation. Tenable will proactively perform the relevant remediation steps within your cloud environment, saving you time and energy.
To learn more about automatic remediation, including relevant requirements, see Automatically Remediate Findings.
To automatically remediate a finding:
- Click on the relevant finding to drill-down into it.
- In the Remediation tab of the finding, click on the Remediate button.
-
Click on the various steps to:
- View detailed information about the resource in question.
- View and edit any suggested policy changes.
- To edit the suggested policy change, click Edit, make any relevant changes, and then click Save.
- Choose whether to disable or delete an access key (e.g., for findings triggered by the IAM user unused credentials policy).
- Click Next.
- If you only granted Tenable read-only permissions during account onboarding, you will be prompted to provide one-time credentials to Tenable.
- Review the steps that will be applied, and then click Apply.